How to Add PSpice Models in OrCAD X Capture CIS
Key Takeaways
-
Always check if PSpice models are available in your Workspace.
-
Locate the PSpice model on the manufacturers’ website (or through a trusted data vendor).
-
Open the PSpice model in PSpice Model Editor, export to a Capture library, and import in the Place Part menu of OrCAD X Capture CIS.
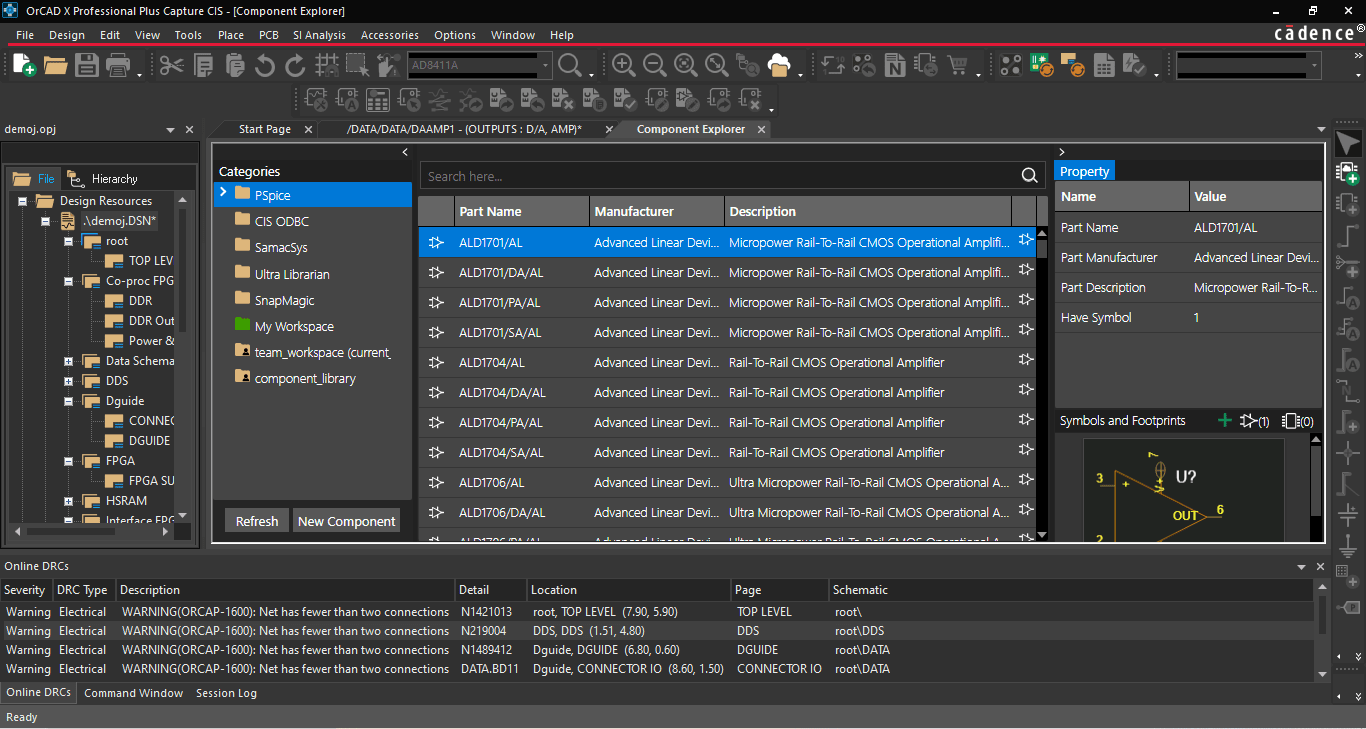
Wondering how to add PSpice models in OrCAD X? Users can first check for PSpice models in the Component Explorer tab.
Simulation and modeling greatly accelerate electronics development, as design teams can closely approximate in-circuit performance before any manufacturing steps occur. SPICE and its many proprietary descendants, like PSpice, are kings for analog circuit analysis. Users can associate footprints, schematic symbols, and PSpice models within the OrCAD X environment to switch between simulation, schematic, and board layout. For those wondering how to add PSpice models in OrCAD X, it’s a straightforward process with multiple implementation methods to suit designer workflows.
Overview of How to Add PSpice Models in OrCAD X Capture CIS
|
OrCAD X Capture CIS |
PSpice Model Editor |
|
|
Access to PSpice Models in Workspace |
|
N/A |
|
Adding New PSpice Models in Workspace |
|
|
Steps for How to Add PSpice Models in OrCAD X Capture CIS
Users can create new PSpice models from scratch or add/edit existing models obtained from a manufacturer/trusted vendor. The process is essentially the same as footprint/schematic symbol creation or importing. Consider the steps for incorporating an existing PSpice model into a design:
-
Obtain model - Find the manufacturer’s or a trusted data vendor’s repository of PSpice models and locate the model(s). Users will have more success with larger manufacturers, but even they may have gaps in a large enough manufacturer. From the manufacturer, these are often free of charge; users can search millions of PSpice models (and associated footprint/schematic symbols) from leading data vendors without ever having to leave the OrCAD X platform.
All of these options are accessible within the Component Explorer tab. To quickly access these libraries within the Component Explorer from a schematic page, navigate to “Place” > “Component” (alternatively, hit “M” on the keyboard to open up the Component Explorer tab). There’s a pre-populated PSpice model folder within the Component Explorer tab. However, note that these models will require footprint/schematic symbol associations if the designer wishes to carry the simulation model into the schematic/layout. Finally, acceptable PSpice file extensions for OrCAD X Capture CIS compatibility are .txt, .cir, .lib, and .net.
-
Exporting to OrCAD X Capture CIS - Launch PSpice Model Editor, select “Capture” when prompted, and open the PSpice file from the browser. Next, navigate to “File” > “Export to Capture Part Library…” and ensure the “Input Model Library” file ends in a .cir extension while the “Output Part Library” ends in a .olb extension. Confirm the export process and ensure library creation finishes without warning or errors in the dialog.
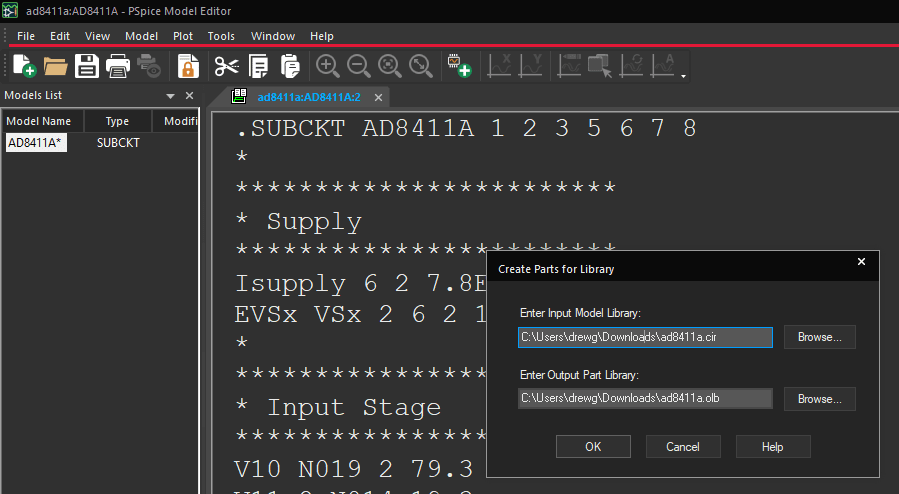
From the PSpice Model Editor, users will export the PSpice model to an OrCAD X Capture CIS library. -
Creating OrCAD X Capture CIS Part - From OrCAD X Capture CIS, open the Place Part menu in a schematic file from the navbar or with the keyboard shortcut “P”. Under the Libraries section, locate the “Add Library” button (or use the keyboard shortcut “Alt” + “A”). Locate the library in its saved location with the file browser and open it. The Libraries list should now populate with any added libraries; select it from the list. The Part List will show all parts found within the selected library, and users can add these parts to the schematic using the standard command options.
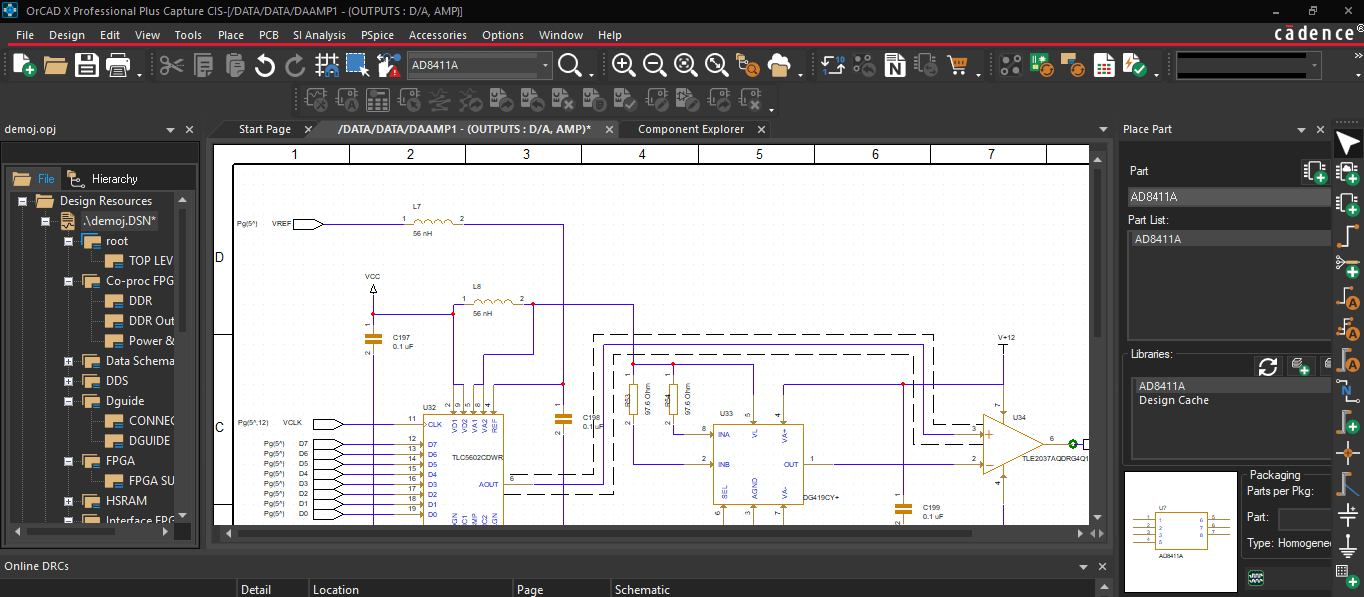
Finally, users will import and select the library in the Place Part menu; the part contains both the schematic symbol and the PSpice model. Users can visually confirm the PSpice model availability for the part (or any other parts) by locating the PSpice symbol at the bottom of the Place Part menu next to the model. This symbol can be helpful when importing large libraries where the PSpice model association for parts is unknown.
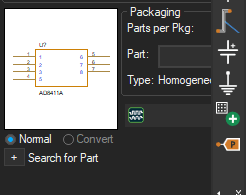
The PSpice symbol indicates this part has an associated PSpice model.
Cadence Solutions for Simulation Model Management
Regarding “how to add PSpice models in OrCAD X,” designers have a few techniques. Checking the pre-populated PSpice folder for the matching model is an excellent first step that doesn’t require additional time beyond searching the part list. Besides that, users can turn to PSpice model information directly from manufacturers or within the expansive libraries of trusted data vendors (with integrated OrCAD X Capture CIS support). Interested in learning more about the OrCAD X platform? See how Cadence PCB Design and Analysis Software assists design teams with cutting-edge tools to develop tomorrow's electronics.
Leading electronics providers rely on Cadence products to optimize power, space, and energy needs for a wide variety of market applications. To learn more about our innovative solutions, talk to our team of experts or subscribe to our YouTube channel.