04 - Managing Workspaces
Overview
With the OrCAD X Professional (POX200 Pro) and OrCAD X Professional Plus (POX300) licenses, OrCAD X Capture provides a collaborative development environment where you can create shared workspaces containing work-in-progress components, designs, and library and project files. With this license, you can share workspaces and provide users access rights to the shared workspaces. A workspace in Capture is a OrCAD X OnCloud-based project storage location that is used to manage all the design data, which includes categories (templates) and components, and design, library, project, and board files. You can manage the files in workspaces from File Manager and components from Component Explorer.
The OrCAD X Professional (POX200 Pro) and OrCAD X Professional Plus (POX300) licenses support the following features:
- Multiple workspaces can be added
- Members can be added to or removed from workspaces
- Privileges can be assigned to subscribed members
- A user can have a subscription to multiple workspaces
- A user can have different access privileges for different workspaces
The OrCAD X Standard (POX100 Standard) license supports the following features:
- Users can save versions of an object, project, or library
- Shared workspace objects can be edited and published based on the assigned privileges
Creating a Workspace
You create a new workspace and share it by assigning users to the workspace in the Workspace Configuration dialog box.
To create a shared workspace, choose View – Workspace – Configuration from the main menu. Alternatively, right-click My Workspace in Component Explorer and choose W orkspace Configuration . The Workspace Configuratio n dialog box opens.
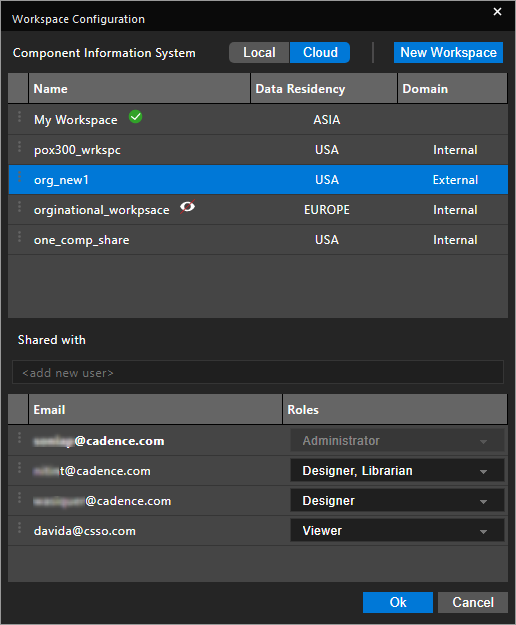
Workspace Configuration Dialog Box
| Field | Description |
|---|---|
| Component Information System |
Provides the option to select one of the following databases:
|
| New Workspace |
Launches the Add Workspace dialog box to create a new shared workspace. |
|
Name |
Displays the name of the workspace. |
| Data Residency |
Displays the physical location (region) of the organization's data. |
| Domain |
Displays the domain which has access to the workspace:
|
| Shared with |
Displays the users with whom the selected workspace is shared. |
| <add new user> |
Lets you add users to access the selected workspace. |
|
Displays the email id of the users with access to the workspace. |
|
| Roles |
Lets you assign a role to the selected user. |
- Select either Local or Cloud in the Component Information System field.
For workspace configuration, Cloud is selected by default.
| Component Information System | When to Use... |
|---|---|
| Local | To continue using an existing local ODBC Component Information System database. With this option selected, Part Manager queries the part data from the local ODBC. If there is no CIS configuration found for the project, this option is disabled. |
| Cloud |
To leverage the part authoring capabilities and the integrated OnCloud CIS data management capabilities. |
2. To create a new workspace, click the New Workspace button.
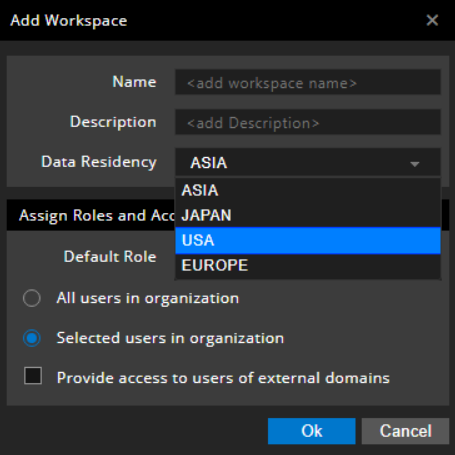
The Add Workspace dialog box is displayed. This is where you specify all the details of the new workspace. 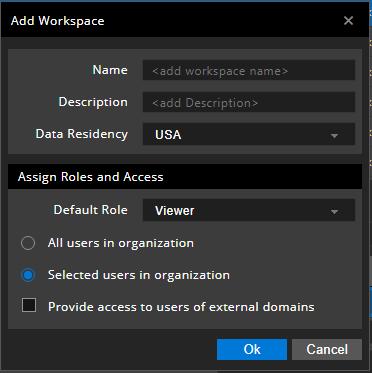
Add Workspace Dialog Box
| Field | Description |
|---|---|
| Name |
The name of the workspace. This field cannot be blank. You can use any combination of alphanumeric characters for a workspace name. However, not all special characters are supported. The following message pops up if you specify any unsupported character in this field:
|
| Description |
A brief description of the workspace being created. |
|
Data Residency |
The physical or geographical location (region) where the data of a workspace resides. This mandatory field facilitates the creation of region-specific workspaces. The default value depends on the region from where the user has logged in. You can select from one of the following regions:
|
|
Default Role |
The role assigned to each new user added for the workspace, by default. This role can be changed for users by the Administrator in the Workspace Configuration dialog box. The following roles can be assigned:
|
| All users in organization |
With this option, you can assign a specific role to all the users in the organization on the workspace. This adds a user entry, |
| Selected users in organization |
With this option, you can assign a specific role to the selected users in the Workspace Configuration dialog box. |
| Provide access to users of external domains |
This option indicates that the people outside the organization's domain can also access the workspace based on the role assigned to them in the Workspace Configuration dialog box. If this option is checked, the workspace domain set changes to External and the same is visible in the Domain column in the Workspace Configuration dialog box. |

To add a new workspace, do the following:
- Specify a unique name for the workspace in the <add new workspace> text box and press
Enter. -
Provide a brief description of the workspace.
- Select a region for the workspace in the Data Residency field.
- Select a default role to the users of the workspace.
- To assign the selected role to all the users in the organization, select the All users in organization option button.
- To assign the role only to specific users in the organization, select the Selected users in organization option button.
- To provide access to the users of the domains external to your organization, select the Provide access to users of external domains check box.
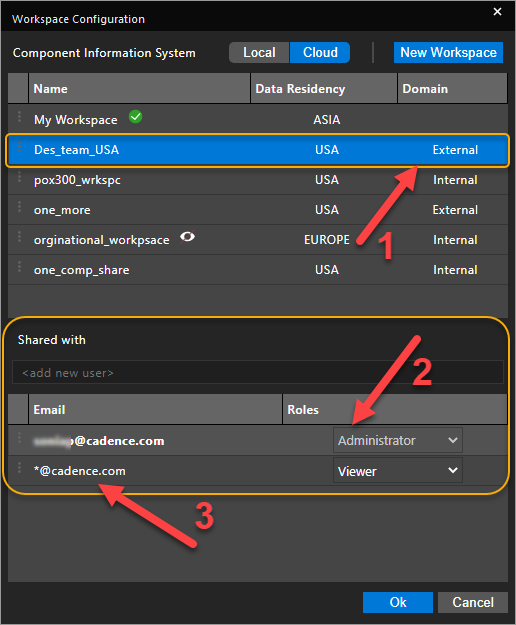
If valid characters are specified for the workspace name, a workspace with that name is created.
In the following image, note that:
- Domain appears as External for the workspace.
- The creator of the workspace is assigned the Administrator role.
- All the users of the organization are assigned the Viewer role.
Modifying a Workspace
You can make changes to an existing workspace including renaming the workspace. However, you cannot change the Data Residency of a workspace.
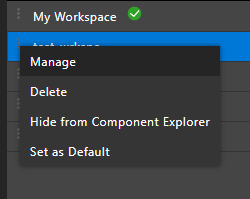
- In the Workspace Configuration dialog box, click the hamburger menu to the left of the workspace name.

Alternatively, right-click the workspace name.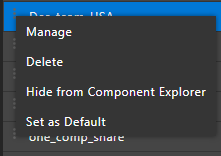
- Choose Manage.
The Manage Workspace dialog box opens.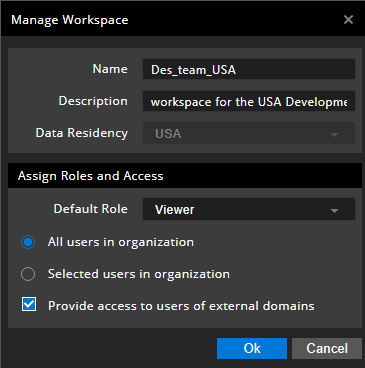
- Make changes as required. For example, change the settings to grant access to the workspace to only selected users in the organization.
- Click Ok.
Note that the assignment of the default role and access to all the users in the organization is removed.
Showing or Hiding a Workspace
When configuring a workspace, you can specify if the workspace appears in Component Explorer or File Manager. By default, all workspaces are visible.
To hide a workspace, do the following:
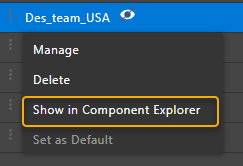
- In the Workspace Configuration dialog box, click the hamburger menu to the left of the workspace name. Alternatively, right-click the workspace name.
- Choose Hide from Component Explorer.
A closed-eye icon appears next to the workspace name, indicating that the workspace will be hidden in Component Explorer and File Manager.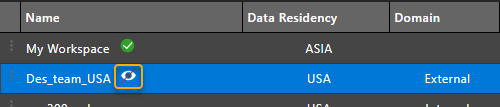
- Similarly, to show the workspace, right-click the workspace name and choose Show in Component Explorer.
- Click Ok .
The shared workspace now appears in File Manager and Component Explorer.
Setting up Default Workspace
My Workspace is the default workspace for all operations. However, you can set any workspace as the default workspace. The default OnCloud workspace database is referred by Part Manager to link and update database components.
To set a workspace as a default, do the following:
- Right-click the workspace and choose Set as Default.
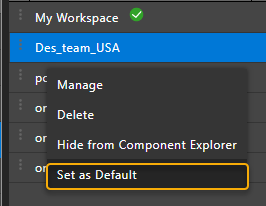
The green tick icon moves next to the new default workspace.
- Click Ok .
In Component Explorer and File Manager, the workspace icon changes to green indicating the new default workspace.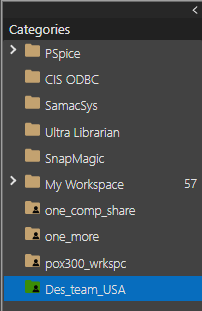
This workspace is the default source database for design authoring and for use in part manager.
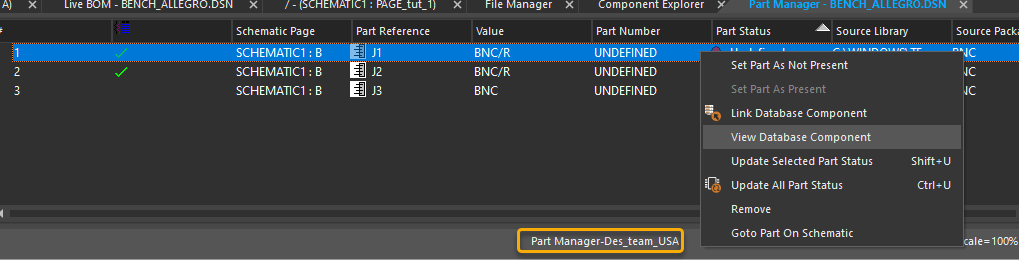
When you run the Link Database Component or View Database Component commands on a part from Part Manager or the schematic page, the component is queried from the default workspace.
Deleting a Workspace
To delete a workspace:
- In the Workspace Configuration dialog box, click the hamburger menu to the left of the workspace name. Alternatively, right-click the workspace name.
- Choose Delete.
- Click Ok .
The workspace is removed.
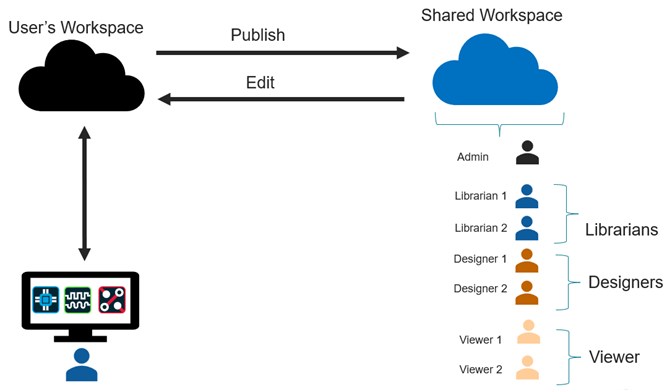
Sharing Workspaces
A workspace owner (Administrator) can share a workspace by assigning access permissions to users. An Administrator adds users and assigns specific roles to them based on their work profile. Each role has associated privileges that are transferred to the users who is assigned the role.
The following image lists the roles supported in a shared workspace:

The following table provides a description of all the supported roles:
| Role | Description |
|---|---|
| Administrator | Provides complete access to all the objects in a shared workspace. With the Administrator role, you can perform all activities possible on the shared workspace, such as modifying user access, editing objects, and overriding the lock on objects. By default, the creator or owner of the workspace is assigned the Administrator role on the workspace that cannot be modified. |
| Designer |
Provides the capability to update and modify a design and check in (publish) or check out (edit) designs in a shared workspace. A user with the Designer role has full access to all file types in the projects folder of File Manager. You can perform all Create, Read, Update, and Delete (CRUD) operations on all the files in the folder.
|
| Librarian |
Provides part authoring, editing, and publishing capabilities in a shared workspace. A user with the Librarian role has full access on all file types in the libraries folder of File Manager. You can perform all Create, Read, Update, and Delete (CRUD) operations on all the files in the folder.
|
| Designer/Librarian | Provides privileges of both the Designer and the Librarian role. |
| Viewer | Provides a read-only access to design and library objects in a shared workspace. With the Viewer role, you can only view the design and library files. |
Assigning Roles to Users
When a workspace is created, the user creating the workspace is designated as the default owner of the workspace with Administrator rights, and the username appears in bold in the Share with section.
Also, at the time creating the workspace, you can assign:
- A specific role to all the users in the organization on the workspace.
- A specific role to the users selected in the Workspace Configuration dialog box.
- Permit people outside the organization to access the workspace.
You can also assign roles to specific users on a workspace and override the assignments done during workspace creation. You grant access rights to users on a workspace in the Shared with section of the Workspace Configuration dialog box.
To assign roles for sharing a workspace, do the following:
- In the Workspace Configuration dialog box, select a workspace.
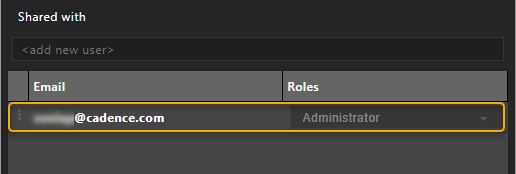
The Shared with section displays the default role assignment for the workspace: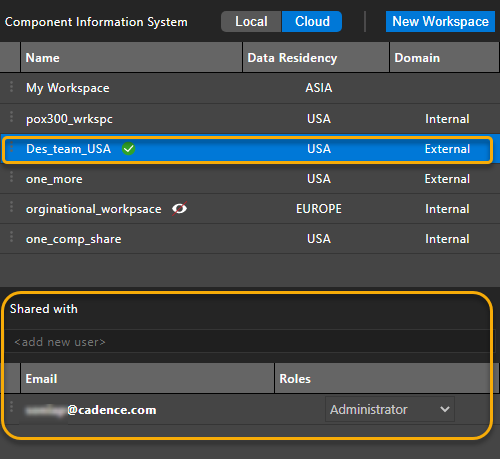
-
In the Shared with section, specify the user id of the team members to share the workspace in the
<add new user>text box and pressEnter.
The user is added and assigned the default role specified while creating the workspace.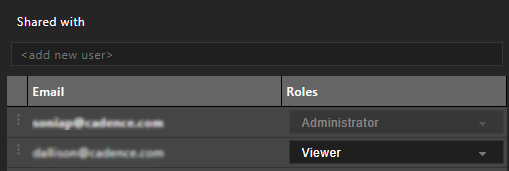
If the user id is present in the list, a red border appears around the text box, and you cannot proceed without changing the user id.
 Any member with a non-Administrator role can view all the role details in the Workspace Configuration dialog box but cannot edit the roles.
Also, the owner of the workspace always appears greyed out and no member with any role, including the Administrator role, can change the role or delete the owner from the workspace. - Click OK to confirm the changes.
The members can now view this workspace in the File Manager and Component Explorer interfaces.
Sharing Projects
To collaborate with other team members on a project, you need to publish the project to a shared workspacewith appropriate roles assigned to the team members.
To publish a project from the local workspace to a shared workspace, do the following:
- Create a shared workspaceand assign roles to the team members who need to work on the shared files.
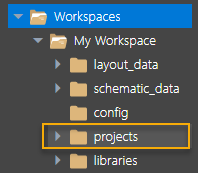
- In File Manager, select the project folder from My Workspace .
-
Right-click and choose Publish . Alternatively, right-click the project folder under projects in the left pane and choose Publish .
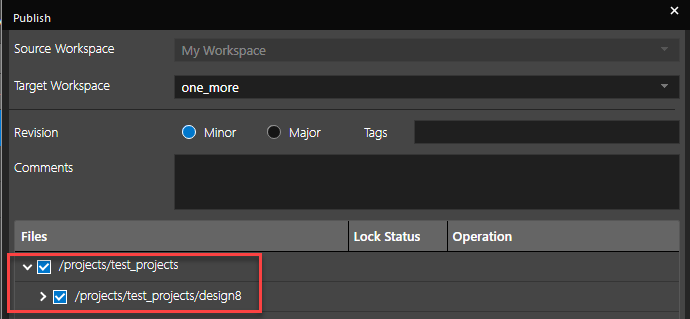
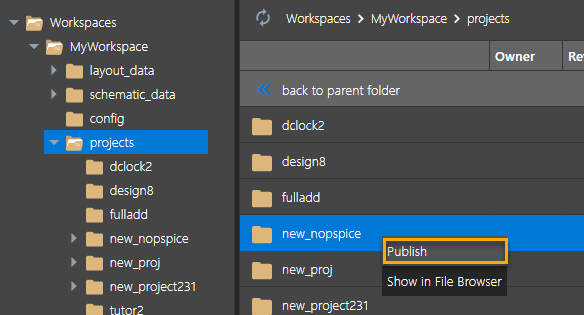 The Publish dialog box is displayed.
 The Publish Dialog Box
Field Description Source Workspace The workspace containing the project or the files to be shared or published. The name of the workspace cannot be changed in the Publish dialog box. Target Workspace The workspace where the project or the files are to be published. Select a shared workspace from the drop-down list. The same workspace name is populated in the Target workspace when you subsequently publish this project.
Revision Select the revision, either Minor or Major depending on how you want to save the version of the file or the project.
- A Major version is identified by a whole number. For example,
1.0,3.0,5.0, and so on. - A Minor version is identified by a decimal number. For example,
1.2,2.4,5.1, and so on.
If ASME revision standard is enabled in the Extended Preferences dialog box, the revision pattern switches from numeric to alphabetic, and the standard delimiter (.) is replaced by the selected ASME delimiter.
- A Custom version is a user-defined value that you specify to override the standard revision sequence or pattern.
By default, the published project or file is saved with a Minor version.
Tags Any user-defined string to tag the file or the project being published. Tags help you organize your files and filter the list of files.
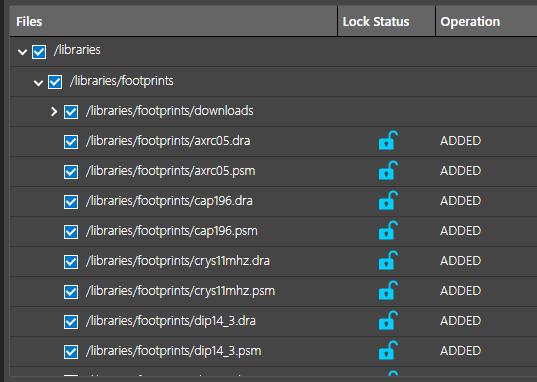
Comments Add a text note regarding the file being published. Files Descend into the folder structure to view the files being published with the project. By default, all the files and subfolder are selected. You can deselect a file that you do not want to share. Lock Status The lock status of the file. Operation Indicates the operation, such as addition or deletion done on the file since the last time it was published. ADDED indicates the file is being published for the first time. NO CHANGE indicates that the files are the same.
Delete from My Workspace Removes the selected file from the local workspace after it is published to a shared workspace. Similarly, you can publish the libraries folder or the selected footprints and symbol files to a shared workspace. A user with the either the Librarian or the Designer/Librarian role has full access on the entire libraries folder.:
- A Major version is identified by a whole number. For example,
- In the Publish dialog box, select the target workspace where the project or the file is to be published for sharing.
- Select Custom in the Revision field and specify
2as the value. - Add a tag or comment as required.
- Deselect any file you do not want to share.
- Click Publish.
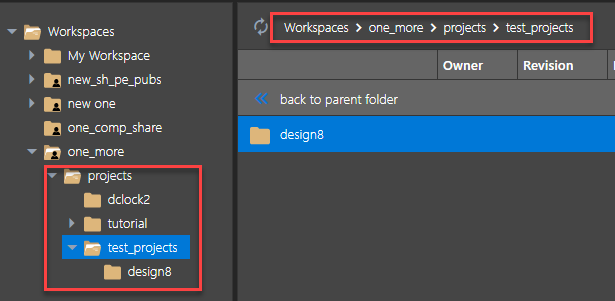
The selected project or files are published to the target shared workspace. - Select the shared workspace in File Manager .
The published project appears in the shared workspace. Based on the assigned roles and the privileges associated with them, users can view or update the project by checking it out to the local workspace.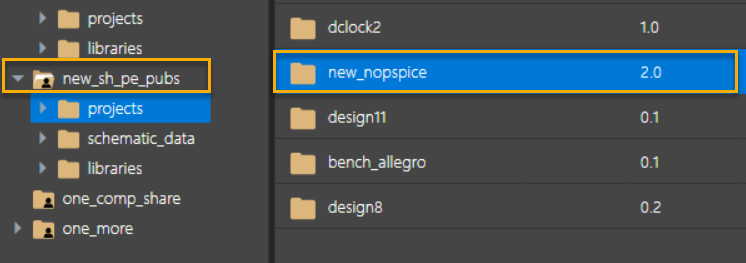
Editing Shared Projects
All the members with access to a shared workspace, can access and use the shared projects and libraries depending on the assigned roles. To edit a project or a file, the users first need to move it to their local workspaces (My Workspace) .
Also, before any changes are made to the file, it needs to be locked to prevent file updates by multiple users. To edit a project, do the following:
-
Right-click the project in the shared workspace and choose Edit to check it out and copy it to My Workspace .
When you edit (check out) a project, the libraries folder, or a file, it is automatically locked.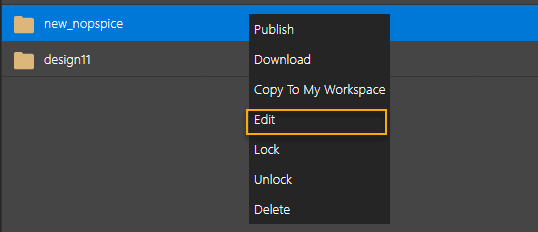 These commands are available on the project folder to the members with the Designer role and on the libraries folders to the members with the Librarian role. Members with the Admin role can access all the commands on all types of files and folders.
Members with the Designer or the Designer/Librarian role can perform operations, such as publish, edit, lock, unlock, or delete only on the files with the following extensions:
.aap
.als
.bom
.brd
.cim
.cir
.dat
.dpf
.dra
.dsn
.inc
.lib
.log
.lst
.mcm
.mdd
.mrk
.net
.olb
.opj
.out
.png
.prb
.prp
.psm
.sch
.sim
.sip
.stl
.sww
.top
- In the Edit dialog box, My Workspace is the target workspace.
- Click OK .
The project folder is copied to the local workspace where you can edit it.
File Locking
When a file, folder, or project is checked out, it is locked by the current user (lock owner). The Lock Status and Lock Owner columns are updated to reflect the status. This file will be available for editing by other users only after the lock owner checks it back into the shared workspace by publishing it or unlocks the file explicitly using the Unlock command. Any user trying to edit a file locked by another user is notified of the file status.
When publishing a file from a source shared workspace to a target shared workspace, it is checked whether the file is locked in the destination workspace. The check is not done on lock status of the file in the source workspace. This is done because the files in the two shared workspaces are independent of each other. A file can be published to a shared workspaces and then copied to My workspace for editing. From My Workspace, the file can be published back into the shared workspace.
As the files in the two shared workspaces are independent of each other, they can have the same revision, but different content.
A user with the Administrator role can unlock a file checked out (locked) by any other user.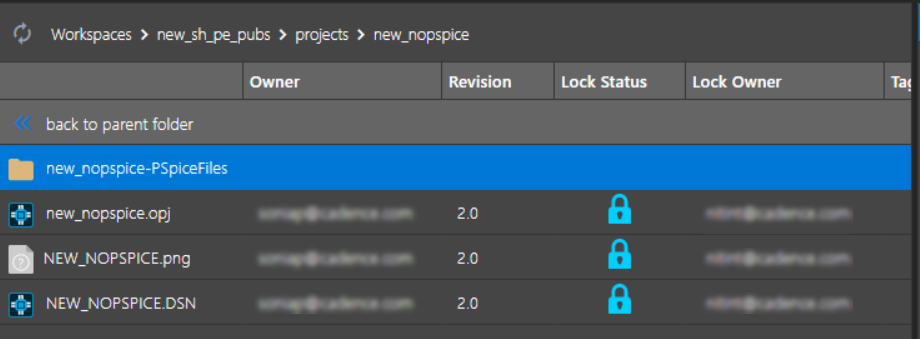
You can also explicitly lock a file without checking it out using the Lock command to prevent other users from modifying it. The lock icon acts as a visual indicator to the users that the file cannot be modified. To unlock this file, use the Unlock command.
Downloading a File
- To download a file, right-click the file in My Workspace and choose the Copy To Workspace command.
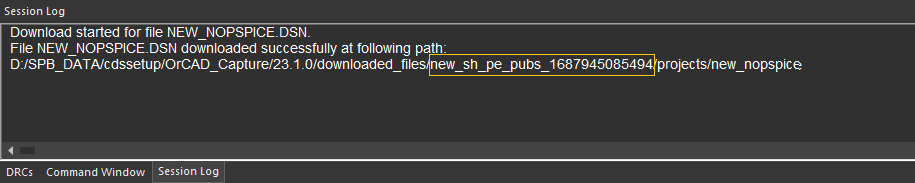
A read-only version of the file is copied and there is no change in the lock status of the file. This is because the command does not check out the file. - Alternatively, right-click the file in My Workspace and choose the Download command.
When downloading a file or folder from a shared workspace, a folder is created with a unique identifier for the workspace, Workspace ID and not the workspace name. This is because if a workspace with an identical name exists, it will be overwritten. The complete path to downloaded file or the folder is displayed in the session log.
Restoring a Revision
The Information tab in the right pane reflects the updated information about a file after it is published to the shared workspace. The information includes file details, such the name, revision, creator, and creation time of the file.
It also includes information, such as when was the file last modified and by whom.
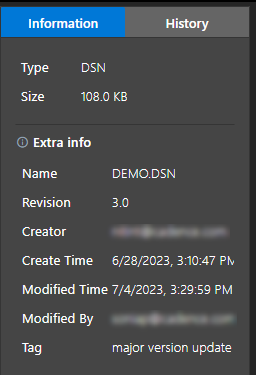
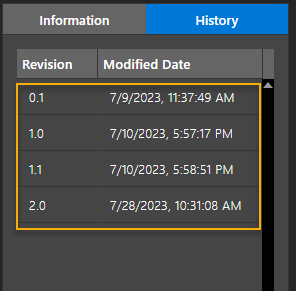
The History tab lists all the earlier versions of the file. Each time this file is modified and checked in, a new row is added for the previous version.
To roll back to a previous version (restore) of the file, do the following:
- Right-click the version of the file to be restored.
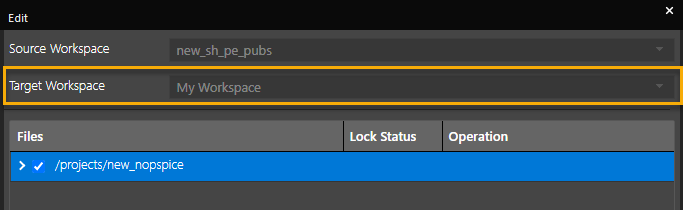
- Choose the Edit command from the shortcut menu.
 The Edit dialog box opens, displaying the names of the target and source workspaces.
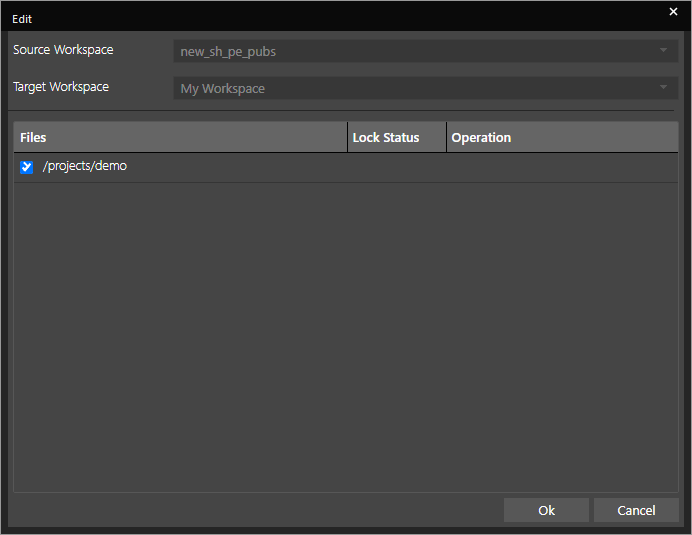
- Click OK .
The selected version of the file is restored in the workspace.
- You can also copy a read-only version of the file to the local workspace. Any existing file with an identical name in the workspace is overwritten.
- You can also delete a version of the file from the shared workspace.
Publishing Shared Projects
After editing the shared files, you need to publish (check in) the project or the files to the shared workspace for other users to view or use them.
To publish or check in a project, do the following:
- Right-click the file or the project in My Workspace and choose Publish .
- Select the Minor or Major options as required and add any tags or comments as required.
- Click Publish .
The file is updated in the shared workspace. The version number of the file is modified as specified and the file is unlocked.
Restoring a Revision
The Information tab in the right pane reflects the updated information about a file after it is published to the shared workspace. The information includes file details, such the name, revision, creator, and creation time of the file.
It also includes information, such as when was the file last modified and by whom.
The History tab lists all the earlier versions of the file. Each time this file is modified and checked in, a new row is added for the previous version.
To roll back to a previous version (restore) of the file, do the following:
- Right-click the version of the file to be restored.
- Choose the Edit command from the shortcut menu.
The Edit dialog box opens, displaying the names of the target and source workspaces. - Click OK .
The selected version of the file is restored in the workspace.
- You can also copy a read-only version of the file to the local workspace. Any existing file with an identical name in the workspace is overwritten.
- You can also delete a version of the file from the shared workspace.
Searching and Filtering Workspace Data
OrCAD X Capture provides a text-based search to filter your workspace data when publishing or copying data to My Workspace. The option is available in the following dialog boxes:
- Publish
- Copy to My Workspace
In these dialog boxes, you can search for specific data using the file name, the operation performed on the file, or a combination of both.
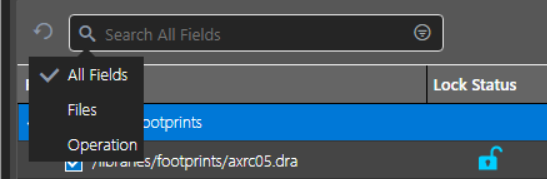
The following table shows all the search options:
| Search Option | Functionality |
|---|---|
| All Fields | Search either by file name or operation performed on the file since the last time it was published. |
| Files | Search only by file name. |
| Operation | Search only by the operation done on the file since the last time it was published. |
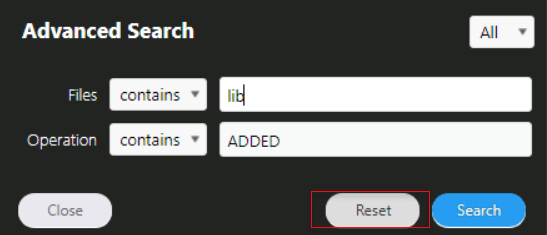
Performing an Advanced Search
OrCAD X Capture also provides an advanced search option to filter the library files, projects, and more from your workspace data. You can search and filter workspace data from the Copy to My Workspace and Publish dialog boxes.
To search, perform the following steps:
- Click the top-right icon on the search bar in the Publish dialog box.
The Advanced Search dialog box appears where you can filter data based on file names and operations done for a file.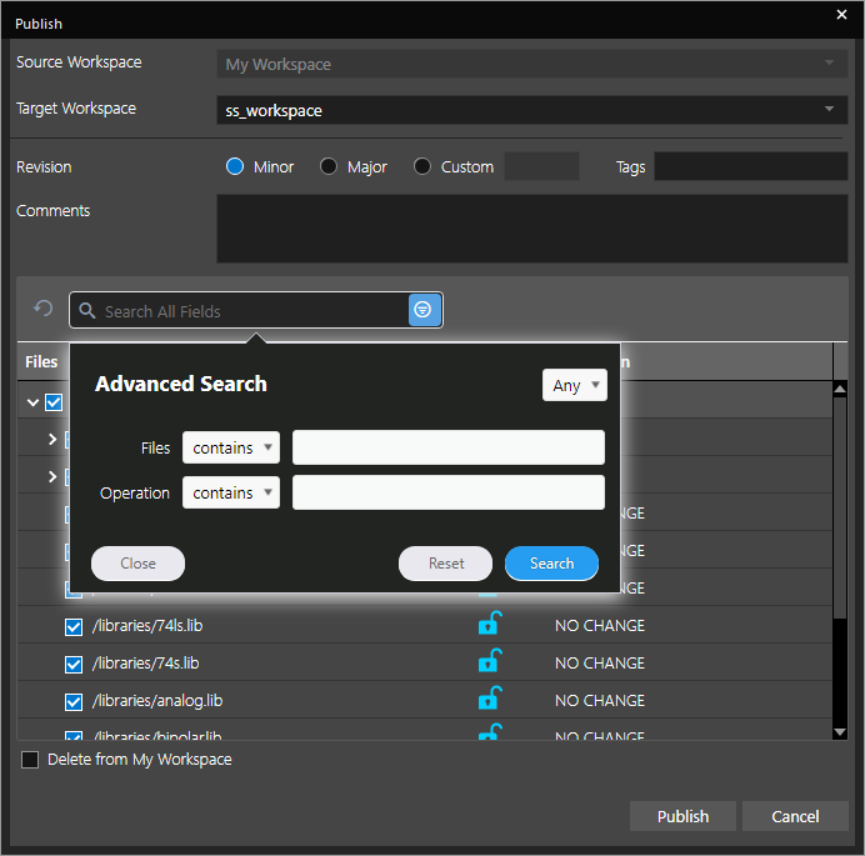 Similarly, in the Copy to My Workspace dialog box, you can search and filter the required data.
-
Search for a specific text string with text filters is , begins with, contains or ends with.
Option
Searches is the exact character string specified in the field begins for a filename that starts with the specified character string contains for a filename that includes the specified character string ends for a filename that ends with the specified character string
3. Similarly, specify the operation performed on the file, such as ADDED , NO CHANGE , UPDATED , or REMOVED .
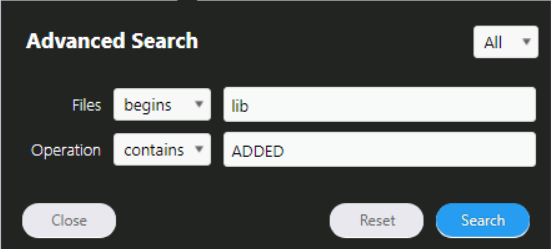
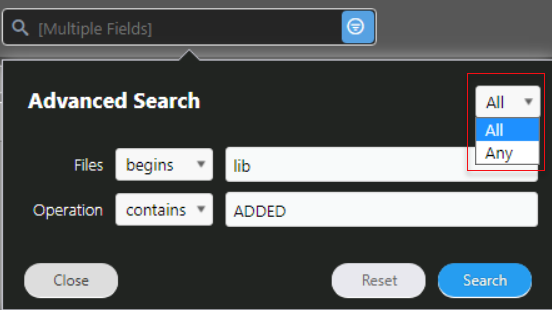
4. Filter all the searched files or any of the search files depending upon the following options you choose from the drop-down:
- All (AND)
- Any (OR)
5. Click Search .
The search string is listed as follows:

The results are displayed in the list as follows:

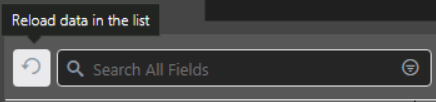
Use the Reload button to refresh the data in the search results.
Saving a New Search
To save the new search, follow these steps:
- Specify a name of your search.

- Click the Save button.
The saved search is displayed in the drop-down when you do a new search. To delete the saved search, click the cross icon in the drop-down.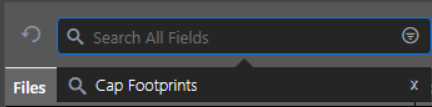
- You can reset the search fields, when required.
Managing OnCloud Workspace Data
With the OrCAD X Professional, OrCAD X Professional Plus, or OrCAD X Standard licenses, you can seamlessly access your OrCAD X Capture designs, libraries, components, and other design elements across devices. All the design data can be stored and managed in an OnCloud workspace which is a cloud-based workspace.
At the time of creating a new project, you can decide if you want to store the project in the OrCAD X OnCloud workspace. If you select the Use Workspace option in the New Project dialog box, the location is pre-seeded and cannot be changed: %HOME%\cdssetup\workspace\
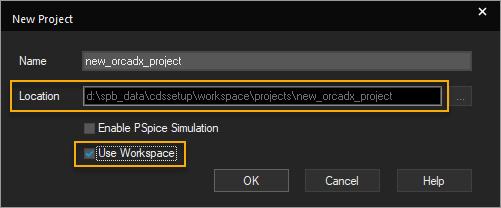
This project can be accessed from the File Manager window, which provides an interface to manage all the design files stored on OrCAD X OnCloud. For the same login credentials, the design data is automatically
synchronized with OrCAD X OnCloud across devices to maintain consistency.
Opening File Manager
The File Manager window offers you a unified location to access and manage all the workspaces and all the files and folders related to projects in the workspaces ensuring that they are in sync with the OnCloud data.
- To open File Manager, choose View – Workspace – File Manager from the main menu.
Alternatively, click the File Manager icon:
File Manager shows all the workspaces available to the user in OrCAD X Capture.
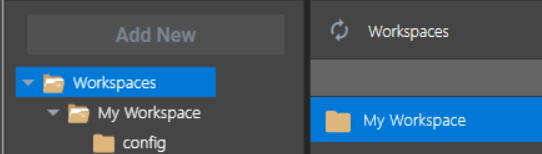
You see My Workspace as your OnCloud workspace that contains some default footprints and symbol libraries.

The workspace data ( My Workspace ) is also cached locally to your machine.
→ To see the cached data, browse to the location: <%HOME%>\cdssetup\workspace . You can also right-click any file to see the cached data of your My Workspace .
Creating New Projects from File Manager
To create a new project from the File Manager window, do the following:
- Select My Workspace in the left pane.
The Add New button is activated. - Click the Add New button.
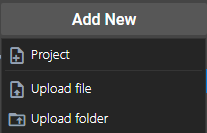
- Select the Project option.
The New Project dialog box is displayed where you can create a new projectin the workspace.
A new project is created in the workspace and a blank schematic is displayed. - Switch back to File Manager.
- Click the projects node in the left pane.
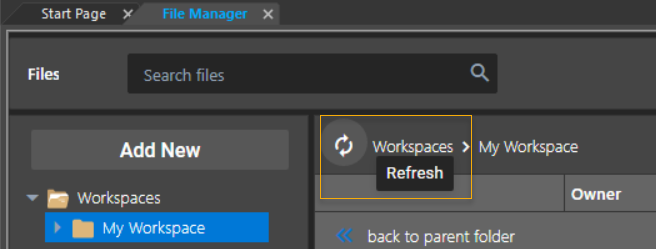
The File Manager view is refreshed to display the newly created project under the projects folder. - Click the Refresh button if the view is not refreshed automatically.
Adding a Local Project to a Workspace
You can also add a project from your local disk to the OnCloud workspace and then access it from any device.
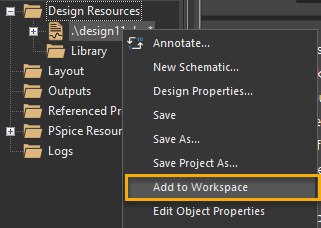
→ To add a local project to the OnCloud workspace, choose File – Add to Workspace from the main menu. Alternatively, right-click the design folder in project manager and choose Add to Workspace .
All the files related to the project are added to the workspace. When you open File Manager, you see all the files added to the workspace folder.
Migrating Data to OnCloud Workspace
You can migrate your existing design database and library data to your OnCloud account using any of the following ways:
Adding Data via File and Folder Upload
You can access File Manager using the following steps:
- Click View – Workspace – File Manager menu.
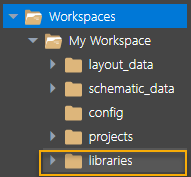
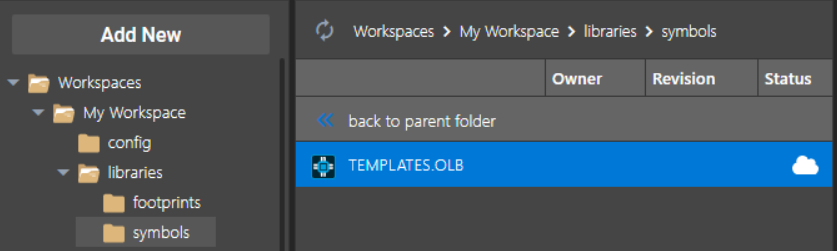
- Choose libraries under My Workspace .
- Expand the libraries tree and select the symbols folder.

You can upload library or design files or an entire project folder to the local workspace from File Manager.
To upload a file or a folder, do the following:
- Click the Add New button.
- Select the Upload file or Upload folder option, as required.
- Browse to the required file or folder, select it, and click the Open button.
Alternatively, you can drag and drop files from the File Browser to any workspace folder.
The selected file or folder is added and displayed in the middle pane.
Adding Data to Local Workspace
You can also add data from the locally-cached folders of your system to your local workspace. To do so, follow the steps:
- Browse to the location:
<%HOME%>\cdssetup\workspaceto see the OnCloud cached data.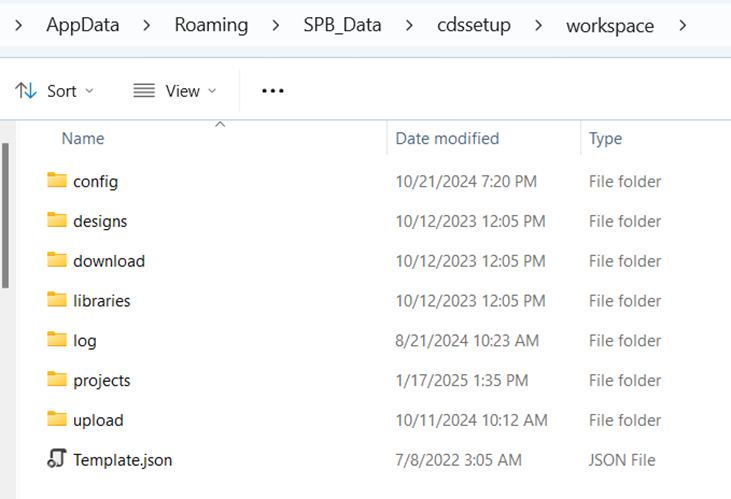
- Open the pspicemodels folder from the libraries folder.
- Copy some PSpice models to the pspicemodels folder.
- In the Capture application, click the refresh icon and see the PSpice models listed in your OnCloud workspace.

Adding Data via Drag and Drop
You can also add data to the OnCloud workspace via the drag and drop option. You can drag the files from your local directory to the local workspace in Capture.
Deleting Files or Folders
To delete a folder from the workspace, do the following:
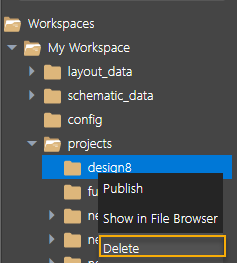
- Right-click the folder in the left pane and choose Delete .
 Alternatively, right-click the folder in the middle pane and choose Delete.
 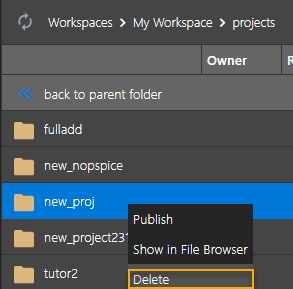 A confirmation message is displayed:
- Click Yes to confirm.
The selected folder is deleted and the File Manager view is refreshed.
→ Similarly, we can delete a file by selecting the container folder in the left pane, right-click the file in the middle pane and choose Delete . Click Yes in the confirmation message to delete the file.
The selected folder is deleted and the File Manager view is refreshed.
Viewing Status of Project Files in a Workspace
All the workspaces available to you are displayed in the left pane of File Manager.
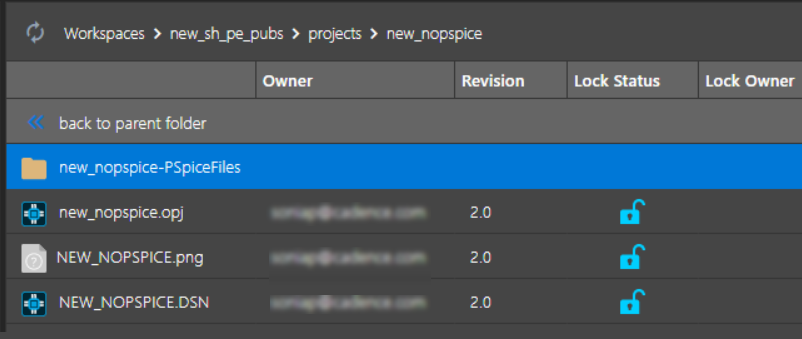
→ To view the status of files, descend into the folder structure to view the files and folders. 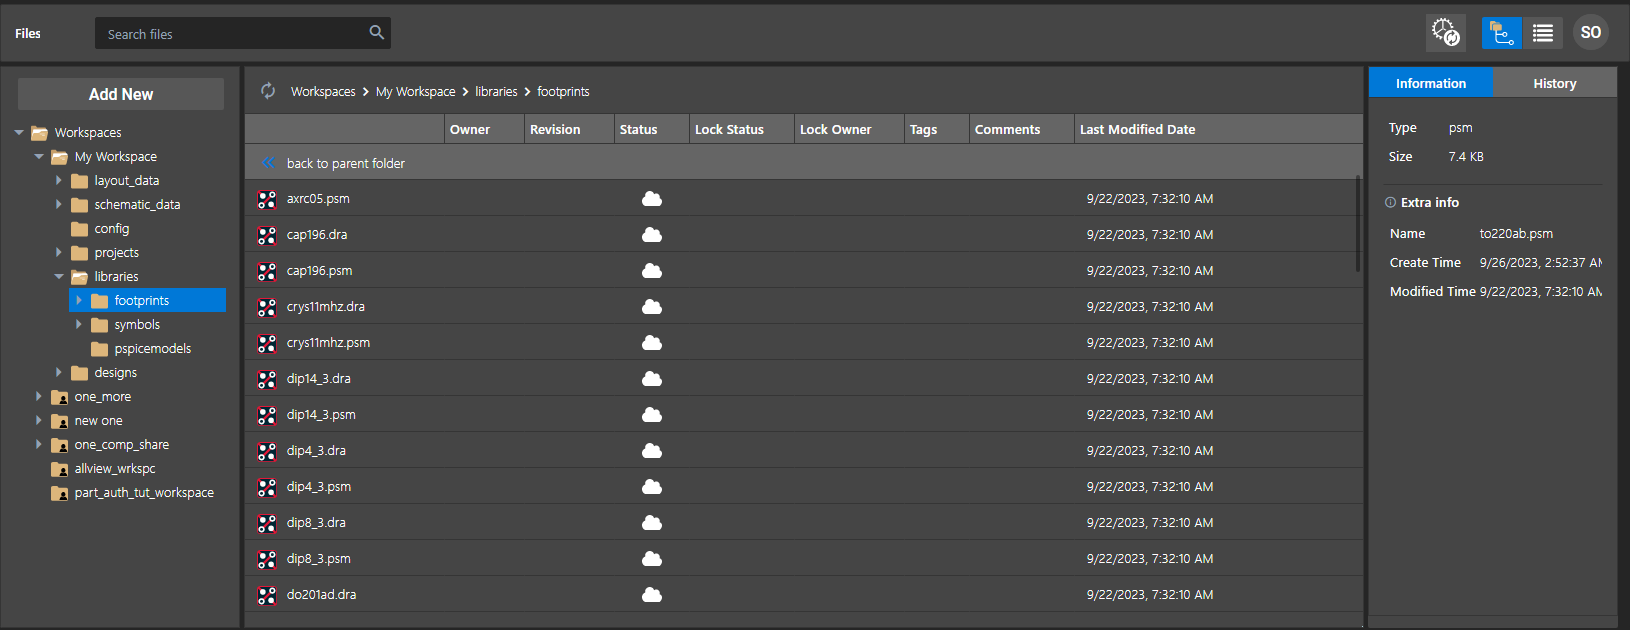
On selecting a folder in the left pane, the files and subfolders in the folder are displayed in the middle pane. The white cloud icon in the Status column indicates that the files in local workspace and the OnCloud server are In Sync . If you hover the mouse pointer over the image in the Status column, the datatip displays the current sync status of the file.


node.exe process is manually ended from the Task Manager while the client and the OnCloud server are being synchronized, the sync log reports the status of a previously-synced project as Processing Started . Before you manually end node.exe , ensure that the sync process is complete and the sync status of all the files in File Manager is In Sync .Refreshing File Status
When any file is published, updated, locked, or unlocked in a workspace, the file status is automatically refreshed. Similarly, you can manually refresh File Manager to view the latest sync status and changes.
→ Click the Refresh icon to update the File Manager view with the latest files.  Examples:
-
- Click Refresh to view the latest updates in the shared workspace.
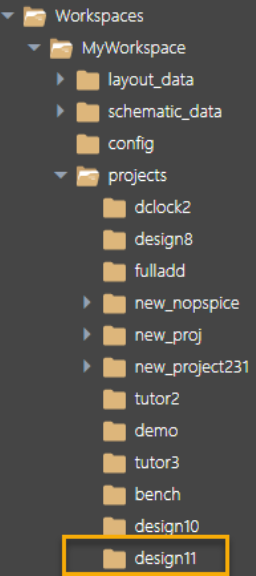
- If you add a new project to the workspace, and click Refresh , the newly added project is updated in the My Workspace node on the left pane of File Manager:
Checking File Upload or Download Status
When new libraries or design files are uploaded to a workspace, the status of the files appears as Pending or Sync In Progress while the files are getting synchronized.
Additionally, there might be files which are getting downloaded in the background from the OnCloud server.
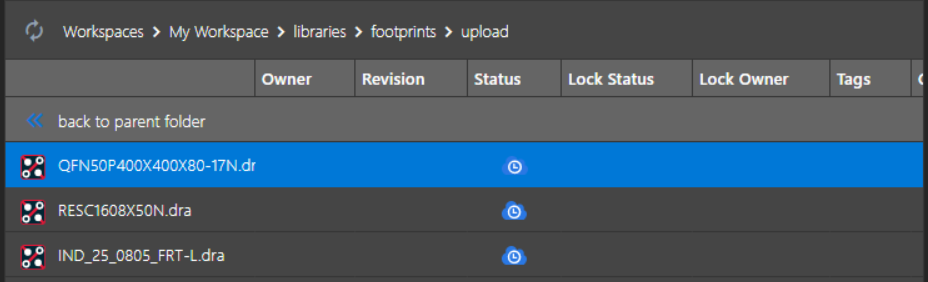
Time taken for this activity to complete depends on the number and size of files being uploaded. While the files get synchronized, you can view the upload or download status of files in the Cloud Sync dialog box.
To view the sync status of files, do the following:
- Click the Cloud Sync icon to open the Cloud Sync dialog box.
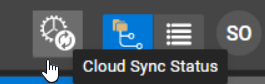
The Cloud Sync dialog box is displayed.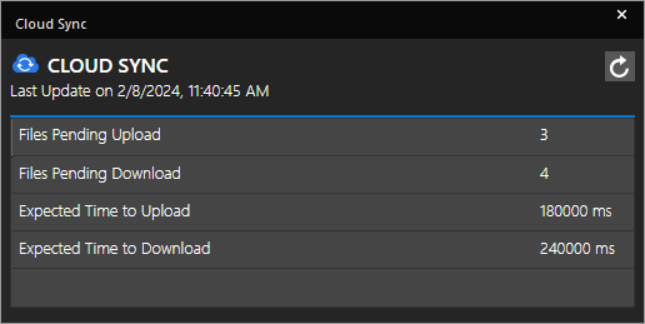
This dialog box shows the number of files pending for upload or download along with the expected time to upload or download the files. The time and date of the last time the data was updated is also indicated here. - Click the Refresh icon
 to check the current upload status.
The updated file upload status is displayed: If there is a discrepancy in the sync time between the client and the OnCloud server, the sync utility automatically runs to synchronize the client and the server data.
Viewing Projects in File Browser
In addition to File Manager, you can also open and view the projects folder and its contents in (Windows) File Browser.
- To view a project in File Browser, right-click a project folder or a file in File Manager and choose Show in File Browser .

File Browser opens the location of the projects folder on the local disk: %HOME%\cdssetup\workspace\projects.
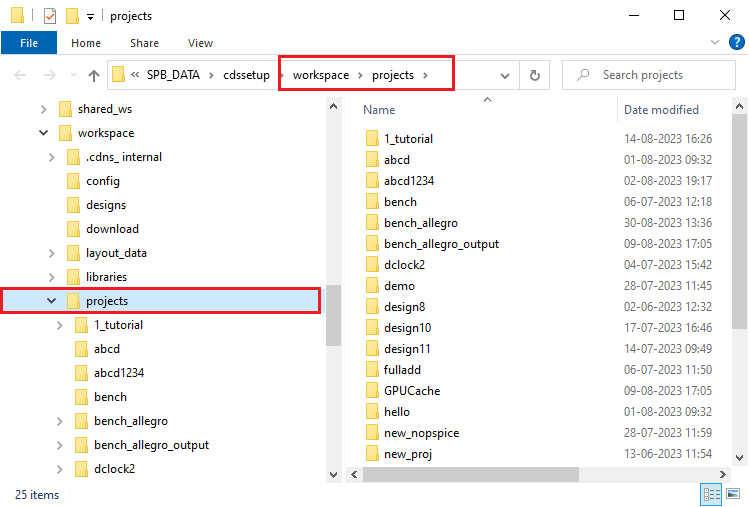
In the OnCloud workspace, all the projects are created and stored in a flat structure under the projects folder. However, you can create a nested folder structure in File Browser by creating a new folder and moving project folders under it.
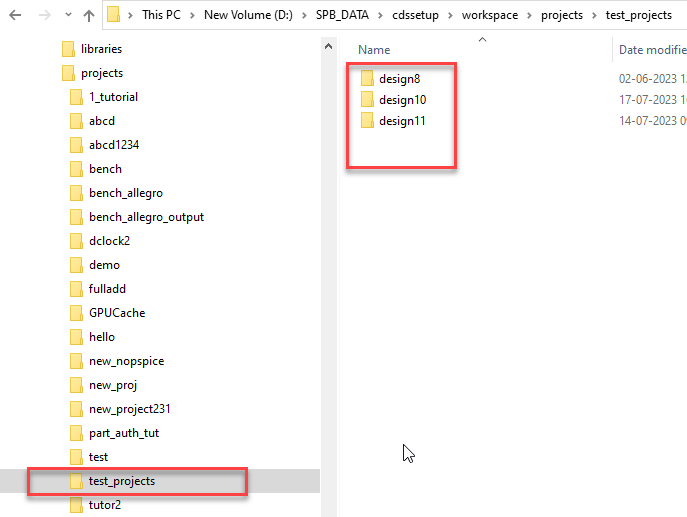
In File Manager, when you refresh the view, the nested structure is retained, and the new folder appears under the projects folder.
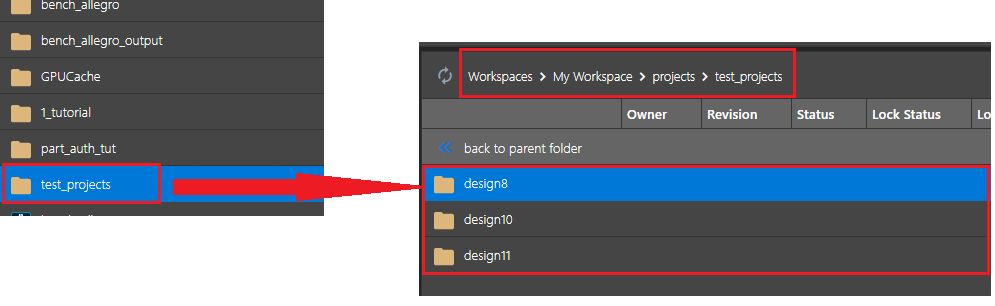
In the target (shared) workspace also the project structure is maintained.
You can publish the projects in the nested folder structure, though it is recommended to keep projects directly under the projects folder.
OnCloud Security and Data Protection
Only authorized people can access the applications and data through identity and access management systems. OrCAD X OnCloud has Multi-factor authentication (MFA) to add a security layer to prevent unauthorized users from accessing your account. OnCloud lets you to decide where your data will be physically stored by choosing from Amazon AWS data centers located in the US West (USA), Asia Pacific, Japan, or Europe from the Capture interface.
To select a center for data storage, perform the following steps in the OrCAD X Capture application:
- Go to View - Workspace.
- Choose Configuration to open the Workspace Configuration dialog box.
- Select New Workspace to create a workspace.
- In the Data Residency field, select a center from the drop-down menu.
5. Click OK.
View the next document: 05 - Working with Designs
If you have any questions or comments about the OrCAD X platform, click on the link below.
Contact Us