11 – Establishing Connectivity
Wire Connectivity Bus Connectivity Modifying Wires and Buses Shorting Part Pins Placing Power, Ground, and No Connect Symbols Placing Off-Page Connectors Hierarchical Ports Adding Hierarchical Ports Establishing Connectivity in Schematic Pages Using Intersheet References Working with Nets Using NetGroups NetGroup and Bus Member Net Generation
Wire Connectivity
In Capture, you can establish connectivity with wires or aliases.
Two perpendicular wires or buses are connected if:
- They form a "T" intersection, either by dragging an object or placing a wire.
- A junction is placed where they cross.
If they simply cross at 90 degrees, they are not electrically connected unless you place a junction at the intersection manually.
You can also use an alias to connect a signal from one area of your schematic page to another. For example, suppose you have placed a part on your schematic page and you want to connect it to another part at the opposite corner of the schematic page. Instead of drawing a wire from the first part to the second part, you can assign a single net alias to a wire connected to both parts. You can connect two crossing nets, after they have been placed, by placing a junction where they cross. For more information about placing junctions see Placing Junctions.
A net can have any number of aliases plus one optional net name. The only purpose of the net name is to give the highest priority to one of a net's aliases. When you assign a name to a net, you force Capture to resolve netname conflicts in favor of a particular alias.
- A bus and a wire can be connected only by name.
If you begin or end a bus segment on a segment of a wire, a vertex is added to the wire and a junction appears, but the bus and wire are not electrically connected.
If you begin or end a wire segment on a segment of a bus, a vertex is added to the bus and a junction appears, but the wire and bus are not electrically connected. - Two buses or two wires can be connected physically.
If you begin or end a bus segment on a segment of another bus, a vertex is added to the second bus, and a junction appears—the buses are connected.
If you begin or end a wire segment on a segment of another wire, a vertex is added to the second wire, and a junction appears—the wires are connected.
If you place parts so that two pins meet end to end, the pins are connected.
It is recommended that you connect the pins of the parts using a wire, and avoid placing parts so that two pins meet end to end. This is because, parts with direct pin-to-pin connections produce a system generated net name to establish the connection and:
- Capture will not allow you to assign your own net name in the place of the system generated net name.
- Searching for the system generated net name can be difficult if you are not aware of the pin-to-pin connection.
- If you move the parts after creating the netlist, the system generated net name might change. This may cause net name conflicts when you run back-annotation.
Capture preserves the case of part names and net names, but ignores the case when comparing names for electrical connections. That means you may use upper-case or lower-case letters as you wish, but you need not remember the case.
Placing and Naming Wires
The purpose of wires is to create connections. When you connect a wire to a pin, Capture provides visual confirmation: the unconnected pin box on the pin disappears. If two wires cross at 90 degrees, they are not electrically connected unless you create a junction by clicking on one wire as you draw the other to it, or by placing a junction over two crossing wires.
When a wire forms a "T" intersection with a pin or another wire, a visible junction is shown. If the two objects don't intersect, like when a wire ends at a pin or where the next wire begins, then a junction does not appear.
When you place a wire, it is assigned a system-generated net name. You can replace the system-generated name by assigning an alias or a net name. If you connect a wire to an existing net, the wire assumes the name of that net.
To place a wire, do the following:
-
Choose Place – Wire menu command.
Or Press the W key on the keyboard. - Click on the schematic page to start the wire.
You can pressF6to change the cursor to crosshair to start the wire from a specific location. - Use the mouse to draw the wire. Click to place a vertex and change directions. The vertex is constrained to multiples of 90 degrees.
- If the wire ends at a pin or another wire, click to end the wire. The wire appears in the selection color.
OR - Double-click to end the wire.
- Select the selection tool to dismiss the wire tool.
OR - Press the Esc key on the keyboard.
Placing Non-Orthogonal Wire
- To place a non-orthogonal wire, hold down the Shift key while you draw the wire. There is no constraint on vertex angles.
Attaching Wire to Net
To attach a wire to a net, do the following:
- Begin or end the wire on the net.
OR
Click as you draw the wire over the net.
OR
Create a net alias, as described below, assigning the alias of the net to this wire. Within a schematic page, wires with the same name or alias are electrically connected.
As you place buses and wires:
- A bus and a wire can be connected only by name.
- If you begin or end a bus segment on a segment of a wire, a vertex is added to the wire and a junction appears, but the bus and wire are not electrically connected.
- If you begin or end a wire segment on a segment of a bus, a vertex is added to the bus and a junction appears, but the wire and bus are not electrically connected.
- If you begin or end a wire segment on a segment of another wire, a vertex is added to the second wire, and a junction appears—the wires are connected.
- Two buses or two wires can be connected physically.
- If you begin or end a bus segment on a segment of another bus, a vertex is added to the second bus, and a junction appears—the buses are connected.
It is recommended that you connect the pins of the parts using a wire, and avoid placing parts so that two pins meet end to end. This is because, parts with direct pin-to-pin connections produce a system-generated net name to establish the connection and:
- Capture will not allow you to assign your own net name in the place of the system-generated net name.
- Searching for the system generated net name can be difficult if you are not aware of the pin-to-pin connection.
- If you move the parts after creating the netlist, the system-generated net name might change. This may cause net name conflicts when you run back-annotation.
- It is recommended that you do not connect a power symbol directly to a power pin. Connect the power symbol to the power pin using a wire.
- When you click on a wire segment, only that segment and its two handles are selected.
- Capture preserves the case of part names and net names, but ignores the case when comparing names for electrical connection. That means you may use upper-case or lower-case letters, and need not remember the case.
Shortcut
Tool palette: 
Placing Junctions
You create junctions on wires while placing wires, or after the wires have been placed. If you are in the process of placing wires, clicking on another wire creates a junction for the two wires. Use the Place junction tool palette to place junctions on existing wires that cross each other, but do not connect.
Use junctions on buses the same way as on wires.
To create a junction while placing a wire, do the following:
- Choose the Place – Wire menu command.
- Click to start the wire.
- Click the left mouse button to change the direction of the wire as needed.
- Move the pointer over the wire segment or wire segment vertex you want to connect with, and click. Capture creates a junction where the two wires meet, and ends the wire you are currently placing.
OR
If you are connecting with a wire or pin and continuing across it, double-click when you reach the intersection. Capture creates a junction at the intersection and continues the wire you are currently placing.
To place a junction on existing wires
- Choose the Place – Junction menu command.
OR
Choose the Place junction button on the Draw toolbar. - Move the pointer over two wires that cross, but do not connect.
- Click.
Capture places a junction where the two wires cross.
- To select a junction, hold the
skey and click to select one or more junctions.
To remove a junction, do the following:
- Choose the Place – Junction menu command.
OR
Choose the Place junction button on the draw toolbar. - Move the pointer over the junction you want to remove and click. Alternatively, hold the
skey while you move the pointer over the junction you want to remove, and click to select it.
Capture removes the junction. The two wires no longer connect.
OR
Choose the Edit – Delete menu command.
OR
Press theDELETEkey.
The two wires no longer connect.
- If the component is deleted, junction dots residing on the pin-stubs will also get automatically deleted in case that junction is not serving as a connection point to other wires/pins.
- When a wire is dragged, un-necessary junctions will not get created unless the drag results in a junction on wire break only.
Shortcut
Tool palette: 
Junction Dot Formation
The creation of a junction dot when displaying connectivity in Capture uses the concept of Junction on straight wire-break only.
Junction on Straight Wire-Beak Only
If a horizontal or vertical straight-wire is broken at a point between the end-points of the wire because of a connection with one or more connection objects (another wire, port, off-page connector, global, part pin or hierarchical pin), a junction dot is created at the point of connection.
Consider a horizontal (or vertical) scalar wire joined with another scalar wire originating at the same connection point and drawn in the opposite direction. In this case, a junction dot is created if any of the following objects is placed at the point of connection of these two wires:
- An orthogonal scalar wire
- An off-page connector
- A scalar schematic port
- A scalar global.
- A scalar pin
- A scalar hierarchical port
- A bus entry point. However, in the case of a bus entry point, the junction dot will not display.
Example: Say the wire w1 is joined with the wire w2, originating at the same connection point and drawn in the opposite direction. A junction dot is created if an orthogonal wire w3 is placed at the point of connection of these two wires.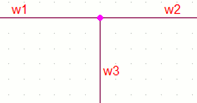
As in the case of scalar wire, consider a horizontal (or vertical) bus or NetGroup joined with another bus or NetGroup originating at the same connection point and drawn in the opposite direction. A junction dot is created if any of the following objects is placed at the point of connection of the two objects:
- An orthogonal bus or NetGroup
- A bus or NetGroup off-page connector
- A bus or NetGroup schematic port
- A bus or NetGroup global
- A bus or NetGroup pin
- A bus or NetGroup hierarchical port
- A bus entry point. However, in the case of a bus entry point, the junction dot will not display.
Example: Say the wire bus or NetGroup (b1[0..1]) is joined with the bus or NetGroup (b2[0..1]), originating at the same connection point and drawn in the opposite direction. A junction dot is created if an orthogonal bus or NetGroup (b3[0..1]) is placed at the point of connection of these two objects.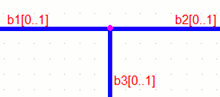
- Since a junction is the attribute of a wire, it will appear only on a wire-end. If three other types of
For example, if a port, an off-page connector, and a ground are shorted together, a junction dot is not created at the point of connection. connection objects are shorted together, no junction is created. - A junction dot is created on a bus or NetGroup wire irrespective of the widths of the buses or NetGroups constituting the connection.
For example, a junction is created if the buses or NetGroups b1[0..1], b2[0..3] and b3[0..5] are shorted together. - A junction dot can be explicitly added or removed by a user only in the case of crossing wires.
Auto-Wiring in Capture
Use the wire command to draw wires between various objects and provide connectivity on the schematic. This is often a tedious and time-consuming task. To automate the task of wiring the components on a schematic page, use the Auto-Wire feature in Capture.
This feature wires two or more points on the schematic page. It also connects multiple points on your schematic to a bus.
When wiring the parts on a page, you wire two (or more) pins on different parts or the same part (for shorting). You can create a net between two (or more) wires and also create a net between any number of pins and wires on a page.
Auto Wiring Two Points
The auto wiring feature in Capture lets you connect any two points (part pins and/or wires) on a schematic page.
To wire two points on a page (pin-to-pin, pin-to-wire or wire-to-wire), do the following:
- Choose the Place – Auto Wire – Two Points menu command.
Or click the Auto Connect two points button on the Draw toolbar.
Capture is now in the Auto-Wire mode. Notice the cursor changes to the Auto-Wire cursor. - Click the pin or wire to start the net.
As you move the cursor across the page, notice a wire, from the start pin or wire, is formed. And the wire stretches as you move across the page. - Click the pin or wire to end the net.
A wire is created between the start and end points. - Choose the selection tool to exit the Auto-Wire mode or go back to step 2 to Auto-Wire other pairs of pins and wires on the page.
Use this feature to short two pins on a part.
Shortcut
Draw Toolbar: 
Auto-Wire Multiple Points
The Auto-Connect feature of Capture allows you to connect any number of points (pins or wires) on your schematic with an easy-to-use multi-select auto-wiring feature.
To auto-wire multiple points on a page
- From the Place menu, choose Auto-Wire then choose Multiple Points.
Or click the Auto Connect multiple points button on the Draw toolbar.
Capture is now in the Auto-Wire mode. Notice the cursor changes to the Auto-Wire cursor. - Click the pin or wire to start the net.
- Click the next pin or wire on the net.
- Continue to click on as many pins or wires as required to create the complete net.
Note: Since you are in the Multiple Point mode, you do not need to press the Ctrl key to multi-select points on the page.
Note: Since Capture is in the Multiple Point mode a wire is not dragged as you move the cursor across the page. This is unlike the Two-Point Auto Wire mode. - Finally, right-click anywhere on the schematic page and choose Connect.
OR
- Click the pin or wire to start the net.
- Press and hold down the Ctrl key and click the next pin or wire on the route.
-
Continue to click on as many pins or wires as required to create the complete net.
You need to keep the Ctrl key pressed with each new pin or wire selected. - With all the pins and wires in the net selected, right-click anywhere on the schematic page and choose Connect.
Shortcut
Tool palette: 
Auto-Wire to Bus
You can use the auto-wiring feature to connect the pins on a part to a bus. You can also connect pins and wires from across the page to a single bus.
In this feature, you simply need to select the pins (and wires) to connect to the bus, choose the Connect to Bus command and finally provide a net alias and all the connections to the bus are made.
To connect Part Pins and / or wires to a Bus
- From the Place menu, choose Auto Wire then choose Connect to Bus.
Or click the Auto Connect to Bus button on the Draw toolbar.
Capture is now in the Auto-Wire mode. Notice the cursor changes to the Auto-Wire cursor. -
Select any number of pins and / or wires to be connected to the bus.
Since you are in the Connect to Bus mode, you do not need to press theCtrlkey to multi-select points on the page. -
Select the bus.
As soon as you select the bus, the wire connections between the selected points on the page and the bus are created. Notice that the bus entries for these connections are also made.When all the connections to the bus are made, you are prompted for the net alias.
This net alias will be used for all the connections to the bus. So you need to provide a alias name prefix followed by a numeric range in square brackets. So that each net alias in the connections will use name prefix followed by the sequenced numeric.
Take the example of the following alias name prefix and number range:
AD [9-0]
The net aliases will be named AD9, AD8, AD7 through to AD0.If you the numeric range that you provide is greater than the number of objects to be connected to the bus, Capture will discard the un-necessary number values. - Enter the net alias name prefix followed by the numeric range.
All the connections to the bus are complete along with the number sequenced net aliases.
The auto-connect to bus feature is extremely sensitive to the exact location of the mouse click on the objects (wires or pins) on the schematic. When you use the feature to connect wires to a bus, you need to ensure that you click at the precise end of the wires. Alternatively, when using this feature, you will find it easier to connect the bus directly to the pins on the part.
Shortcut
Tool palette: 
Auto-Wire to NetGroup
You can use the auto-wiring feature to connect the pins on a part to the component signals on a NetGroup wire. You can also connect pins and wires to the signals on a NetGroup block.
To auto-connect Part Pins and / or wires to a NetGroup wire
- From the Place menu, choose Auto Wire then choose Connect to Bus.
Or click the Auto Connect to Bus button on the Draw toolbar.
Capture is now in the Auto-Wire mode. Notice the cursor changes to the Auto-Wire cursor. -
Select any number of pins and / or wires to be connected to the NetGroup wire.
Since you are in the Connect to Bus mode, you do not need to press the Ctrl key to multi-select points on the page. - Select the NetGroup wire.
As soon as you select the NetGroup wire, the Select Nets dialog box displays the list of all the signals contained in the selected NetGroup with checkbox to the left of each signal. And a checkbox to the left of the NetGroup name. - Check each of the signals in the NetGroup that you want to connect to the pins.
In the Select Nets dialog, you can check the items at any level. This implies that you can select individual signals, NetGroups or buses. If you select a NetGroup or a bus, all the contained signals are selected. - Click OK.
The nets that connect the part to the bus are assigned aliases depending on the signals in the NetGroup that are connected to the pins on the part.
For example, if you create a NetGroup N1 that contains two signals S1 and S2. If these signals are connected to a part, the aliases that are assigned to the connecting nets are N1.S1 and N1.S2. However, if you rename the net alias defined for the NetGroup or signal within the NetGroup, Capture will auto-rename the signals.
So if you rename the NetGroup net alias to, say, P1, Capture will immediately rename the net aliases on the connecting nets to P1.S1 and P1.S2.
Also, if you rename the NetGroup signals to, say, T1 and T2, Capture renames the net aliases to P1.T1 and P1.T2. For details on renaming signals in a NetGroup, see Renaming a NetGroup Member.
Further, say you connect a NetGroup hierarchical port HP1 to the NetGroup wire N1. The connectivity of the NetGroup hierarchical port will override the connectivity of the NetGroup wire. So, if you now auto-wire the NetGroup to the part, the aliases on connecting nets are HP1.S1 and HP1.S2. This means that renaming the NetGroup hierarchical port will affect the net aliases names. However, renaming the NetGroup wire will not affect the net wire will not affect the names of the net alias names.
Consider the above scenario, where you chose a combination of a NetGroup wire and a NetGroup hierarchical port. Say you auto-wire the part to the NetGroup wire. Immediately the net aliases are set to N1.S1 and N1.S2. Now, the net aliases naming (and auto-renaming) is associated with the NetGroup wire. So, if after this you connect the NetGroup hierarchical port to the NetGroup wire the net aliases are not renamed to the port. Note that this is only for purposes of net alias naming. The connectivity of the nets still depends on the precedence of objects. So the pins on the part are shorted to the signals on the NetGroup port. This can easily be verified by checking the flat net names of the connecting nets.
To auto-connect Part Pins and / or wire to the signals in a NetGroup block
- From the Place menu, choose Auto Wire then choose Two Points.
Or click the Auto Connect two points button on the Draw toolbar.
Capture is now in the Auto-Wire mode. Notice the cursor changes to the Auto-Wire cursor. - Click the pin or wire to start the net.
As you move the cursor across the page, notice a wire, from the start pin or wire, is formed. And the wire stretches as you move across the page. - Click the NetGroup entry pin on the NetGroup block.
A wire is created between the pin / wire and the NetGroup entry. - Choose the selection tool to exit the Auto-Wire mode or go back to step 2 to Auto-Wire other pairs of pins and wires on the page.
Bus Connectivity
A bus is a group of scalar signals (wires), and is never connected to a net. Once a bus acquires a valid name or alias, that name or alias defines the signals carried by the bus and connects those signals to the corresponding nets. For example, the alias A[0:3] defines a four-signal bus that connects the four bus signals A[0], A[1], A[2], and A[3] to the individual wires named A0, A1, A2, and A3. Net aliases on wires do not use brackets.
You can place one pin on a part that represents all the pins for a bus. Such a pin is called a bus pin. Bus pins use the same naming convention as buses.
You can use bus pins in most of the cases where you can use scalar pins. Examples of these would be:
- Off-page connectors.
- Hierarchical ports.
- Hierarchical pins of nonprimitive parts and hierarchical blocks.
Bus pins will only work with the VHDL netlist format. No other netlist format understands them.
Do not use bus pins in the following situations:
- Pins on primitive parts.
- Any design that you intend to use with PCB Editor.
Like wires, buses can acquire names and aliases by two means:
- Direct application of a valid bus name
- Electrical connection to a hierarchical port, off-page connector, or global bus pin with a valid bus name or alias
Bus Naming Conventions
For a Bus
A bus name must have the form basename[m..n] where m..n specifies a range of decimal integers representing the signal numbers of bus members. There are (n - m + 1) wires in the bus. You can use two periods (..), a colon (:), or a dash (-) between m and n.
Examples:
|
ADDR[0..31] |
(32 members) |
|
DATA[16:31] |
(16 members) |
|
CONTROL[4-1] |
(4 members) |
|
A[100..190] |
(91 members) |
Do not add any space between the basename and the left bracket ([), because this can cause problems during the netlist operations.
Also, note that you should not end a bus name with a numeric character (0-9), because this can cause problems during the netlist operations. However, numeric characters can occur at other places in the bus name, however. For example, BUS2A will work, but BUSA2 could cause problems when you generate the netlist.
For a Bus Member
The name of a bus member must have the form basename N where N is the bus member's signal number in the bus. The signal can have additional aliases, but it must have this name to be connected to the bus. Also, bus members cannot have a preceding zero in their name. For example, A0 is a legal name for a bus member, but A00 is not.
Aliases
To make connections to a bus, you label the bus, label the signals that are members of the bus, and assign an alias to each signal entering and leaving the bus. Each signal bears an alias that is within the bus range. For example, if the bus alias is ADDR[0..3], the four bus members must bear aliases ADDR0, ADDR1, ADDR2, and ADDR3.
In Capture, you can use an alias to connect a signal from one area of your schematic page to another without placing a bus between the areas. For example, suppose you have placed the bus TIMING[1..4] on your schematic page and you want to connect it to another object at the opposite corner of the schematic page. Instead of drawing a bus from TIMING[1..4] to the other object, you can assign the alias TIMING[1..4] to the other object.
To provide a visual cue that a signal is tied to a bus, you can physically connect the signal to the bus. It is recommended that you use a bus entry for this connection. The advantage of using a bus entry is that two bus entries can be connected at the same point on a bus without connecting the signals. If two wires are run directly to a bus at the same location, the signals are connected.
Bus Naming Rules
In addition to the rules by which net names are resolved, bus names and aliases run the following rules.
These rules apply when two buses with different aliases are physically connected to each other or you attach multiple aliases on a single bus.
- If one alias defines a subset of the signals defined by another, like-named signals are connected. For example:
Given aliases A[0..2] and A'[0..5]:
A[0] connects to A'[0], A[1] connects to A'[1], and A[2] connects to A'[2]. -
If buses are with different aliases
A[x..z]andB[p..t], the connection is done in bit-wise manner.A[x]is connected toB[p],A[y]is be connected toB[q]and so on, wherex,z,p, andtare whole numbers.
For example:
Given aliases A[0..2] and A'[1..3]:
A[0] connects to A'[1], A[1] connects to A'[2], and A[2] connects to A'[3].
Given aliases A[0..2] and B[5..0]:
A[0] connects to B[5], A[1] connects to B[4], and A[2] connects to B[3].
Creating Buses
Before you place buses and wires, remember the following points:
- A bus and a wire can be connected only by a name.
- If you begin or end a bus segment on a segment of a wire, a vertex is added to the wire, but no junction appears—the bus and wire are not connected.
- If you begin or end a wire segment on a segment of a bus, a vertex is added to the bus, but no junction appears—the wire and bus are not connected.
- Two buses or two wires can be connected physically.
- If you begin or end a bus segment on a segment of another bus, a vertex is added to the second bus, and a junction appears—the buses are connected.
- If you begin or end a wire segment on a segment of another wire, a vertex is added to the second wire, and a junction appears—the wires are connected.
To create a bus, do the following:
-
Choose the Place – Bus menu command.
- Click to start the bus.
- Use the mouse to draw the bus.
- Click to place a vertex and change directions. The vertex is constrained to a multiple of 90 degrees.
- Double-click to end the bus.
- Select the selection tool to dismiss the bus tool or repeat from step 2 to place additional buses.
Placing a Non-Orthogonal Bus
-
To place a non-orthogonal bus, hold the
Shiftkey while you draw the bus. There is no constraint on vertex angles.
Naming a Bus
To name a bus, do the following:
-
Choose the Place – Net Alias menu, choose command.
Capture displays the Place Net Alias dialog box.
- Following the naming conventions for buses, enter the net alias in the dialog box that appears, then click OK. The bus appears in the selection color.
- Use the mouse to move the net alias and click on the bus to place the net alias. The net alias appears in the selection color. The tip of the pointer must be touching the net for you to place the net alias.
- Select the selection tool to dismiss the net alias tool. The alias is added to the alias list for the net.
Shortcut
Tool palette: 
Connecting Single-Signal nets to Bus
To connect single-signal nets to a bus
- Place the bus and assign it a name.
- From the Place menu, choose the Bus Entry command. The bus entry symbol is attached to your pointer.
-
If the entry is not at the angle you need, then choose the Edit – Rotate menu command to rotate the entry
90degrees counterclockwise. - Use the mouse to position one end of the entry on the bus, then click to place the bus entry.
- Repeat step 4 until all bus entries are placed. If you place the bus entries at regular intervals, you can simplify connecting the single-signal nets to the bus entries.
- Place a wire to connect the first bus entry to one net, and place an alias, taking care to assign this bus member the lowest value in the bus range.
- Select the entire wire and press Ctrl and drag the wire so that it connects the next net to the bus. Note that the wire is copied to the new location and the alias value is increased by one. However, if you select only an end of the wire (and not the entire wire) and then drag the wire keeping Ctrl pressed, the wire is moved to the new location along with the original alias value.
- Choose the Edit – Repeat menu command.
The wire and the incremented alias are placed at the specified distance from the previous set. - Repeat step 8 for every net in the bus or repeat steps 7 and 8 as needed, then select the selection tool to dismiss the set.
Shortcut
Tool palette: 
Modifying Wires and Buses
Labeling Wires and Buses
You use aliases to connect electrical objects.
To place an alias, do the following:
-
Choose the Place – Net Alias menu command.
-
Enter the net alias text, following the naming conventions for buses and bus members, then click OK.
A rectangle representing the alias text is attached to the pointer. The tip of the pointer must be touching the net for you to place the net alias. - Use the mouse to move the alias text and click directly on the wire or bus. The alias text appears in the selection color.
- Select the selection tool or press Esc, to dismiss the net alias tool.
To label a series of bus members, do the following:
- Use the Repeat command to place the bus members at regular intervals.
- On the first bus member, place one alias, taking care to assign this bus member the lowest value in the bus range.
- Place a net alias, using the left mouse button, on each member of the series.
- Select the selection tool, or press Esc, to dismiss the net alias tool.
Shortcut
Tool palette: 
To edit net alias text, do the following:
- Select the net alias.
-
Choose the Edit – Properties menu command.
- In the dialog box that appears, you can change the color, the font, the rotation, or the alias.
- Click OK to dismiss the dialog box.
To move net alias text, select the net alias text and drag it to another location.
Editing Appearance of Wire and Bus
You can change the look and feel of a wire or a net on a schematic page by changing the color, line style or line width.
To edit the look and feel of a wire or bus, do the following:
- Select a wire or bus on the page.
- Right-click the wire or bus and choose Edit Wire Properties.
The Edit Properties dialog box displays. The dialog box contains three drop-down lists to edit the line style, line width and color of the wire. - Make the required selections in the drop-down lists and click OK.
To edit the look and feel of a net, do the following:
- Click on a net on the page.
- Right-click the net to display the pop-up menu.
- Click the Edit Net Properties option.
The Edit Properties dialog box displays.
The dialog box contains three drop-down lists to edit the line style, line width and color of the wire. - Make the required selections in the drop-down lists and click OK.
Combining wire and net look and feel
If you change the look and feel of a wire in a net and then change the look and feel of the net, the properties of the wire will override the properties of the net.
Scenario 1
- Say a net contains two sections (wires).
- Select one wire in the net and change the color property of the wire to red.
- The color of the other wire in the net is not affected.
- Now select the net and change the color of the entire net to blue.
- The color of the second wire in the net changes to Blue. However, the color of the first net remains red.
- This is because the custom properties of a wire will override the properties of a net.
Scenario 2
- Say a net contains two sections (wires),
- Select one wire in the net and change the color property of the wire to red.
- The color of the other wire in the net is not affected.
- Now select the net and change the color of the entire net to blue.
- The color of the second wire in the net changes to blue. However, the color of the first net remains red.
- Again, change the color of the wire to Default.
- The wire color changes to blue.
- This is because the wire now inherits the color of the net.
Moving Connectivity Objects
Connectivity and orthogonal drag
Connectivity, of course, is of vital importance to an electronic design. Therefore, it is important to understand how connectivity is maintained when you move objects on a schematic page.
Capture draws wires that maintain connectivity with a moved object in a stair step (orthogonal) fashion. When you reposition an object, connectivity may be affected.
Capture warns you of connectivity changes as you drag the object by placing markers at the connectivity change points visible on the page. At the same time, the cursor changes to an exclamation point as shown in the following schematic, and the status line warns of net connectivity changes.
Because some connectivity changes may not be visible on screen, most connectivity changes for which you see an alert are documented in the session log.
Capture automatically places junctions to create electrical connections at "T" intersections where wires abut and do not cross. Also, Capture places a junction for you where a wire crosses a pin.
Note: Before you edit a design created in an earlier version of Capture in Capture Release 9.1, you should run a Design Rules Check to show where Capture will place junctions in your design. If you do not want electrical connections at "T" intersections and on pins where wires cross, you can adjust the design as necessary by using an earlier version of Capture before you edit in Capture Release 9.1.
In Capture Release 9 and earlier, you could place wires as shown in the figure below and Capture would not automatically place junctions for you at "T" intersections or pins.
If you complete the operation, connectivity change warnings will appear in the session log as shown below.
------------------------------------------------------
The following 2 points have been identified as net connectivity change
points from the last operation
------------------------------------------------------
(2.60, 1.80)
(2.60, 2.00)
The orthogonal drag feature eliminates most unintentional disconnects. As such, Capture will no longer warn you of some connectivity changes caused by dragging objects. If you drag the end of a wire or wire segments that are connected to pins or net symbols, they will disconnect. If you drag wire-to-pin or wire-to-net symbol disconnects back into place, you will see connectivity change indicators. Wire-to-wire connections stretch to maintain connectivity, and junctions maintain connections when you drag wire segments, objects, or entire nets.
The following table shows when Capture provides a connectivity change alert:
|
Object Type |
Drag |
Place |
Pasting |
Resizing |
|
Part |
Yes |
Yes |
Yes |
N/A |
|
Hierarchical Block |
Yes |
No |
Yes |
N/A |
|
Wire |
Yes |
Yes |
Yes |
Yes |
|
Bus |
Yes |
Yes |
Yes |
Yes |
|
Net Symbol |
Yes |
Yes |
Yes |
N/A |
|
Bus Entry |
Yes |
No |
Yes |
N/A |
To drag a segment orthogonally
- Select the segment and drag it to the new location. The wire or bus stretches orthogonally to maintain connectivity.
To drag a segment non-orthogonally
- Hold the Shift key while you select the end point and drag the wire. The selected end of the wire moves in any direction while the opposite end remains in place.
When you click on a wire segment, only that segment and its two handles are selected.
When you drag a part or wire to another location and that change affects connectivity, Capture flags a warning with a changed cursor and temporary markers on your schematic. Visible and off-screen connectivity changes are saved in the session log, if you complete the operation.
Capture now provides you the following UI options to control the drag operation:
- A check box named Allow component move with connectivity changes in the Miscellaneous tab of the Preferences dialog box.
- A toolbar button with the following toggle states:
- If the check box is selected or the toolbar button is in the
 state, then Capture will allow you to drag and place the selected part or wire on the schematic, even if it results in connectivity changes. Also, Capture will flag a warning with a changed cursor and will show the temporary markers.
 - However, if the check box is not selected or the toolbar button is in the
 state, then the selected part or wire attaches to the cursor and does not get placed on the schematic, if it results in connectivity changes. Also, Capture flags only a warning with a changed cursor and does not show the temporary markers.
- If the check box is selected or the toolbar button is in the
To move a wire or bus
- Select the wire or bus.
- Hold the Alt key while you move the wire or bus. The wire or bus segment breaks connectivity with the rest of the net.
To copy a wire
- Hold the Ctrl key while you drag the wire.
To move a vertex
- Select a wire segment next to the vertex.
- Drag the vertex to the new location.
One segment of the wire or bus stretches to the new location.
The other segment breaks connectivity.
Deleting Wires and Buses
You can delete a bus segment, a wire, or an entire net.
To delete a wire or bus segment, do the following:
- Select the segment.
- From the Edit menu, choose Delete.
To delete a net do the following:
- Select one segment of the net.
- Right click and choose the Select Entire Net command.
- Choose the Edit – Delete menu command.
Shorting Part Pins
You short the pins on a part to connect these together. Capture provides the Connect command to short multiple pins on a part.
To short pins on a part, do the following:
- Multi-select the pins to be shorted.
You can do this by clicking on the pins to short while keeping the Ctrl keep pressed.
If the pins are on one side of the part, click outside the part and drag the mouse over the pins to be shorted. - Right-click and choose Connect.
All the selected pins are shorted.
Placing No Connect Symbols
The Design Rules Check tool checks for unconnected pins. If you intentionally leave a pin unconnected in a schematic page, it needs a no connect symbol. The Design Rules Check tool ignores unconnected pins with no connect symbols.
If a pin with a no connect symbol is connected to a net, the no connect symbol has no effect on the pin and becomes invisible. If the pin is later disconnected from the net, the no connect symbol becomes visible again.
Placing No Connect Symbol
To place a no connect symbol, do the following:
- Press Shift, and then X keys.
- Position the mouse pointer over the pin, and click. The end of the pin changes from a square (unconnected) to an X (not connected).
OR - Choose the Place – No Connect menu command.
- Position the mouse pointer over the pin, and click.
The end of the pin changes from a square (unconnected) to an X (not connected).
OR - Select the pin.
- Choose the Edit – Properties menu command.
The property editor appears. - Change the filter to <All>.
- Select the Is No Connect property.
- Click Apply, and close the property editor.
- Click the left mouse button in any open space on the schematic page. The end of the pin changes from a square (unconnected) to an X (not connected).
No connects cannot be deleted with the Delete command.
Removing No Connect Symbol
To remove a no connect symbol, do the following:
- Position the mouse pointer over the pin, and click. The end of the pin changes from an X (not connected) to a square (unconnected).
OR - Select the pin.
- From the Edit menu, choose Properties. The property editor appears.
- Change the filter to <All>.
- Clear the Is No Connect property.
- Click Apply, and close the property editor.
- Click in any open space on the schematic page. The end of the pin changes from a square (unconnected) to an X (not connected).
Placing Power and Ground Symbols
When you place a part that has power and ground pins, the power and ground pins of the part are automatically connected to like-named global power and ground nets of the schematic folder. This happens because, when you place the part, the power and ground pins of the part are assigned a net name that is the same as the pin name. If you need to isolate one power or ground pin from the others, you can assign it a unique net name.
Power and ground pins are invisible and global by default. This means that they are connected, on a project -wide basis, to all pins, power objects, and nets of the same name.
If you need to isolate a power or ground net, do one of the following:
- make the pin visible and connect it to another net or power object
- display the invisible power pin and connect it to a net or power object
To place power or ground symbols, do the following:
-
From the Place menu, choose Power OR Ground.
The Place Power or Place Ground dialog box appears. - In the Place Power dialog box, select a power symbol and click OK.
OR
In the Place Ground dialog box, select a ground symbol and click OK. - Use the mouse to move the symbol to the appropriate location and click. The symbol appears in the selection color.
- Select the selection tool, or press
Esc, to dismiss the power or ground tool. - Click an area where there are no parts or objects to deselect the symbol.
Shortcut
Tool palette: 

To rotate power or ground symbols, do the following:
- Select the symbol.
- From the Edit menu, choose the Rotate command. The symbol rotates 90 degrees counterclockwise.
- Repeat step 2 as necessary.
- Click an area where there are no parts or objects to deselect the symbol.
To create a power or ground symbol, do the following:
- Open the library that is to hold the new symbol, and select the library in the project manager.
- Choose the Design – New Symbol menu command.
The New Symbol Properties dialog box appears. - Enter a name and select Power as the Symbol Type, then click OK. The part editor opens with an empty part boundary box.
- Use the graphics tools to create the symbol; the part boundary box dimensions change to accommodate the graphic elements.
- To isolate a power net to a schematic folder, place a power symbol and attach it to a hierarchical port.
- To isolate a power net to a schematic page, place a power symbol and attach it to an off-page connector.
When Capture resolves net name conflicts, the name of the off-page connector takes precedence over the name of the power object, and the scope of the off-page connector is limited to the schematic folder. All pins on the same page that are connected by name or by wire to the power symbol are connected to the isolated power net.
For example, say you want to isolate your analog and digital grounds and then connect them at one point when you make a printed circuit board. You place your analog circuitry on a separate schematic folder. On each page in the analog schematic folder, you place a ground symbol with the name GND. This implicitly connects all the pins named GND to ground. Then you connect that power symbol to an off-page connector named AGND. To connect AGND to the digital ground (GND), you can create a part whose footprint is a strip of copper with two pads, GND and AGND.
Working with Power Pins
Browsing for Power Pins
In Capture, power and ground supply pins are referred to generically as "power pins". Normally, power pins are invisible, and global—this means they are shorted by name or they are connected to like-named power pins, power objects, and power nets throughout the schematic folder.
However, if you need to change the shorting behavior on the pins, you would need to make them visible and then work on the pin properties.
Alternatively, you can view the list of all the power pins in a schematic design and then edit the power names or define them as NC pins.
To browse the power pins in a design
- Select the design in the Project manager.
- On the Edit menu choose Browse – Power Pins.
- In the Browse Properties dialog box, you can choose the mode as occurrences or instances and click OK.
This list displays all the power pins in this design.
If you double-click on a line item in this list, you are directed to the component containing the selected power pin. However, since the pins are all invisible, you are still not able to make any changes to the pin properties.
To change the properties of a power pin
- Click the power pin list.
- On the Edit menu choose the Properties option (Or Press Ctrl + E).
The list of power pins now displays in the Assign Power Pins dialog.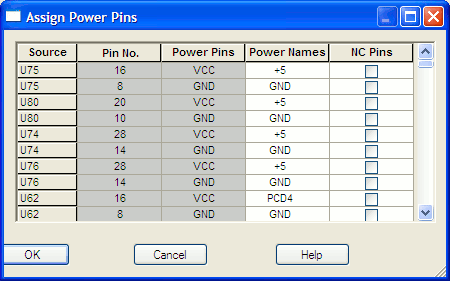
You can now use the Power Name property on a pin to change the shorting behavior on the pin. This implies that you can change the power name of a pin.
To change the power name of a pin
- Pick another power name from the drop-down list on the Power Names cell of a selected Power pin.
OR
Type an alternative power name in the power name cell.
You can also define a power pin as an NC pin by checking the NC Pin option.
This functionality allows you to work with and change the power name and NC Pin property of power pins without having to first make the pins visible.
Making Power Pins Visible
In Capture, power and ground supply pins are referred to generically as "power pins". Normally, power pins are invisible, and global—that is, they are connected to like-named power pins, power objects, and power nets throughout the schematic folder. You can override this default connection by making a power pin visible and connecting it to a wire or other connectivity object. If you connect a power pin to a net using a hierarchical port, or off-page connector, then the pin is no longer global.
Capture can also display invisible power pins on individual part instances or throughout a design. Merely displaying an invisible power pin does not change its global nature; however, connecting a wire or other connectivity object to an invisible power pin isolates it from the design-wide (global) net. If there are duplicates of the pin in the devices of a multi-part package, then all of the pins should be made visible, then wired.
To display invisible power pins
Invisible power pins always appear in the part editor. The method by which you display invisible power pins in the schematic page editor determines whether you can connect wires and other connectivity objects to them
On a part instance
- Select the part in the schematic page editor.
- From the Edit menu, choose Properties.
- Find the Power Pins Visible property column on the property editor Parts tab and select the check box, then close the property editor.
Connecting a wire or other connectivity object to a power pin made visible by this method isolates that pin from the design-wide power net.
Throughout a design
- In the Project manager Options menu, choose Design Properties.
- In the Design Properties dialog box, choose the Miscellaneous tab.
- Select the Display Invisible Power Pins option (for documentation purposes only).
- Click OK.
You cannot connect to a power pin made visible by this method.
To make power pins visible
A power pin is by default connected to a global net that has the same name as the power pin. You can override this default connection by making the power pin visible by either of the methods below and connecting it to a wire or other connectivity object.
On a new part
- In the Part editor Place menu, choose Pin.
- In the Place Pin dialog box, change the Type to Power.
- Verify that the Pin Visible option is selected.
- Click OK.
- Place the pin.
For a power pin that is already placed, select the pin in the part editor. From the part editor's Edit menu, choose Properties. In the Pin Properties dialog box, verify that the Type is Power and that the Pin Visible option is selected, then click OK.
On a part instance
- Select the part in the schematic page editor.
- Choose the Edit – Part menu command.
- For each power pin you want to make visible, select the pin, then choose the Edit – Properties menu command.
- In the Pin Properties dialog box, change the Type to Power.
- Verify that the Pin Visible option is selected.
- Click OK.
- Close the part editor window.
- In the Save Part Instance dialog box, select the required option to apply the changes to all instances of the part in the design or only the selected (current) instance.
- Click OK.
Replace Cache command of the Design menu. For more information, see Replacing and Restoring Parts.
Placing Off-Page Connectors
Off-page connectors provide connections between schematic pages within the same schematic folder. An off-page connector is connected by name to other off-page connectors within the same schematic folder.
- Like-named off-page connectors in different schematic folders are not connected.
- The Select Entire Net command is restricted to the active schematic page—it does not follow hierarchical blocks, hierarchical ports, or off-page connectors across schematic folders or schematic pages. For more information, see Tracing Nets.
- Remember that nets on a schematic page are electrically connected by name, by alias, or by connection to a named hierarchical port or off-page connector.
- To connect an off-page connector to a bus, name the off-page connector with the same name and range as that of the bus. For example, to connect an off-page connector to a bus named
ABC[0:3], name the off-page connector asABC[0:3].
To connect schematic pages laterally (within the schematic folder), do the following:
- From the Place menu, choose Off-Page Connector.
- Select a symbol (standard or user-created), enter a name, and choose OK.
- Place the symbol anywhere on the schematic page.
- Repeat steps 1 through 3 for the other schematic pages (within the same schematic folder) that you wish to connect.
The size of a part or a symbol is limited to 32 by 32 inches.
To create a hierarchical port or off-page connector, do the following:
- Open the library that will hold the new symbol.
- Choose the Design – New Symbol menu command.
The New Symbol Properties dialog box appears. - Enter a name and select off-page connector or hierarchical port as the symbol type, then click OK.
The part editor opens with an empty part boundary box. - Use the graphics tools to create the symbol. The symbol dimensions expand automatically to accommodate the graphics.
- Choose File – Save.
If you are creating the symbol in a new library that has not yet been saved, the Save As dialog box appears, where you specify a name for the library file.
- If you edit a library provided by OrCAD, it is important that you assign a new library name so that your changes are not overwritten when you upgrade or update your software.
- When you save a project, Capture automatically creates a backup with a .DBK file extension. When you save a library, Capture automatically creates a backup with a .OBK file extension. If you save only a schematic page or a part, no backup is generated.
Hierarchical Ports
Hierarchical ports and hierarchical pins provide connection between levels of hierarchy on a schematic page. Inside a hierarchical block, a hierarchical pin provides only vertical (downward-pointing) connection. It is connected by name to hierarchical ports on schematic pages within the attached schematic folder or to the appropriate signals in the VHDL entity port definitions. You can think of its function as bringing a net "up" from the attached implementation into the hierarchical block (but not out onto the schematic page). Outside a hierarchical block, a hierarchical port provides vertical (upward pointing) and lateral connections. Its connected vertically to the like-named hierarchical pin inside any hierarchical block to which it is attached. Its connected laterally to like-named nets, hierarchical ports, and off-page connectors within the same schematic folder. You can think of its function as carrying a net out of the schematic folder.
Before you create or re-size a hierarchical block, do the following:
- Choose the Options – Preferences menu command to open the Preferences dialog box.
- Ensure that the Snap to grid option is selected in the Preferencesdialog box.
If the hierarchical block is on Fine grid, hierarchical pins inside it are also on Fine grid—even if you change the Snap to grid setting before you place them—and it may be difficult to connect to these off-grid hierarchical pins.
A part with an attached schematic folder functions exactly like that for hierarchical blocks, and pins on such a part function exactly as described for hierarchical pins within a hierarchical block. You can use the same attached schematic folder for either method of defining a hierarchy. The only difference between the two methods is that a part with an attached schematic folder is easier to reuse.
If you choose the Descend Hierarchy command on a non-primitive part or hierarchical block, and Capture cannot find the attached implementation, Capture creates a schematic folder or VHDL model in the active design.
If you attach an existing implementation to a hierarchical block, Capture automatically creates the hierarchical pins that correspond with the schematic folder's hierarchical ports or the VHDL models port definitions. If you descend the hierarchy on a hierarchical block whose implementation does not yet exist, then Capture automatically creates the hierarchical ports (for schematics) or port definitions (for VHDL models) that correspond with to the hierarchical pins of the hierarchical block.
Attached files work much like their counterparts in email—they do not provide an alternative definition of the part (as do attached schematic folders).
If you do not specify a full path and file name in the Library field, Capture expects to find the attached schematic folder in the same design as the part of hierarchical block to which it is attached. If the specified schematic folder does not exist in either the design or library, Capture creates the schematic folder when you descend the hierarchy on the part or hierarchical block.
For compatibility with future versions of Windows, Capture preserves the case of the path and filename as you specify them in the Library field.
Nets on a schematic page are electrically connected by name, by alias, or by connection to a named hierarchical port or off-page connector.
Adding Hierarchical Ports
Nets on a schematic page are electrically connected by name, by alias, or by connection to a named hierarchical port or off-page connector.
Connecting Pages Vertically through a Hierarchical Block
Place a hierarchical block and attach the implementation. Complete the following steps to bring the net into the hierarchical block:
- Bring the net into the hierarchical block:
- Select the hierarchical block.
- Choose the Place – Hierarchical Pin menu command.
- Enter a name and choose OK.
- Place the symbol within the boundaries of the selected hierarchical block.
This hierarchical pin is downward pointing—it is connected to any like-named hierarchical port on any schematic page in the attached schematic folder.
To complete the procedure, carry the net up to the hierarchical block. - Open a schematic page contained in the schematic folder attached to the hierarchical block mentioned above.
- Make sure no hierarchical block is selected.
- From the Place menu, choose Hierarchical Port.
- Select a symbol, enter the name used in step 3 of the preceding sequence, and choose OK.
- Place the symbol anywhere (except inside a hierarchical block) on the schematic page.
This hierarchical port is upward pointing—it is connected to any like-named hierarchical pin inside any hierarchical block to which it is attached. - If required, use off-page connectors to carry the net to other schematic pages in the same schematic folder (see Placing Off-Page Connectors for instructions).
- Be careful not to create recursion in your design. Capture cannot prevent recursion, and the Design Rules Check command does not report it.
- Recursion causes Capture to process infinitely as it tries to expand the design, resulting in the loss of any changes you've made to your design since it was last saved.
- You can use the copy and paste keyboard shortcuts (
CTRL+CandCTRL+V) to enter the same name in the Name text field of both dialog boxes.
Connecting Hierarchical Ports with Nets
To connect hierarchical ports or off-page connectors with nets, do the following:
- Extend the net to the hierarchical port or off-page connector by placing a wire or bus.
OR
- Select the hierarchical port or off-page connector and choose Properties from the Edit menu.
- In the Name or Value field, type the name of the net, and click OK.
OR - Select the hierarchical port or off-page connector's name and choose Properties from the Edit menu.
- In the Name or Value field, type the name of the net, and click OK.
Establishing Connectivity in Schematic Pages
In Capture, you connect schematic folders and schematic pages by extending nets between them, using off-page connectors, hierarchical blocks, and hierarchical ports. Off-page connectors carry nets between schematic pages within a single schematic folder. Hierarchical blocks and hierarchical ports carry nets between schematic folders.
A part with an attached schematic folder functions exactly as described for hierarchical blocks, and pins on such a part function exactly as described for hierarchical ports within a hierarchical block. You can use the same attached schematic folder for either method of defining a hierarchy. The only difference between the two methods is that a part with an attached schematic folder is easier to reuse.
If you choose the Descend Hierarchy command on a non-primitive part or hierarchical block, and Capture cannot find the attached schematic folder, Capture creates a schematic folder in the active design.
Remember that nets of a schematic page are electrically connected by name, by alias, or by connection to a named hierarchical port or off-page connector.
When you attach a schematic to a part or a hierarchical block, you can specify a full path and filename in the Library text box. So, although you can specify a library that has not been saved, do not descend into the attached schematic folder until the library that contains the schematic folder has been saved.
If you do not specify a full path and filename in the Library field, Capture expects to find the attached schematic folder in the same design as the part of the hierarchical block to which it is attached. If the specific schematic folder does not exist in either the design or library, Capture creates the schematic folder when you descend the hierarchy on the part or hierarchical block.
For compatibility with future versions of Windows, Capture preserves the case of the path and file name as you specify them in the Library field.
To extend a net across schematic pages within a single schematic folder, do the following:
- Open the schematic page editor on a page that contains the net.
- From the Place menu, choose the Off-Page Connector command.
- Select a symbol and enter a name in the Name field; then click OK.
- Connect the off-page connector to the net, either by name or by wire.
- For each schematic page on which the net resides (and within the same schematic folder), repeat steps 1 through 4, using the same name for each off-page connector you place.
To extend a net through a hierarchy, do the following:
- Open the schematic page editor on the parent page.
- Place a hierarchical block, then assign a name to the hierarchical block.
OR
Place a non-primitive part. - If necessary, attach a schematic folder to the hierarchical block or part.
- If you placed a hierarchical block in step 2, then from the Place menu, choose the Hierarchical Pin command and assign the pin a name.
- Open a schematic page in the attached schematic folder.
- Place a hierarchical port using the Hierarchical Port command with the same name of the hierarchical pin you used in step 4, then place wires to connect the hierarchical port to the net.
- Repeat steps 4 through 6 for each hierarchical pin in the hierarchical block, or for each pin on the part.
- Be careful not to create recursion in your design. Capture cannot prevent recursion, and the Design Rules Check command does not report it.
- If you attach external schematic folders or other files to hierarchical blocks in a design or parts in a library, be sure to include the attachments when you pass the design or library to a board fabrication house or to another engineer. Attached schematic folder and other files are not carried along automatically when you copy or move a part, schematic folder, or schematic page to another library, design, or schematic folder. Only the “pointers” to the attached schematic folders and files—that is, their names and the names of the designs or libraries that contain them—are carried along.
Attached files work much like their counterparts in email—they do not provide an alternative definition of the part (as do attached schematic folders).
Shortcuts
Tool palette: 


EXAMPLE
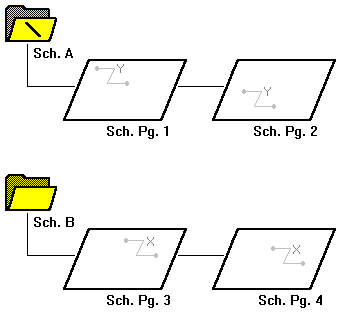
This figure shows two schematic folders, A and B, with two schematic pages each. The schematic folder marked with a backslash (\) is called the root schematic folder. In this demonstration, you see how to create a simple hierarchy.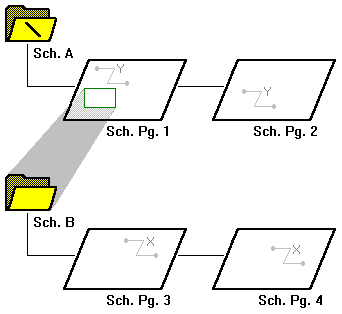
To establish the hierarchy with schematic folder A above schematic folder B, do the following:
- Place a hierarchical block on schematic page 1.
- Attach schematic folder B.

To carry a net between schematic folders A and B, do the following:
- Select the hierarchical block on schematic page 1 and place a hierarchical pin named X inside it.
This hierarchical pin is a point of attachment for electrical connections between the hierarchical block and other objects on schematic page 1. - Place a hierarchical port named X on schematic page 3.
This hierarchical port is a point of attachment for electrical connections between schematic page 3 and other schematic pages. It is connected by name to the hierarchical pin inside the hierarchical block on schematic page 1.
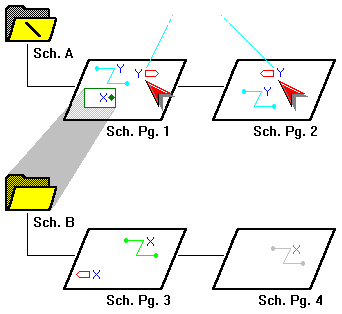
Hierarchical ports generally carry a net "up" through a hierarchy. In the root schematic folder, they usually represent external signals such as physical connectors on a PC board.
Note that hierarchical ports in schematic folder A are electrically connected by name, so any like-named connectivity objects on schematic pages 1 and 2 are part of a single net named Y. You could make either one (but not both) of these hierarchical ports an off-page connector without affecting the electrical connections.
To connect the schematic pages in schematic folder B, place an off-page connector named X on both schematic pages 3 and 4. Any like-named connectivity objects on schematic pages 3 and 4 are part of a single net named X.

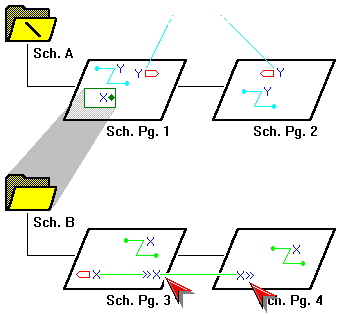
To connect the X and Y nets, it is not enough simply to rename one set of objects, as shown here. Again, the hierarchical pin does not bring the "green" net X out of the hierarchical block and onto the schematic page.
When you physically connect any part of the "blue" net X to the hierarchical pin inside the hierarchical block, the nets are joined.
Using Intersheet References
Intersheet references indicate the source and destination of schematic page and schematic signals in your design, making it easier to trace signals and find errors in the electrical connectivity of your design. Compare this to off-page connectors, which are used for signals between schematic pages within the same schematic, or hierarchical ports, which are used for signals between schematics.
An intersheet reference for an input signal indicates all the schematic pages from which the signal originates; an intersheet reference for an output signal indicates all the schematic pages to which the signal travels.
For example, an output hierarchical port with intersheet references 35, 42, and 61 indicate that the signal goes to schematic pages 35, 42, and 61.
In this section:
- Creating Intersheet References
- Guidelines for Creating Intersheet References
- Intersheet references in a flat design
- Intersheet references in a hierarchical design
- Intersheet References Reports
- Signal Navigation in Capture
Creating Intersheet References
To add intersheet references, do the following:
- Choose the Tools – Intersheet References menu command.
The Intersheet References dialog box displays.
You can also access this dialog box by choosing the Annotate option on the Tools menu. Then in the Annotate dialog box select the Add Intersheet References option and click OK. - Select the Place On Off-Page Connectors option if you want the intersheet references placed on off-page connectors.
- Verify that the value used for X Offset is correct. This option adjusts the horizontal spacing between the port name and the intersheet reference. Increase the value to increase the separation.
- Select or clear the option in the Port Type Match Matrix group box as required to specify how port types are to match each other when creating intersheet references.
- Click OK. Capture performs error checking on your design while it generates intersheet references.
-
To generate a report of the intersheet references of the selected design, select the View Report option and specify the name of a CSV file in which you want to create the report.
Use the Intersheet references command, with the option to generate the .csv output file. This file will be available in the Outputs folder in the Project manager.
- If any design errors are encountered during the creation of intersheet references, a message box appears asking if you want to view the errors or warnings in the session log. Choose either the Yes button or the No button, as appropriate. If no design errors are encountered during report creation, the intersheet references are added to your design.
To remove intersheet references, do the following:
- Choose the Tools – Annotate menu command.
The Annotate dialog box appears. - Select Delete Intersheet References, and click OK.
All the intersheet references are removed from the design.
Guidelines for Creating Intersheet References
When generating intersheet references for a design, Capture uses a number of rules. The following set of guidelines will help you understand the details of how the intersheet references are generated and the points you need to keep in mind when running this command.
- Same name Off-page connector and Port
If an off-page connector and a port on the same page have the same name, no intersheet reference will be generated if another off-page connector or port of this name does not exist on another page. Also, two warning messages will be logged for the two un-connected signals. - Hanging Off-page Connectors
If a page contains two off-page connectors that are not connected to any pin (know as hanging off-page connectors), the intersheet references for these two off-page connector will be generated. However, if these hanging off-page connectors exist on different pages, the Intersheet references will not be generated. Also, two warning messages will be generated for the two un-connected signals. - Placing Intersheet References
When placing an intersheet reference, if the net symbol is a left port or off-page connector, the IREF will be displayed to the right of the graphical lines. If the net symbol is a right port or off-page connector, the IREF will be displayed to the left of the graphical lines. - Zone Information for Port
The zone information will not be displayed for a port that is inherited from a hierarchical pin. However, the zone information will be displayed if that signal is routed to another page. - Multiple Occurrence Port
If a port has multiple occurrences, then all the pages are appended to the IREF property for each occurrence of the port. - Bus Intersheet References
If a design has two buses and the hierarchical ports on these bus are EN2[7..0] and EN2[0..7], then one a intersheet reference will be displayed for each port, showing connectivity between the two buses. However, a warning will be displayed in the session log stating that the hierarchical port EN[7..0] appears twice on the same page.
If an off-page connector with the name A[15:0] is connected to a hierarchical port with the pin name A[0:3], then pin A0 on the hierarchical block is mapped to A15. This implies that the flatnet name for this pin is A15 and not A0.
If the off-page connector name is A[15:0], then intersheet references are generated on pages that have flatnets with names A0, A1 through A15.
If an off-page bus is placed on the top page of a design and another off-page bus on another page of the design, then the intersheet references will be generated only if the appropriate bus bits are specified on the off-page defined in the latter page of the design. To verify this, you need to open the property editor for each bus bit and check the schematic net and flatnet name defined for the bit. - Grid Display Option
If an off-page connector is connected to a hierarchical pin, in the Intersheet References grid display option, the grid information is not displayed with the port. - Port Page Number Append
The port page number will be added to an off-page connector intersheet reference only when the net connected to the off-page is connected to a part pin and a is port connected to the same net on the other page. - Generate Intersheet References
The following matrix provides a snapshot of the scenarios for Intersheet References:
|
Scenario |
IREF Generated |
|
Port is a bus, bus bit is a port or net name equals to bus bit |
YES |
|
Port is a bus, bus bit is an off-page connector or net name equals to bus bit |
NO |
|
Off-Page connector is a bus, bit is an off-page connector or net name equals to bus bit |
NO |
|
Port is a bus and a bus with same name exists |
YES |
|
Off-page connector is bus and a bus with same name exists |
YES |
|
Same port name exists on same page |
YES |
|
Same off-page connector name exists on the same page |
YES |
Intersheet references in a flat design
For every off-page connector on the pages of a flat design, the intersheet reference of its port will be attached to that connector.
Take the example of the following flat design that contains three pages.
Note the off-page connectors (con_A, Con_B and Con_C) used to the parts across the three pages.
Notice the output if you create intersheet references to trace the signals across the pages of this design: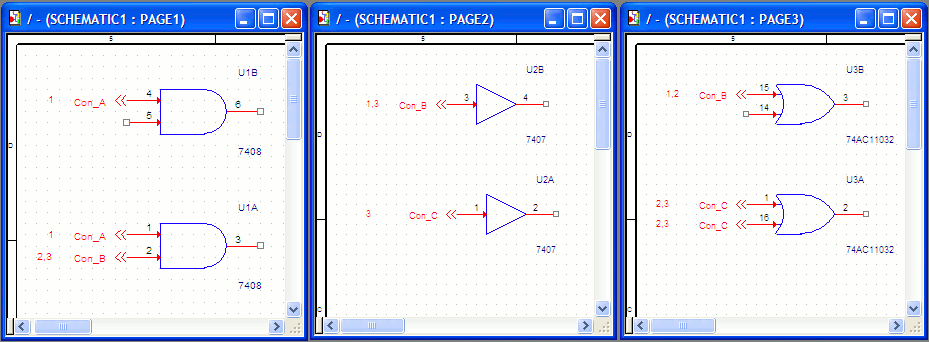
Con_A:
Since the two connectors lie on page 1, the intersheet references are defined as 1 for both connectors.
Con_B
On page 1 the reference is defined as 2,3. This implies that the signals for this connector exist on page 2 and page 3.
Similarly, if you see the Con_B reference on page 2 is 1, 3 and the reference on page 3 is 1,2.
Con_C
The page 2 reference for Con_B is 3 since the signals for this exist on page 3. Now the page 3 reference for both Con_C connectors on page 3 show as 2,3. This implies a signal exists on page 2. Also, another signal for this connector exists on page 3 itself.
In a design containing a large number of pages and signals, you use the signal navigation facility in Capture to navigate connected signals across pages on your design.
Intersheet references in a hierarchical design
Take the example of the FULLADDER design that contains two occurrences of the HALFADD hierarchical blocks.
Note that the hierarchical blocks on the FULLADD page are connected to the two HALFADD pages via hierarchical ports.
Notice the output if you create intersheet references to trace the signals across the pages of this design: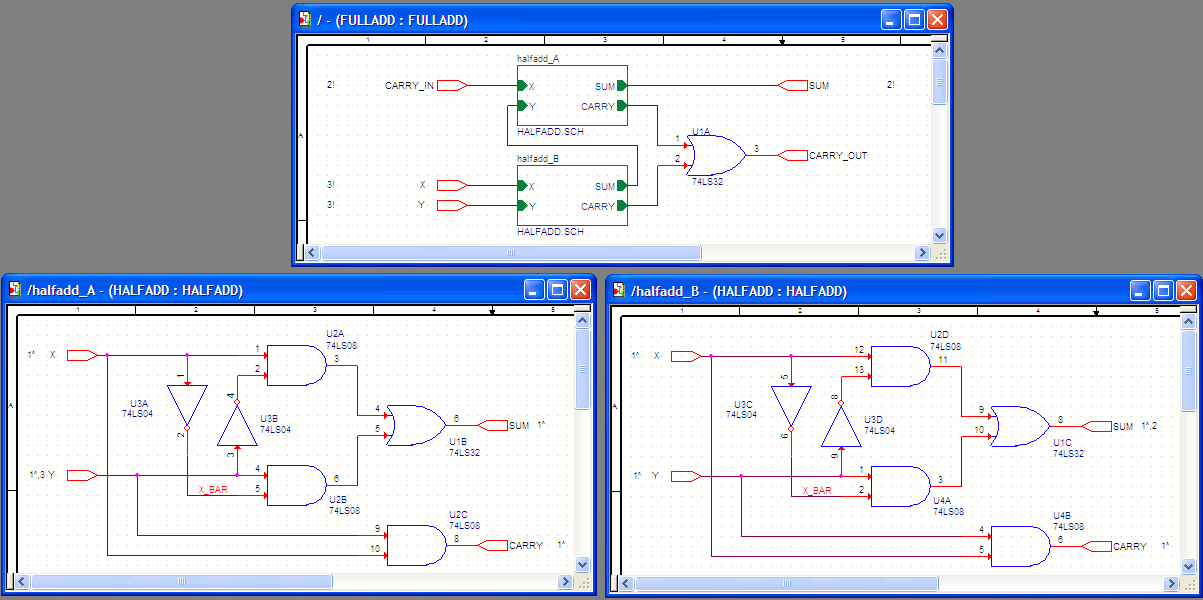
CARRY_IN (FULLADD)
The intersheet reference for the CARRY_IN port on the FULLADD page is defined as 2!. This implies that the signal for this port is on page two of the design (halfadd_A). Also, the exclamation (!) symbol implies that the connected signal exists one level lower in the hierarchy.
X (FULLADD)
The reference for the X port on the FULLADD page is defined as 3!. This indicates that the connecting signal is on page 3 (halfadd_A), and the exclamation symbol implies that the connecting signal exists one level lower in the hierarchy.
X (halfadd_A)
The intersheet reference for the X port on the halfadd_A page is defined as 1^. This indicates that the connected signal exists on page 1 (FULLADD). Also, the caret (^) symbol implies that the connecting signal exists one level higher in the hierarchy.
Y (halfadd_A)
The reference for the Y port on the halfadd_A page 1^,3 defines that one connecting signal exists on page 1 (FULLADD) and the caret symbol indicates that this signal exists one level higher in the hierarchy. The second connecting symbol exists on page 3 (halfadd_B). Similarly, the intersheet reference for the SUM port on the halfadd_B page is 1^,2.
In a complex design containing a large number of pages and signals, you use signal navigation facility in Capture to navigate connected signals across pages on your design.
Intersheet References Reports
When you create the intersheet references for a design, the Intersheet References dialog box provides an option to create a report file (in the .csv format). This report file provides a complete list of all the connected signals on your design.
The following report file sample is generated from the FULLADD design.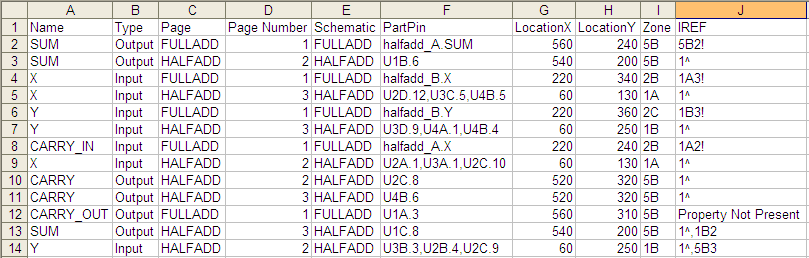
As an example, see the following two selected rows from the report:
| Name | name of the port or off-page connector |
| Type | signal type |
| Page | the page on which the port or off-page connector exists |
| Page Number | defined by the Page Number property of the title block on that respective page |
| Schematic | schematic folder containing the specific pages |
| PartPin | the part and pin combination connected to the port or off-page connector |
| LocationX | the X-axis location on the schematic page grid for the port or off-page connector |
| LocationY | the Y-axis location on the schematic page grid for the port or off-page connector |
| Zone | the zone location on the schematic page grid for the port or off-page connector |
| IREF | is the reference of the connected signal. Notice in the first item the reference is 1A3!. This means that the connected signal exists on the 1A zone of page 3 of the design and is one level lower in the hierarchy |
Signal Navigation in Capture
You can use the signal navigation feature in Capture to navigate the connected signals on a design. This feature allows you to select a signal that you want to trace. Capture then browses for all the connected signals on the design. Finally, you can select and highlight the signals from the browse list.
To find and navigate the signals on a design, do the following:
- Select the off-page connector, hierarchical port, net or bus to find its connecting signals.
- Right-click and choose Signals.
- A browse list appears with all the signals that are connected to the currently selected signal.

- Double-click on a signal in this list to navigate to the connected signal.
Working with Nets
A net comprises the wires, buses, parts, and symbols that are logically connected via net names, net aliases, off-page connectors, and hierarchical ports.
Assigning Net Aliases
A net is not required to have an alias, but by using an alias, you can establish connectivity.
Within a schematic page, a net with an alias is connected to any net with the same alias, or to any off-page connector, hierarchical port, or global pin with the same name.
A net alias differs from a net name in that a net can have numerous aliases, but it can have only one name. When the Create Netlist tool resolves the conflict between the various aliases attached to a net, the net alias has the highest priority; so by assigning a net name, you can determine the final name of your net.
When you place a wire, it is assigned a system-generated name. When you place a net alias on the wire, the system-generated name is replaced by the alias.
A net alias is visible at the location where you place the alias, You may find it useful to label the net throughout your project.
To create a net alias, do the following:
-
Choose the Place – Net Alias menu command.
- Enter the net alias text in the dialog box that appears, then click OK. A rectangle representing the net alias is attached to the pointer.
- Use the mouse to move the net alias and click the left mouse button on the wire to place the net alias. The net alias appears in the selection color. The tip of the pointer must be touching the net for you to place the net alias.
- Select the selection tool to dismiss the net alias tool. The alias is added to the alias list for the net.
Shortcut
Tool palette: 
To assign a net name, do the following:
- Select the wire.
-
Choose the Edit – Properties menu command.
The Property editor window opens to the Schematic Nets tab. - Change the entry in the Name column to one of the existing net aliases and close the property editor.
To edit a net alias, do the following:
- Select the net alias.
- From the Edit menu, choose the Properties command.
- In the dialog box that appears, you can change the color, the font, the rotation and the alias itself.
- Click OK.
To move net alias text, do the following:
- Select the net alias text on a net. A handler appears around the net alias text.
- Drag the net alias text handler to the location (on the same net) where you want to place it.
Note: You can not move a net alias outside of a net segment. - Drop the net alias handler. The net alias text appears in the new location on the net.
To display the net alias at multiple locations, do the following:
- Select the portion of net where you want the alias to be visible.
-
Choose the Edit – Properties menu command.
The property editor appears. - Click the New button. The Add New Property dialog box appears.
- Assign a name, such as NAME1, to the new property. Do not assign a value at this time. Click OK to dismiss the Add New Property dialog box.
- Select the cell of the new property, and click the Display button.
- Select the Value Only Display Format option, and click OK.
- Click Apply, and then close the property editor.
- Repeat steps 1 through 7 for each location where you want the alias to appear, assigning another property name (NAME2, NAME3 . . .) at each location.
- Use the Update Properties tool to assign the net's alias as the value to the properties NAME1, NAME2, NAME3 . . .
Editing Nets
A net is one or more wires that are physically connected or that have been connected by a net alias, a hierarchical port, or an off-page connector. In addition, all like-named power pins, power objects, and attached wires throughout the project constitute a net, unless they have been isolated.
You can edit a discrete wire, a wire segment, or you can edit the net as a whole. You can also easily edit or add to the properties of multiple nets.
Finding a Net
To find and select a net, do the following:
- In the project manager, select the schematic folder or schematic pages that you wish to search.
-
Choose the Edit – Browse – Nets menu command.
The Browse Properties dialog box pops up and the Browse Nets window opens in a tab displaying a list of all nets by name and by alias.
OR
Choose the Edit – Browse – Flat Netlist menu command.
The browse window displays a list of the nets that appear in netlists.
OR
Choose the Edit – Find menu command, and then type an asterisk (*) in the Text to Search field and click the Find button.
The Find window displays a list of all the nets by name and by alias. - From the list, double-click on the name of the desired net. The schematic page editor opens with the net appearing in the selection color.
- Right-click to display the pop-up menu.
-
From the menu, choose the Select Entire Net command.
All net segments on the active page appear in the selection color.
The status bar displays the net name of a selected net or wire.
Remember that nets on a schematic page are electrically connected by name, by alias, or by connection to a named hierarchical port or off-page connector.
Editing Net Properties
To edit net properties, do the following:
- Select a segment on the net.
-
Choose the Edit – Properties.
The property editor appears. - Change the filter to Capture.
- Use the property editor to edit, add, or remove properties as necessary.
Deleting a Net
To delete a net, do the following:
- Select the net.
- Right-click on the net and choose Select Entire Net.
- Choose the Edit – Delete menu command.
Tracing Nets
When you need to trace a net, you may not know all the net aliases or how many schematic pages the net touches. Using Capture, you can overcome these problems and find every portion of the net. You will need to start with a portion of the net selected in the schematic page editor, or with a net name, an off-page connector name, or a hierarchical port name. If you start with a name, use the Power Pins command of the project manager to locate a portion of the net.
The actions involved in tracing a net can be done in any order. Typically, you locate a part of the net, highlight all portions of the net on the same schematic page, follow the net onto other schematic pages in the same schematic folder, and then follow the net into other schematic folders.
To find a net using a name, do the following:
- In the project manager, select the schematic folder that holds the name. If you do not know which schematic folder holds this portion of the net, select all schematic folders (press Ctrl while you click on a schematic folder to add it to the selection set).
- Choose the Edit – Find menu command.
The Find toolbar displays. - In the Text to Search field, enter the name or a wildcard character in the Search options list and specify if it is the name of a net, an off-page connector, or a hierarchical port.
- Click the Search button to initiate the search.
A list of all the objects that match your search criteria appears in the Find window. - Double-click an item in the Find window.
The schematic page editor opens with the net or off-page connector or hierarchical port selected.
To locate and highlight all the wires of a net on a single page, do the following:
- Click a wire of the net to select the wire.
- Right-click the wire and choose Select Entire Net.
All the wires of the net appear in the selection color. You may need to zoom out to see the entire net.
Nets on a schematic page are electrically connected by name, by alias, or by connection to a named hierarchical port or off-page connector.
To trace a net across pages of a schematic folder, do the following steps:
- Locate and highlight all wires of the net on one page.
- Scan the selected net for off-page connectors and for hierarchical ports not inside a hierarchical block.
For each off-page connector or hierarchical port, note the name. - In the project manager, select the current schematic folder.
- Choose the Edit – Find menu command.
The Find toolbar displays with the Find field selected. - In the Text to Search field, enter the name, select Off-Page Connectors, then click the Find button.
The Find window displays a list of off-page connectors with the specified name. - For each entry in the Find window, double-click on the entry.
The schematic page editor opens with the off-page connector appearing in the selection color. - Repeat step 2, selecting Hierarchical Ports in the Find list on the Find toolbar.
To trace a net between schematic folders, do the following:
- Locate and highlight all the wires of the net on one page.
- Scan the selected net for hierarchical ports not inside a hierarchical block.
- For each port, note the name.
- In the project manager, select all schematic folders except the active folder.
- Choose the Edit – Find menu command.
- In the Text to Search field, enter the name, select Hierarchical Ports, then click Find.
The Find window displays a list of hierarchical ports with the specified name. - For each entry in the Find window, double-click on the entry. The schematic page editor opens with the hierarchical port appearing in the selection color.
As you place buses and wires, remember the following points:
- A bus and a wire can be connected only by name.
If you begin or end a bus segment on a segment of a wire, a vertex is added to the wire and a junction appears, but the bus and wire are not electrically connected.
If you begin or end a wire segment on a segment of a bus, a vertex is added to the bus and a junction appears, but the wire and bus are not electrically connected. - Two buses or two wires can be connected physically.
If you begin or end a bus segment on a segment of another bus, a vertex is added to the second bus, and a junction appears—the buses are connected.
If you begin or end a wire segment on a segment of another wire, a vertex is added to the second wire, and a junction appears—the wires are connected.
Capture preserves the case of part names and net names, but ignores the case when comparing names for electrical connection. That means you may use uppercase or lowercase letters as you wish, but you need not remember the case.
When you attach a schematic folder to a part or hierarchical block, you can specify a full path and file name in the Library text box. So, although you can specify a library that has not been saved, you should not try to descend into the attached schematic folder until the library that contains the schematic folder has been saved.
If you do not specify a full path and filename in the Library field, Capture expects to find the attached schematic folder in the same design as the part of hierarchical block to which it is attached. If the specified schematic folder does not exist in either the design or library, Capture creates the schematic folder when you descend the hierarchy on the part or hierarchical block.
For compatibility with future versions of Windows, Capture preserves the case of the path and filename as you specify them in the Library field.
Using NetGroups
A NetGroup is a collection of nets. The nets in a NetGroup can be scalar, vector or a combination of both. You can create a NetGroup that consists only of nets (like a bus). You can also create a NetGroup that consists of nets (scalar and / or vector), consists of buses and consists of other NetGroups.
In this section:
- NetGroups
- Named NetGroup
- Unnamed NetGroup
- Components of a NetGroup Block
- Netlising NetGroup Designs
- NetGroup Connectivity
NetGroups
By definition, a NetGroup is a completely heterogeneous collection of nets. Unlike a bus, which is a homogeneous collection of nets (scalar or vector), a NetGroup provides a greater flexibility in grouping nets together.
For example, you can collect together a large number of signals on a page of a schematic into a NetGroup. You create an off-page connector and then connect all the signals on the NetGroup to the signals on another page.
To create a NetGroup, you use the following objects (that are NetGroup-aware):
- Off-page connector
- Port
- Bus Wire
- Pin
- Global
When you create a NetGroup and define a property for the NetGroup, this property is inherited by all the constituent nets of the NetGroup.
You can create two types of NetGroups, a named NetGroup or an unnamed NetGroup.
When you add a NetGroup to a design, the design database version is upgraded to v16.5. This implies that the design can now not be opened in any version of Capture prior to v16.5. However, you can choose to remove all the NetGroups from a design (if you need to open the design in a previous version), by choosing Save As from the File menu and clicking the Remove NetGroups from the design checkbox.
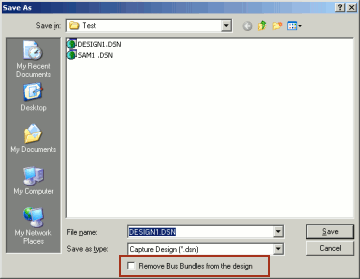
Named NetGroup
When you create a named NetGroup, you need to specify the associated NetGroup definition and then specify a name for the NetGroup. This type of NetGroup is persistent and can be instantiated across a design. The NetGroup can also be exported as a library and then instantiated and used in other designs. However, if you need to create a NetGroup for one-time use, you create an unnamed NetGroup.
Creating NetGroups
To create a named NetGroup
-
Choose NetGroup from the Place menu in Capture.
The Place / Create NetGroup dialog displays.
You use this dialog box to build associated NetGroup definitions that you can use anywhere in your design.
- To specify a new associated NetGroup definition, click the Add NetGroup button.
The New NetGroup dialog displays.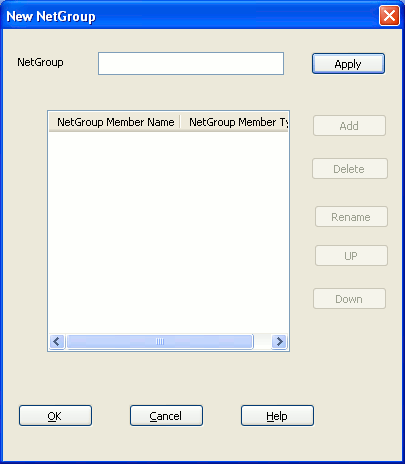
- In the NetGroup Name text box, enter the name of the NetGroup and click Apply.
- To add a new NetGroup member, click the Add button.
Note:The Add button is disabled until you specify the NetGroup name and click Apply.
The Add NetGroup Member dialog displays.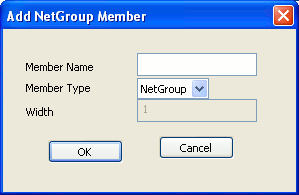
You can add NetGroups, buses or scalars as members of a NetGroup.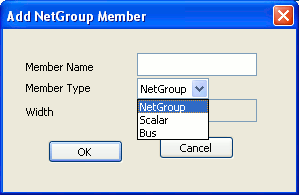
If you add a NetGroup or a bus, you need to also specify the width of the member. For example, if you add a NetGroup named AD that contains five signals, you will specify the name as AD[0..4] or AD[5-9]. The same holds true for buses.
When you add a bus or a NetGroup as a member of a NetGroup definition, you need to specify the bus or NetGroup member using the normenclature [LSB..MSB]. The least significant byte followed by the most significant byte.
Modifying NetGroups
If you add a NetGroup as a member to a NetGroup, the new NetGroup is also available for use as a NetGroup on its own. So in the Place NetGroup dialog, you will see the new associated NetGroup definition.
In the New NetGroup dialog, you can also rename or delete existing NetGroup members. You can also move the existing members up and down.
You move the positions of the members of a NetGroup, up or down to specify the horizontal position they will display in when you place the NetGroup on a page.
Renaming a NetGroup Member
To rename a NetGroup member
- In the New NetGroup or Modify NetGroup dialog, select the NetGroup member to rename.
- Click the Rename button.
The Rename NetGroup Member dialog displays. - Type a new name for the member and click OK.
When you rename a NetGroup member that is either a NetGroup or a bus, you need to ensure that you only change the name of the member. This implies, in the rename procedure, you cannot change the width of the member.
When you rename a NetGroup member that is a NetGroup, you need to rename the NetGroup to the name of an existing NetGroup not already contained within the current NetGroup.
To edit a named associated NetGroup definition
- To open the NetGroup dialog, choose NetGroup from the Place menu.
- Click the check-mark next to the NetGroup you want to modify and click the Modify button.
Note: You need to click the check-mark next to the name of the NetGroup. Selecting the NetGroup name will not make the NetGroup available for edit.
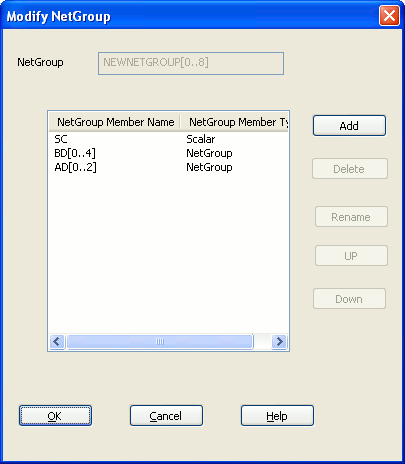
When you edit an associated NetGroup definition, you can add, delete or rename members. You can also move the positions of the existing members up and down. However, you cannot change the name of the member.
To delete a named NetGroup
- Choose NetGroup from the Place menu in Capture.
- In the Place NetGroup dialog, choose the NetGroup to delete.
- Click Delete NetGroup.
- You cannot delete a NetGroup that is used in the design.
- You cannot delete a NetGroup that is defined in another NetGroup.
- If you delete a NetGroup (say, N1) that contains other NetGroups (say, SubN1 and SubN2)), the top level NetGroup (N1) is deleted. However, the contained NetGroups (SubN1 and SubN2) are not deleted.
Copy and Paste NetGroups across Designs
You can use the Capture Copy and Paste commands to copy a NetGroup from one design to another. This functionality is the same as for other schematic page objects.
When you copy a NetGroup to another design, the associated NetGroup definition is also copied. This means that if you open the NetGroup dialog, you will see the associated NetGroup definitions now available for use in the new design.
Also, if you copy and paste a NetGroup into another design and NetGroups of the same name exist in the destination NetGroup, the NetGroups in the destination design will not be overwritten.
Modifying Pins in a NetGroup
To add or remove pins from a netgroup
- Select the NetGroup on the design.
- Choose Add/Remove Pins on NetGroup Block from the pop-up menu.
- Select the pins to add or remove selection from pins that you want to remove.
- Click OK.
You can click to add the pins.
Exporting and Importing Associated NetGroup Definitions
You can export the NetGroups defined in a design to an associated NetGroup definition xml file. These NetGroups can then be imported and used in any other design.
To export an Associated NetGroup to a Definition Xml
- From the Place menu choose NetGroup
- Open the NetGroup dialog
- Click Export NetGroup.
- In the Save As dialog, specify the name and destination of the NetGroup definition xml.
When you run the Export NetGroup command in Capture, all the named NetGroups in the current design are exported to the definition xml.
This implies the unnamed NetGroup definitions are not exported.
To import an Associated NetGroup Definition Xml
- From the Place menu choose NetGroup.
- Open the NetGroup dialog.
- Click Import NetGroup.
The Associated NetGroup Definitions xml files dialog box displays. - Enter the full path of the associated NetGroup definition xml file or browse to and select the associated NetGroup definition xml file and click Open.
The NetGroups contained in the file are imported into the current design.
Placing NetGroups
Placing a named NetGroup on a page
After you define a NetGroup, you can place the NetGroup on the page of the design.
You can place a named NetGroup on a page as:
- a block
- a hierarchical port
- an off-page connector
- a hierarchical pin
You can change the default settings in the NetGroup section of the Extended Preferences Setup window (Options – Preferences – More Preferences).
To place a named NetGroup as a block
- To place a NetGroup as a block you need to go to the NetGroup dialog box. This box is open if you have just created a new associated NetGroup definition or you can open this from the NetGroup menu item on the Place menu.
When placing a NetGroup on a page, you have the option to place the entire NetGroup or place only selected members of the NetGroup. - To place the entire NetGroup on the page, click the check box to the left of the NetGroup name.
(To place only selected members of the NetGroup, expand the NetGroup node and click the check boxes to the left of the selected members.)
Notice, when you click the NetGroup name check box or any one of the NetGroup member check boxes, the Name field is filled with the name of the NetGroup. This is the default name given to the named NetGroup instance, and you have the option to edit this instance name. - To place the NetGroup as a block, choose the Place NetGroup Block check box and click OK.
The cursor changes to a crosshair icon. - Draw a block to contain the NetGroup. This is done the same way as when drawing a hierarchical block on a page.
To place a named NetGroup as a hierarchical port
- To place a named NetGroup as a hierarchical port, you need to go to the Place Hierarchical Port dialog box.
To open this dialog, choose the Hierarchical Port menu item from the Place menu. - Enter a symbol for the port.
- To place the hierarchical port as a NetGroup port, choose the NetGroup Port check box.
- From the drop-down list, choose the NetGroup.
- Click OK and place the port on the page.
The look and feel of a NetGroup port is different from that of a hierarchical port.
Also, if you place the cursor over the NetGroup port, the tooltip displays the associated NetGroup definition.
To place a named NetGroup as an off-page connector
- To place a named NetGroup as an off-page connector, you need go to the Place Off-Page Connector dialog box.
To open this dialog box, choose the Off-Page Connector menu item from the Place menu. - Enter a symbol for the connector.
- To place the off-page connector a NetGroup connector, choose the NetGroup Port check box.
- From the drop-down list choose the NetGroup.
- Click OK and place the connector on the page.
The look and feel of a NetGroup connector is different from an off-page connector.
Also, if you place the cursor over the NetGroup connector, the tooltip displays the associated NetGroup definition.
To place a named NetGroup as a hierarchical pin
-
To place a named NetGroup as an hierarchical pin, you need go to the Place Hierarchical Pin dialog box.
To open this dialog box, choose Place – Hierarchical Pin.
- Enter hierarchical pin's name and choose pin type from list of pin types.
- Select the pin as bus, if hierarchical pin connects to a bus, or scalar, if the hierarchical pin connects to a wire.
- Click User Properties button to edit pin's property.
- To place the hierarchical pin as a NetGroup pin, choose the NetGroup Pin check box.
- Select the required NetGroup from the drop-down list of NetGroups.
- Click OK and place the NetGroup Pin in the hierarchical block.
Sync up and down of NetGroup pins is supported in hierarchical blocks.
Assigning NetGroup
To assign a NetGroup to a bus
- Choose Place - Net Alias.
The Place Net Alias dialog box appears. - In the Alias field, specify a name for the alias.
- Select NetGroup Aware Aliases.
- Select a NetGroup from the list. You can also edit to specify a new NetGroup name.
- Click OK.
The alias has the same width as the specified NetGroup. - Click on a Bus in the design to assign the NetGroup.
Unnamed NetGroup
An unnamed NetGroup allows you to create an associated NetGroup definition for one-time usage. This means that the associated NetGroup definition is built dynamically and the NetGroup cannot be further instantiated across the design.
A benefit of an unnamed NetGroup is that you first create a empty definition and then add signals, as required. While, you cannot instantiate the associated NetGroup definition elsewhere in your design (or page), you can, however, reference the NetGroup on other pages within the same schematic. An unnamed NetGroup can contain a scalar or a bus. However, unlike a named NetGroup an unnamed NetGroup cannot contain another NetGroup.
Creating an Unnamed NetGroup
To create an unnamed NetGroup
- Choose NetGroup from the Place menu in Capture.
The Place / Create NetGroup dialog displays. - To specify the NetGroup as unnamed, choose Place UnNamed NetGroup checkbox.
The Instance Name field displays the default name for the NetGroup (@@UNNG). You can edit this name as required. - Click OK.
- Draw a block to contain the unnamed NetGroup. This is done the same way as drawing a hierarchical block on a page.
Modifying Unnamed NetGroups
You can modify an unnamed NetGroup in the following ways:
Adding a Scalar Member to an Unnamed NetGroup
To add a scalar member to an unnamed NetGroup, do the following:
- Select the unnamed NetGroup.
- From the Place menu choose the Hierarchical Pin menu item.
The Place Hierarchical Pin dialog displays. - Enter a name for the scalar member.
- Specify the width as scalar by selecting the Scalar radio button in the Width group.
- Click OK.
The pin is attached to the cursor. - Place the pin on one of the edges of the unnamed NetGroup.
Adding a Bus Member to an Unnamed NetGroup
To add a bus member to an unnamed NetGroup, do the following:
- Select the unnamed NetGroup.
- From the Place menu choose the Hierarchical Pin menu item.
The Place Hierarchical Pin dialog box displays. - Enter a name for the bus member.
Note: The name of the bus must also define the size of the bus. - Specify the width as bus by selecting the Bus radio button in the Width group.
- Click OK.
The pin is attached to the cursor. - Place the pin on one of the edges of the unnamed NetGroup.
Deleting a Member from a NetGroup
To delete a member from an unnamed NetGroup, select the member to delete and press the Delete key.
In the case of an unnamed NetGroup, the order of the members depends on the order in which they are added to the NetGroup. Also, you can see the ordered list of members defined to the right of the NetGroup.
Placing an Unnamed NetGroup as a Hierarchical Port
To place an unnamed NetGroup as a hierarchical port, do the following:
- To place an unnamed NetGroup as a hierarchical port, you need go to the Place Hierarchical Port dialog.
To open this dialog, choose the Hierarchical Port menu item from the Place menu. - Enter a symbol for the port.
- To place the hierarchical port as an unnamed NetGroup port, choose the Show UnNamed NetGroup check box.
- From the drop-down list choose the unnamed NetGroup.
- Click OK and place the port on the page.
Placing an Unnamed NetGroup as an Off-page Connector
To place an unnamed NetGroup as an off-page connector, do the following:
- To place an unnamed NetGroup as an off-page connector, you need to go to the Place Off-Page Connector dialog.
To open this dialog box, choose the Off-Page Connector menu item from the Place menu. - Enter a symbol for the connector.
- To place the hierarchical port as an unnamed NetGroup port, choose the Show UnNamed NetGroup check box.
- From the drop-down list choose the unnamed NetGroup.
- Click OK and place the connector on the page.
Reordering Pins in an Unnamed NetGroup
To reorder pins in an unnamed NetGroup, do the following:
- Select the unnamed NetGroup on the design.
- Choose Reorder pins for UnNamed NetGroup from the pop-up menu.
The Reorder UnNamed NetGroup Pins dialog box appears. - Select any of the listed pins and click or Down to change the order.
- Click OK.
Components of a NetGroup Block
When you place a NetGroup block on a page, the block consists of a number of different parts and definitions that are different from a hierarchical block. The parts help in using the NetGroup for connectivity. These definitions help to understand the constituent members of the NetGroup.
NetGroup Entry/Exit Pin
When you define a NetGroup, you specify members of the NetGroup. You will then need to connect signals on your page to these members. On a NetGroup block these members appear as ports and are referred to as NetGroup pins. The nomenclature for a NetGroup pin is <NetGroupInstanceName>.<MemberName>.
NetGroup Pin
The benefit of a NetGroup is that you do not need to create as many exit points as the number of entry points. When you define the NetGroup, one exit point is created that holds the signals for all the entry points. This exit point is referred to as the NetGroup entry pin.
NetGroup Wire
When you connect the entry / exit pins of the NetGroup to a wire, you are effectively connecting all the signals that constitute the NetGroup into one wire. This wire is known as the NetGroup wire.
Netlising NetGroup Designs
When you netlist a design, the signals in the design are mapped on the output netlilst.
A NetGroup is a hetrogeneous group of nets and hence the NetGroup as it is, cannot be translated as a NetGroup onto a netlist. The Capture netlisting command netlists the signals in a NetGroup by extracting out the signals when creating the netlist.
However, when the signal names display on the netlist, the names must also contain the name of the NetGroup. This prevents the possibility of duplicate signal names on the netlist. To define a NetGroup-signal name combination on the netlist, Capture uses <NetGroup Name><Separator><Signal Name>.
For example, if you create a VHDL or Verilog netlist out of a design that contains NetGroups, the output uses the dot notation to handle the signals contained in the NetGroup.

Other Netlists
While most of the netlists generated through the Capture netlist command support the dot notation to signify NetGroup signals, some netlisters (available in the Other Netlists tab of the Create Netlist dialog) do no support the dot in a net name. To handle this, Capture provides a TCL script (capCorrectNetnamesONL.tcl) that defines an alternative separator in the netlist depending on the netlister.
|
Formatter |
Name Separator |
|
orVstmodel.dll |
_ (underscore) |
|
orOhdlnet.dll |
_ (underscore) |
|
orPcadnlt.dll |
_ (underscore) |
|
orEdif.dll |
_ (underscore) |
|
orCbds.dll |
- (hyphen) |
|
orCalay90.dll |
- (hyphen) |
|
orCalay.dll |
- (hyphen) |
This TCL script runs during the netlisting procedure. This implies that if you have a custom netlister not included in Capture, and the formatter does not support the default dot separator you can update this script to specifiy an alternative separator.
NetGroup Connectivity
As the name suggests, a NetGroup allows you to group together a heterogeneous group of signals. You can use this feature to easily connect a large number of signals on a page, across pages in a design and even across a hierarchy. This section describes NetGroup connectivity using four scenarios. Two scenarios for named NetGroups and two scenarios for un-named NetGroups.
To connect signals on the same page to a NetGroup, you can use the Auto-connect to NetGroup feature of Capture . For details, see Auto-Wire to NetGroup.
If you short buses and NetGroups together, the order of preference depends on factors like the width of the bus or NetGroup. This preference defines the resultant object (bus or NetGroup), Winning bus, and the flat nets generated out of the short. For details (covering a set of scenarios), see Net Generation Scenarios.
Named NetGroup Connectivity
Using named NetGroups you can connect signals across pages in a hierarchical design. You can also use named NetGroups to connect signals across a page at the same level of a hierarchical design or across pages in a flat design.
Using a Named NetGroup to connect signals across a hierarchy
A NetGroup enables the connectivity of signals across the levels of a hierarchical design.
Scenario 1

In this example, the signals at the top level (SCHEMATIC1:PAGE1) of the design need to be connected to signals on the page SCHEMATIC2:PAGE1 at lower levels of the hierarchy.
- The signals on SCHEMATIC1:PAGE1 are first tapped into a large NetGroup, PCIX. This NetGroup contains the signals of this page that needs to be connected to pages across the hierarchy.
Four signals (a, b, c & d) need to be connected from the top level to the signals on SCHEMATIC2:PAGE1. - These four signals are first placed in a NetGroup JTAG that is then placed, as a member, in the large NetGroup PCIX.
- Next, the JTAG NetGroup is placed separately onto the SCHEMATIC1:PAGE1 page.
- The PCIX.JTAG NetGroup port is connected to the separate JTAG NetGroup.
- Each NetGroup port of the JTAG NetGroup is then connected to the corresponding ports, a, b, c & d of the hierarchical block of SCHEMATIC2.
- Finally, on the page SCHEMATIC2:PAGE1, four off-page connectors, a, b, c & d, are created to tap out the corresponding signals from SCHEMATIC1:PAGE1.
Scenario 2
In this example, the four signals, a, b, c & d are connected to signals on SCHEMATIC3:PAGE1 using a NetGroup off-page connector.

- Again, the signals on SCHEMATIC1:PAGE1 are first tapped into a large NetGroup, PCIX, containing 19 signals.
- In this case, the PCIX.JTAG NetGroup port is connected to the JTAG hierarchical port of the SCHEMATIC3 hierarchical block.
- Finally, on SCHEMATIC3:PAGE1, the JTAG signals are tapped out by placing a JTAG NetGroup connector.
Using a Named NetGroup to connect signals across pages in a design
A NetGroup also increases the ease of the connectivity of signals across the pages of a design.
In this example, you will connect signals across pages in a flat design.
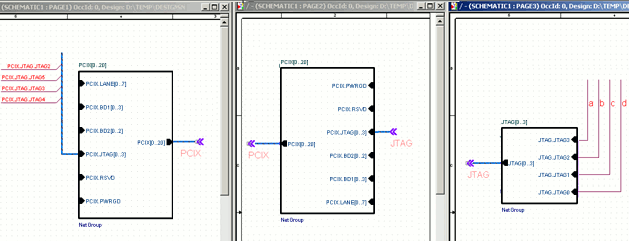
- The signals on SCHEMATIC1:PAGE1 are first tapped into a large NetGroup, PCIX, containing 19 signals. This associated NetGroup definition contains all the signals of this page that need to be connected to pages across the design.
Four signals need to be connected from PAGE1 to PAGE3 on SCHEMATIC1. - On PAGE1, these signals are connected via a bus to the PCIX.JTAG NetGroup entry point.
- The PCIX NetGroup off-page connector creates the outlet for the signals of the NetGroup.
- Another instance of the NetGroup is placed on SCHEMATIC1:PAGE2 to tap out the signals from SCHEMATIC1:PAGE1. To build the connectivity of these signals on SCHEMATIC1:PAGE2, place a NetGroup off-page connector PCIX on the page.
- The signals are part of the JTAG NetGroup (included within the PCIX NetGroup). To tap out these signals, connect a NetGroup off-page connector to the PCIX.JTAG NetGroup entry in the PCIX NetGroup on SCHEMATIC1:PAGE2.
- Next, on SCHEMATIC1:PAGE3, place an instance of the JTAG NetGroup.
- Also, place a JTAG off-page connector to the JTAG NetGroup port.
- Finally, tap out the signals from the NetGroup entry points to complete the signal connectivity.
Un-named NetGroup connectivity
Similar to named NetGroups, you can also use un-named NetGroups to connect signals across pages in a hierarchical design. Again, as in named NetGroups, in un-named NetGroups, you can connect signals across a page at the same level of a hierarchical design or across pages in a flat design.
Using an Un-named NetGroup to connect signals across a hierarchy
Along with using named NetGroups to connect signals on different levels of a hierarchical design, you can also use un-named NetGroups. We use unnamed NetGroup to group multiple signals on the fly. This implies that we create (in the design) any signals we want to include in the NetGroup.
In this example, the signals, a, b, and y, at the top level (SCHEMATIC1:PAGE1) of the design are to be connected to corresponding signals on the page, SCHEMATIC3:PAGE3 at a lower level of the hierarchy.
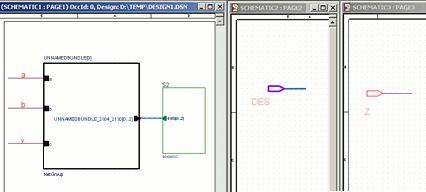
- An unnamed NetGroup is first placed on SCHEMATIC1:PAGE1.
This is an empty associated NetGroup definition so we still need to add members to this NetGroup. - Specify three scalar members for the NetGroup. These will be used as entry points from the signals a, b, and y to the unnamed NetGroup. To this, add three hierarchical pins and name them a, b, and y.
- Then connect the three signals to the NetGroup entry points.
- The NetGroup port is then connected to a hierarchical port, named DES, of the SCHEMATIC2:PAGE1 hierarchical block placed on SCHEMATIC1:PAGE1.
- The NetGroup port DES is placed on SCHEMATIC2:PAGE1.
Using a Un-named NetGroup to connect signals across pages in a design
An unnamed NetGroup can also be used to connect signals across pages at the same level of a design.
In this example, the signals on SCHEMATIC1:PAGE1 of the design need to be connected to signals on SCHEMATIC1:PAGE2.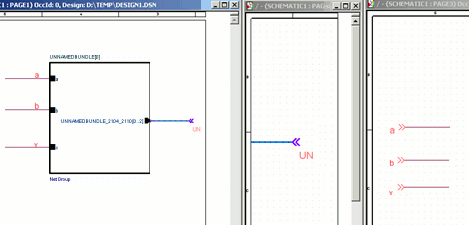
- An unnamed NetGroup is first placed on SCHEMATIC1:PAGE1.
This is an empty associated NetGroup definition so we still need to add members to this NetGroup. - Specify three scalar members for the NetGroup. These will be used as entry points from the signals a, b, and y to the unnamed NetGroup. To this, add three hierarchical pins and name them a, b, and y.
- Then connect the three signals to the NetGroup entry points.
- Since we are connecting signals across pages at the same level of a design, the NetGroup is connected to a NetGroup off-page connector UN.
- To build the connectivity of these signals on SCHEMATIC1:PAGE2, place a NetGroup off-page connector UN on the page.
- Finally, on SCHEMATIC3:PAGE3, create off-page connectors for the signals, a, b, and y.
NetGroup and Bus Member Net Generation
In a design that contains multiple NetGroups and buses, if you short two of these objects together, the signal output of the short depends on the definition of the objects.
If you short together buses and NetGroups, the resultant signal will be generated by the object with higher significance (as described in this section). In this section, the term Winning Bus is used to specify the object (bus or NetGroup) that defines the resultant signals in the connectivity of a design. This term is used in the case of a bus as well as a NetGroup.
Net Generation Scenarios
When you short a bus/NetGroup to a bus/NetGroup, the short will result in:
- a resultant object (bus or NetGroup)
- a winning bus
- the flat nets generated from the short
- the associated NetGroup definition (in case a NetGroup is involved in the short)
This table describes scenarios that you encounter when you short together NetGroups and buses in a Capture design. The table is followed by one example for each of the described scenarios.
|
Short |
Generated Object (Bus or NetGroup) |
Winning Bus |
Generated Flat Nets |
Definition |
|
Bus & Bus |
Bus |
Higher width bus |
Follow lexicographic order |
NA |
|
EXAMPLE |
||||
|
B[0..5] |
B[0..5] |
A0 A1 A2 A3 B4 B5 |
NA |
|
|
NetGroup & NetGroup - physical short |
NetGroup |
Higher width NetGroup |
Winning Bus defines flat nets |
associated NetGroup definition should match winning bus |
|
EXAMPLE |
||||
|
S[0..5] |
S[0..5] |
S.JTAG0, S.JTAG1, S.JTAG2, S.JTAG3, S.JTAG4, S.JTAG5 |
S[0..5] |
|
|
NetGroup & NetGroup - logical short |
NetGroup |
Higher width NetGroup |
Winning Bus defines flat nets |
associated NetGroup definition should match winning bus |
|
EXAMPLE |
||||
|
S[0..5] |
S[0..5] |
S.JTAG0, S.JTAG1, S.JTAG2, S.JTAG3, S.JTAG4, S.JTAG5 |
S[0..5] |
|
|
In the case of a logical (named) connection:
|
||||
|
NetGroup & NetGroup |
NetGroup |
Lexicographically smaller NetGroup |
Winning Bus defines flat nets |
associated NetGroup definition should match winning bus |
|
EXAMPLE |
||||
|
NetGroup & NetGroup - logical short |
NetGroup |
Lexicographically smaller NetGroup |
Winning Bus defines flat nets |
associated NetGroup definition should match winning bus |
|
EXAMPLE |
||||
|
In the case of a logical (named) connection, if the aliases names of both the NetGroups is the same, only then will the two NetGroups be shorted together. |
||||
|
B[0..2] |
B[0..2] |
B.B0,B.B1 and B.B2 |
B[0..2] |
|
|
Bus & NetGroup |
NetGroup |
NetGroup |
Winning Bus defines flat nets |
associated NetGroup definition should match winning bus |
|
EXAMPLE |
||||
|
S[0..5] |
S[0..5] |
S.JTAG0, S.JTAG1, S.JTAG2, S.JTAG3, S.JTAG4, S.JTAG5 |
S[0..5] |
|
|
Bus & NetGroup |
Hybrid Bus (Bus+NetGroup) |
Higher width NetGroup |
Winning Bus defines flat nets |
associated NetGroup definition should match winning bus |
|
EXAMPLE |
||||
|
B[0..5] |
B[0..5] |
B.JTAG0, B.JTAG1, B.JTAG2, B3, B4 and B5 |
S[0..2] |
|
|
Bus & NetGroup |
NetGroup |
NetGroup |
Winning Bus defines flat nets |
associated NetGroup definition should match winning bus |
|
EXAMPLE |
||||
|
S[0..5] |
S[0..5] |
S.JTAG0, S.JTAG1, S.JTAG2 |
S[0..5] |
|
|
NetGroup wire & NetGroup OPC/GLOBAL/PORT |
NetGroup |
NetGroup OPC/GLOBAL/PORT |
Winning Bus defines |
associated NetGroup definition should match winning bus |
|
EXAMPLE |
||||
|
B[0..2] |
B[0..2] |
B.B0, B.B1, S.JTAG2, S.JTAG3, S.JTAG4, S.JTAG5 |
B[0..2] |
|
|
Bus & NetGroup OPC/GLOBAL/PORT |
NetGroup |
NetGroup OPC/GLOBAL/PORT |
Winning Bus defines |
associated NetGroup definition should match winning bus |
|
EXAMPLE |
||||
|
S[0..5] |
S[0..5] |
S.JTAG0, S.JTAG1, S.JTAG2, S.JTAG3, S.JTAG4, S.JTAG5 |
S[0..5] |
|
|
Bus & NetGroup OPC/GLOBAL/PORT |
NetGroup |
NetGroup OPC/GLOBAL/PORT |
Winning Bus defines |
associated NetGroup definition should match winning bus |
|
EXAMPLE |
||||
|
S[0..2] |
S[0..2] |
S.JTAG0, S.JTAG1, S.JTAG2, B3,B4,B5 |
S[0..2] |
|
|
NetGroup wire and Bus OPC/GLOBAL/PORT |
Bus |
Bus OPC/GLOBAL/PORT |
Winning Bus defines |
associated NetGroup definition should match winning bus |
|
EXAMPLE |
||||
|
S[0..2] |
S[0..2] |
B0,B1, B2, S.JTAG3, S.JTAG4, S.JTAG5 |
S[0..5] |
|
|
NetGroup wire and Bus OPC/GLOBAL/PORT |
Bus |
Bus OPC/GLOBAL/PORT |
Winning Bus defines |
associated NetGroup definition should match winning bus |
|
EXAMPLE |
||||
|
B[0..5] |
B[0..5] |
B0,B1, B2, B3,B4,B5 |
S[0..2] |
|
|
NetGroup wire and NetGroup connector |
NetGroup |
NetGroup connector |
Winning Bus defines |
associated NetGroup definition should match winning bus |
|
NetGroup connector and NetGroup connector |
NetGroup |
Lexicographically smaller NetGroup connector |
Winning Bus defines |
associated NetGroup definition should match winning bus |
View the next document: 12 - Working with Capture TCL
If you have any questions or comments about the OrCAD X platform, click on the link below.
Contact Us