19 - Using Capture with PCB SI
The OrCAD X Capture Signal Integrity (SI) analysis feature enables you to perform SI analysis early in the design cycle to avoid iterations at a later stage. You can launch SigXplorer on a flat net from OrCAD X Capture to perform SI analysis and associate the Electrical Constraint set (Electrical Cset) to the flat net back to Capture from SigXplorer. The complete topology file is also embedded into the DSN. Capture also supports a distributed design environment for SI analysis by enabling you to export the net connectivity as topology files that can be updated using SigXplorer and then imported to Capture.
In Capture, you can set up SI libraries, assign SI models and then explore the signals in SigXplorer. You can also export and import Electrical Csets in Capture. In addition, you can audit Electrical Csets and model assignments.
You can validate the Electrical Csets in Capture or import the topology files to Constraint Manager and perform audit on the files.
Setting up a Library
You need to specify the libraries containing the DML or IBIS models to be able to assign these models to the parts in your design. You also need to specify a working library. Capture writes the assigned models to a device DML file in the working library. You can use the Library Setup dialog box to add libraries, change priority of added libraries by changing the sequential order, and remove libraries. You can also launch the Library Management utility to specify working libraries and to ignore libraries. You will not be able to assign models from the ignored libraries.
You can launch the Model Integrity tool that helps you ensure the integrity of the model data required for high-speed circuit simulations and lets you create, manipulate, and validate models quickly in an easy-to-use editing environment.
To set up library, do the following steps:
- Choose SI Analysis – SI Library Setup to launch the Library Setup (SI Analysis) dialog box.
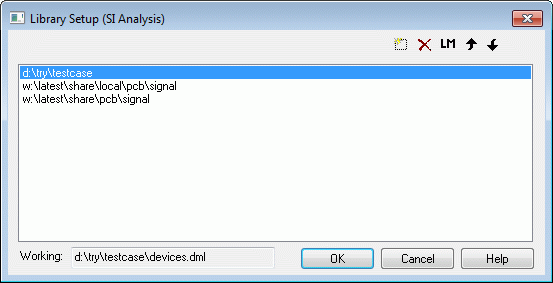
- In the Library Setup (SI Analysis) dialog box, click the Add a new library (
 ) button to add a library to list. You can also move the libraries up (
 ) or down (
 ) in the list, or delete (
 ) a library.
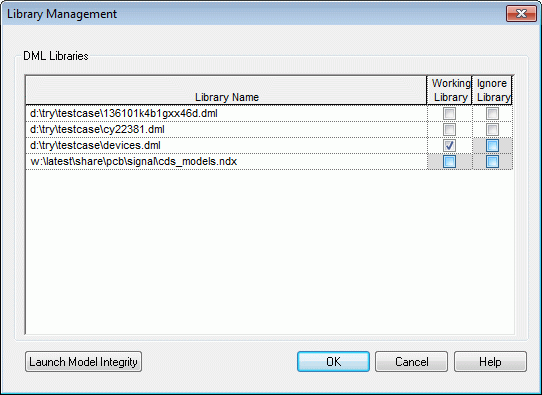 You can click the Launch Library Management button (
 ) to launch the Library Management dialog box.
 - In the Library Management dialog box, select the Working Library field for any one of the libraries to specify it as your working library.
- Similarly, select the Ignore Library field for one or more listed libraries to ignore them.
You can also launch Model Integrity by clicking Launch Model Integrity.
Assigning Models
You can assign DML signal models on instances and pins by using one of the following options:
- Assign on individual instances and pins: Select the instances on the design and choose SI Analysis – Assign SI Model or choose Signal Integrity – Assign SI Model from the shortcut menu.
This launches the SI Model Assignment dialog box.
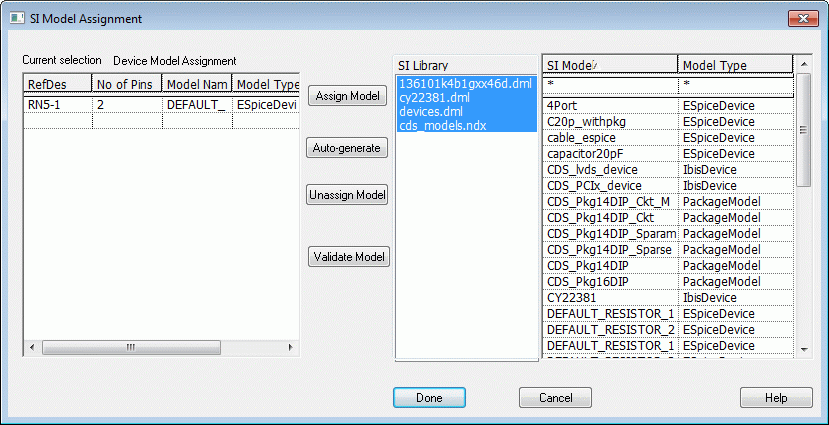
You can either assign a model from an existing library or automatically generate a model. You can also use this dialog box to validate models and remove model assignments.
You can choose View – Selection Filter and then choose Assign SI Model from the shortcut menu for any part or pin.
- Auto-assign for discrete models: Choose SI Analysis – Auto Assign Discrete SI Models.
This generates and adds default models on all the discrete devices on the design.
The SIGNAL_MODEL property is added on occurrences instead of instances if there are differences in properties or if there are multiple occurrences of an instance.
M is the symbol for Meter. If you want to assign value in the Mega range such as MegaOHM to a part, use Meg instead of M, If you use M while specifying value for a part where Meter does not make sense, the M will be ignored while defining the SIGNAL_MODEL property.VALUE property: comma (,), semi-colon (;), slash (/).You need to ensure that voltage is defined for the DC nets for proper extraction. If power and ground pins do not have voltage property, the performance might be affected. For example, if a large number of bypass capacitors are present and the ground pins do not have voltage property, the performance will be affected because each net will be explored.
- Choose SI Analysis - Identify DC Nets to modify or add voltages on the DC nets in the design.
Managing Electrical Csets
You can add Electrical Cset to your design either in the concurrent mode by exploring the signals in SigXplorer or in the distributed mode by importing Electrical Csets. After adding the Electrical Cset to a design, you can assign or associate the Electrical Csets to the nets in your design. You can also export topology files that can be opened in the distributed mode in Signal Explorer.
In both the distributed and concurrent modes, you can import the Electrical Csets in PCB Editor and launch Constraint Manager for the Electrical Csets. You can back annotate any changes to OrCAD X Capture from PCB Editor.
ERROR: unable to create property PROPAGATION_DELAY on object Xnet aaa TX+
Concurrent Mode
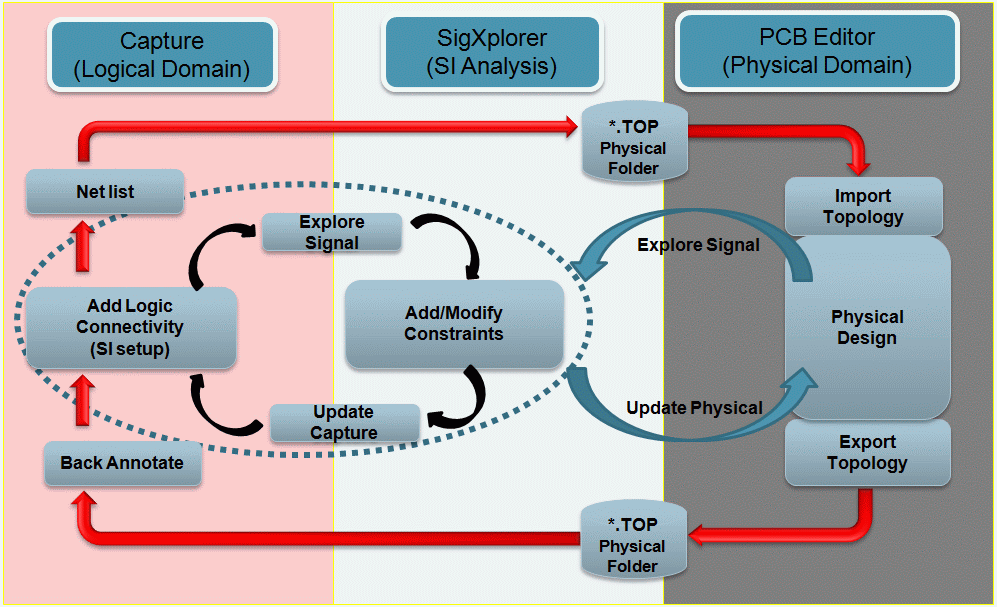
In concurrent mode, when Signal Explorer and Capture are in the same system, you can select any net on the design and choose SI Analysis – Explore Signal or choose SI Analysis – Explore Signal from the pop-up menu to generate XNET definition and launch Signal Explorer. A Topology file (.top) is generated and displayed by SigXplorer.
The displayed topology includes any discrete components with SIGNAL_MODEL property which are part of the XNET and any T-points that are part of the topology.
You can choose to change parameter values for discrete components in SigXplorer and save the topology file. In SigXplorer, choose File – Save to save the topology and then choose File – Update Capture.
When you exit Signal Explorer, the topology file is added as the value of the ELECTRICAL_CONSTRAINT_SET property of the net in Capture.
Distributed Mode
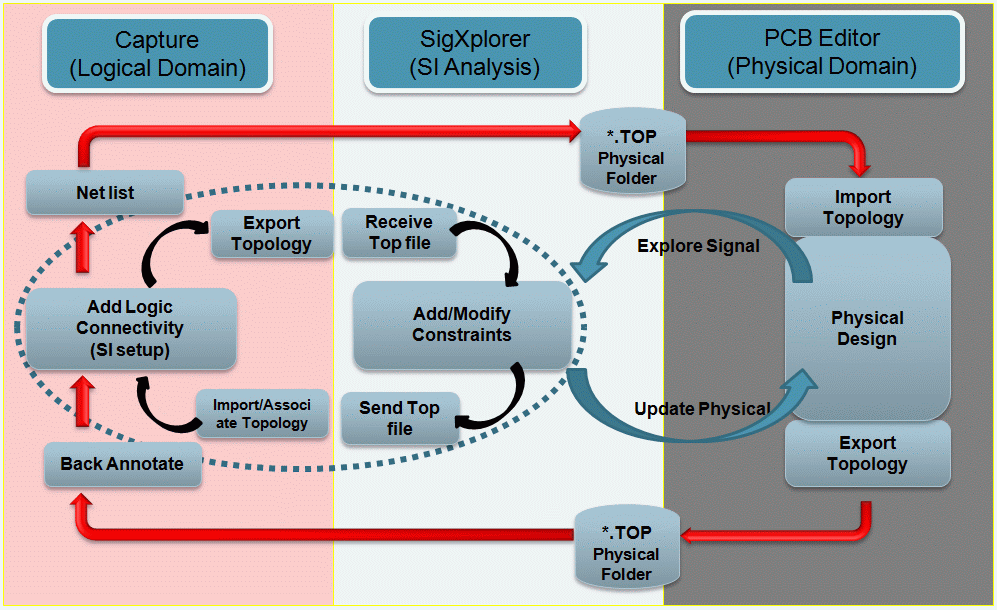
In the distributed mode, where Signal Explorer is located in another system, you can use Export Electrical Cset to export the Cset file from Capture. The exported Cset can then be sent for SI Analysis. After importing the Csets into SigXplorer and updating them, the Csets can be sent back to be imported and associated in Capture using the Import Electrical Cset menu item.
Validating Electrical Csets
You can validate Electrical Csets in Capture or in Constraint Manager.
- To validate the Electrical Csets in Capture, choose SI Analysis - Validate Electrical Cset Assignments.
To validate Electrical Csets using Constraint Manager, do the following :
- Netlist the design for PCB Editor and launch Constraint Manager.
- Import the topology file.
- Choose Audit – Topology to perform audit of the topology templates.
You can also open and make changes to the topology file in Constraint Manager.
View the next document: 20 - Managing Toolbars
If you have any questions or comments about the OrCAD X platform, click on the link below.
Contact Us