02 - Using Part Libraries
You can open and edit a library file from the (Windows) File Explorer as well as in Capture.
Instead of editing parts in libraries provided by OrCAD X, copy the part and save the changes in a custom library. In case you edit a library provided by OrCAD X, ensure that you assign a new library name using the File – Save As command from the main menu, so that your changes are not overwritten when you update or upgrade the software.
If you move a library after you place a part, the connection between the part and its library is broken. In this case, the Update Cache command cannot locate the library and you need to use the Replace Cache command and specify the new path to the library.
Adding a Library to a Project
When you add a library to a project, all the parts contained within the library become available for placement on the schematic pages.
To add an existing library to your project, do the following:
- Choose the File – Open menu command.
- Select the library you want to open.
If the library file is not listed:
- In the Look in drop-list box, select a new drive, a new directory, or both.
- In the Files of type box, select the type of file to open.
- Choose the Open button.
The project manager window opens and the library parts appear in project manager.
If you open an SDT library, Capture prompts you to save the library.
To add a recently used library to your project, from the File menu, choose the name of the library you want to add.
If you move a library after you place a part, the connection between the part and the library is broken. In this case, the Update Cache command will not find the library and you need to use the Replace Cache command and specify the new path to the library.
Library Correction Utility
The library correction utility automatically verifies and corrects missing pin numbers and duplicate pin names in the Capture symbol library by scanning through all the parts in the library, finding out, and correcting the components that have missing pin numbers and duplicate logical pin names. This utility also converts components with lowercase pin names to uppercase and makes the Power pins visible for all the components in the library.
Library Correction Utility
Use the library correction utility to fix missing pin numbers and duplicate pin names issues in a design. In the Capture schematic design to layout design flow, an error—ERROR ALG0031— is flagged, if any of the components in the design have missing pin numbers or duplicate pin names.
Use Model
For New Designs:
Yo can run this utility on library files, for correcting missing pin numbers and duplicate pin names, and use these libraries to create new designs. After correcting the libraries, you will not encounter errors, ALG0031 and ALG0050.
Correcting Existing Designs:
You can run this utility on library files for correcting missing pin numbers and duplicate pin names, and then use the Update Cache command from the Design menu.
What if you do not have libraries for Existing Design?
Though this is not the preferred way, you can copy all the design cache components to a new library and then run this utility on that library. Now use the Replace Cache command from the Design menu. In this process, design cache points to a single library after replacing the cache. This affects the canonical path in the .pst files, as the source library name is embedded in the canonical path.
If you do not have all the libraries for the existing design, perform the followings steps:
- Copy all design cache components to a new library.
- Run the library correction utility on the new library, created in step 1.
- Use Replace Cache command from the Design menu.
Correcting Missing Pin Numbers and Duplicate Pin Names
Use the library correction utility to fix missing pin numbers and duplicate pin names issues in a design.
Starting the Library Correction Utility
To run the Library correction utility, do the following:
- Choose Accessories – LibCorrectionUtil – Library Verification/Correction.
- In the Library Correction Utility dialog box, browse to the library for correction in the Select Library for Correction field.
Verifying or Correcting Library Components
Missing Pin Numbers
- Check the Missing Pin Numbers option to correct the components with missing pin numbers.
The library correction utility scans through all the parts in the library and finds out the components with missing pin numbers. All the missing pin numbers are updated by their corresponding pin names. At the end of updating process, one of the following messages appears:
"Corrected <number of parts corrected> of Parts in <lib_path>/<lib_name>.olb for missing pin numbers" or "No Part in this library has missing pin numbers".
The log file is generated at the location where the selected library resides. The naming convention used for log files is <Library_name>Miss.log. The log file lists all the parts and also the pin numbers for each corrected part in the library. If you choose the Verify option, only the log file is generated but the library is not updated.
Missing pins Log File Example:
List of verified or corrected packages:
CONNECTOR DB25No missing Pin numbersCAPACITOR NON-POLCAPACITOR NON-POL.Normal 1CAPACITOR NON-POL.Normal 21 parts in library C:\TEMP\MISSINGPIN_NUMBERS.OLB have missing pin numbers.
The last line of the log file indicates that one part in the MISSINGPIN_NUMBERS.OLB library has missing pin numbers. The pin names for the missing pin numbers are 1 and 2.
Duplicate Pin Names
- Check the Duplicate Pin Names option to correct the components with missing pin numbers.The library correction utility scans through all the parts in the library and finds out the components that have duplicate logical pin names.
– If a component has duplicate power pin names, those pins are not considered as duplicate pin names.
– To remove duplicate pin names, the library correction utility changes the duplicate pin names by appending "#" followed by the pin number to the duplicate pin names.
– The combination of the pin name and the pin number makes the pin name unique.
The first pin that this utility encounters does not get appended with # followed by its pin number.
At the end of updating process, the following message pops-up:
"Corrected <number of parts corrected> of Parts in <lib_path>/<lib_name>.olb for duplicate pin names" or "No Part in this library has duplicate pin names".
The log file is generated at the location where the selected library resides. The naming convention used for log files is <Library_name>Dup.log. The log file lists all the parts and also the corrected pin names for each of the corrected part in the library. If you choose the Verify option in the next step, only the log file is generated but the library is not updated.
Duplicate Logical pins Log File Example:
List of verified / corrected packages
ASSYMETRICALASSYMETRICALAA.Normal 2 A\#2ASSYMETRICALCC.Normal 8 A\\#874LS00No duplicate Pin names1 parts in library
C:\TEMP\DUPLICATE\_PIN\_NAMES.OLBhave duplicate pin names
The last line of the log file indicates that one part in the DUPLICATE_PIN_NAMES.OLB library has duplicate pin names. The corrected pin names are A#2 and A\#8.
Known Limitation
If all the pin types other than Power have duplicate pin names and missing pin numbers, the missing pin numbers functionality copies the pin names in place of missing pin numbers. This is followed by the duplicate pin names functionality which appends pin names to pin numbers followed by # (hash). Even then the pin names are not unique. This results in the error, Error ALG0050. For these parts, you need to edit each part and create unique pin names for each pin type other than the Power pin type.
Verifying or Correcting
- Select Verify.
The library is verified for the missing pin numbers and/or duplicate pin names and a log file is generated.
Or - Select Correct
The library is corrected for missing pin numbers and/or duplicate pin names and a log file is generated.
When you opt for correction, the library is corrected. Therefore, if you want to have a copy of the old library, you need to back-up the library. In fact, it would be always safe to make a backup of the old library before correcting the library.
Changing Casing of Pin Names and Numbers
- Select the Change the Pin name and number to uppercase option.
The utility scans through all the parts in the library and converts all the components that have pin names appearing in lowercase to uppercase.
At the end of updating process, the following message is displayed
"Changed all the Pin name to upper case. Please close the library and reopen to see the change."
When you check this option, the utility will scan through all the parts in the library and change the Power pins settings for all the non-zero length pins in the library to Visible. Additionally, you can also make all zero length Power pins in the library visible. To do this, check the Change Zero Length Pins to check box and choose an appropriate pin shape option (Line/Short) from the list box.
The Change Zero Length Pins to check box is available only, if the Make All Power Pins Visible check box is checked.
At the end of updating process this utility will pop up message: " Made all the Power Pins visible. Please close the library and reopen to see the change.“
Assumption:
This utility will put a pin name in place of an empty pin number. Matching footprints is your responsibility as a user because in some cases footprint may not match with pin numbers as shown in the following example:
|
Pin number |
Pin name |
|
1 |
A |
|
3 |
C |
|
4 |
D |
The Library Correction utility will copy B in place of the missing pin number between 1 and 3. In this case, footprint should contain pin numbers as 1,B,3,4 instead of 1,2,3,4.
Exporting and Importing a Capture Library
You can convert a Capture library (.olb) to an XML (.xml) file, by exporting it.
To export a Capture library, do the following:
- Launch Capture.
- Choose File – Export – Library XML.
The OLB to XML dialog box opens. - Specify the library file path.
The XML File field gets updated. - Change the XML file name and location, if required.
To convert a Capture library (.olb) file to an XML file, Capture uses an XML schema that is located at the following location: <installation_directory>\tools\capture\tclscripts\capDB\olb.xsd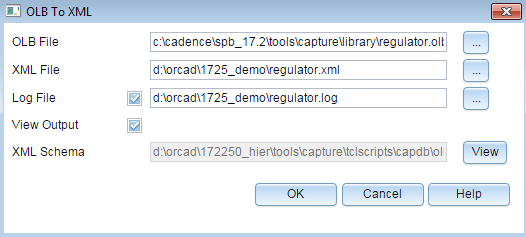
- Click OK.
The XML file is displayed if you had selected the View Output option.
To import an XML to create a Capture library, do the following:
- Launch Capture.
- Select File – Import – Library XML.
The XML to OLB dialog box opens. - Specify the input XML file path.
The OLB File field gets updated. - Click the Browse button corresponding to the OLB File field to save the generated library file at a different location. This is optional.
- Select the Overwrite Mode from the drop-down list.
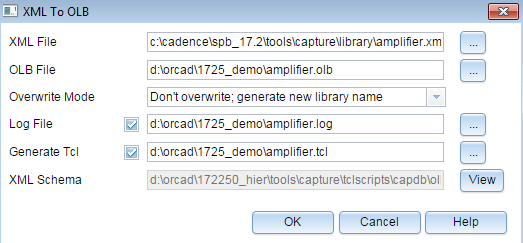
- Click OK.
The library is imported.
Opening a Library
When you open a library, you can edit it in part editor.
To open a library, do the following:
- Choose File – Open.
The Open dialog box appears. - Select the library to open.
If the library file is not listed:
- In the Look in drop list box, select a new drive, a new directory, or both.
- In the Files of type box, select the type of file to open.
- Select the Open button.
The Project Manager window opens; the library parts appear in project manager.
If you open an SDT library, Capture prompts you to save the library.
To open a recently used library, from the File menu, choose the name of the library you want to open.
View the next document: 03 - Managing Libraries on OrCAD X OnCloud
If you have any questions or comments about the OrCAD X platform, click on the link below.
Contact Us