01 - PSpice Circuit Simulation for Mixed-Signal Designs
What is PSpice A/D?
PSpice A/D is a simulation program that models the behavior of a circuit containing any mix of analog and digital devices. Because the analog and digital simulation algorithms are built into the same program, PSpice A/D simulates mixed-signal circuits with no performance degradation because of tightly coupled feedback loops between the analog and digital sections.
Used with design entry tools such as OrCAD X Capture or Design Entry HDL for design entry, you can think of PSpice A/D as a software-based breadboard of your circuit that you can use to test and refine your design before ever touching a piece of hardware.
Run basic and advanced analyses
PSpice A/D can perform:
- DC, AC, and transient analyses, so you can test the response of your circuit to different inputs.
- Parametric, Monte Carlo, and sensitivity/worst-case analyses, so you can see how your circuit’s behavior varies with changing component values.
- Digital worst-case timing analysis to help you find timing problems that occur with only certain combinations of slow and fast signal transmissions.
Digital worst-case timing analysis is not available in PSpice A/D.
The range of models built into PSpice A/D include not only those for resistors, inductors, capacitors, and bipolar transistors, but also these:
- transmission line models, including delay, reflection, loss, dispersion, and crosstalk
- nonlinear magnetic core models, including saturation and hysteresis
- eight MOSFET models, including BSIM4 version 4.1, BSIM3 version 3.2, and EKV version 2.6
- five GaAsFET models, including Parker-Skellern and TriQuint’s TOM2 model
- IGBTs
- digital components with analog I/O models (not in PSpice A/D)
Use parts from PSpice’s extensive set of libraries
PSpice A/D provides two types of libraries:
Standard PSpice libraries
The standard PSpice A/D libraries feature over 16,000 analog and 1,600 digital and mixed-signal models of devices manufactured in North America, Japan, and Europe.
Use parts from standard PSpice A/D libraries or PSpice Advanced Analysis libraries if you want to analyze the part with PSpice.
The standard PSpice A/D libraries are installed at the following locations:
- Capture symbols for standard PSpice A/D libraries are at
<install_dir>\tools\Capture\Library\PSpice\
Design Entry HDL symbols for standard PSpice A/D libraries are at<install_dir>\share\library
- Standard PSpice A/D model libraries are at
<install_dir>\tools\PSpice\Library\
PSpice Advanced Analysis libraries
The PSpice Advanced Analysis libraries contain over 4,300 analog parts. The Advanced Analysis libraries contain parameterized and standard parts. The majority of the parts are parameterized. The parametrized parts have tolerance, distribution, optimizable and smoke parameters that are required by the PSpice Advanced Analysis tools. Standard parts in the Advanced Analysis libraries are similar to parts in the standard PSpice A/D libraries.
The parametrized parts are associated with template-based PSpice A/D models. An important advantage of using the template-based PSpice A/D models is that you can pass model parameters as properties from the design entry tool. For example, if a template-based model is associated with a part, the model parameters that you specify on an instance of the part in your design will be passed to the model. There is no need to edit the model itself to change a parameter value. This is unlike the standard PSpice A/D parts that are associated with device characteristic curve-based PSpice models, where you need to edit the model to change a simulation parameter. For more information on template-based and device characteristic curve-based PSpice models.
Use parametrized parts from Advanced Analysis libraries if you want to analyze the part with an Advanced Analysis tool. Most of the analog parts in the standard PSpice A/D libraries contain smoke parameters. You can use these parts to perform smoke analysis using the Smoke tool in PSpice Advanced Analysis.
| This Advanced Analysis tool... | Uses these part parameters... |
|---|---|
|
Sensitivity |
Tolerance parameters |
|
Optimizer |
Optimizable parameters |
|
Smoke |
Smoke parameters |
|
Monte Carlo |
Tolerance parameters, Distribution parameters |
The Advanced Analysis libraries are installed at the following locations in the installation directory:
- Capture symbols for Advanced Analysis libraries at
\tools\Capture\Library\PSpice\AdvAnls\
Design Entry HDL symbols for Advanced Analysis libraries at
<install_dir>\share\library\ - PSpice Advanced Analysis model libraries at
\tools\PSpice\Library
Vary device characteristics without creating new parts
PSpice A/D has numerous built-in models with parameters that you can tweak for a given device. These include independent temperature effects.
Model behavior
PSpice A/D supports analog and digital behavioral modeling, so you can describe functional blocks of circuitry using mathematical expressions and functions.
Analyses you can run with PSpice A/D
Basic analyses
DC sweep & other DC calculations
These DC analyses evaluate circuit performance in response to a direct current source. Table 1-1 summarizes what PSpice A/D calculates for each DC analysis type.
| For this DC analysis... | PSpice computes this... |
|---|---|
|
DC sweep |
Steady-state voltages, currents, and digital states when sweeping a source, a model parameter, or temperature over a range of values. |
|
Bias point detail |
Bias point data in addition to what is automatically computed in any simulation. |
|
DC sensitivity |
Sensitivity of a net or part voltage as a function of bias point. |
|
Small-signal |
Small-signal DC gain, input resistance, and output resistance as a function of bias point. |
AC sweep and noise
These AC analyses evaluate circuit performance in response to a small-signal alternating current source. Table 1-2 summarizes what PSpice A/D calculates for each AC analysis type.
| For this AC analysis... | PSpice computes this... |
|---|---|
|
AC sweep |
Small-signal response of the circuit (linearized around the bias point) when sweeping one or more sources over a range of frequencies. Outputs include voltages and currents with magnitude and phase. You can also use Bode Plot Template Windows in Probe to view this information. |
|
Noise |
For each frequency specified in the AC analysis:
|
Transient and Fourier
These time-based analyses evaluate circuit performance in response to time-varying sources. Table 1-3 summarizes what PSpice A/D calculates for each time-based analysis type.
| For this time-based analysis... | PSpice computes this... |
|---|---|
|
Transient |
Voltages, currents, and digital states tracked over time. For digital devices, you can set the propagation delays to minimum, typical, and maximum. If you have enabled digital worst-case timing analysis, then PSpice A/D considers all possible combinations of propagation delays within the minimum and maximum range. Digital worst-case timing analysis is not available in PSpice A/D.
|
|
Fourier |
DC and Fourier components of the transient analysis results. |
Advanced multi-run analyses
The multi-run analyses—parametric, temperature, Monte Carlo, and sensitivity/worst-case—result in a series of DC sweep, AC sweep, or transient analyses depending on which basic analyses you enabled.
Parametric and temperature
For parametric and temperature analyses, PSpice A/D steps a circuit value in a sequence that you specify and runs a simulation for each value.
Table 1-4 shows the circuit values that you can step for each kind of analysis.
| For this analysis... | You can step one of these... |
|---|---|
|
Parametric |
global parameter |
|
Temperature |
operational temperature |
Monte Carlo and sensitivity/worst-case
Monte Carlo and sensitivity/worst-case analyses are statistical. PSpice A/D changes device model parameter values with respect to device and lot tolerances that you specify, and runs a simulation for each value.
Table 1-5 summarizes how PSpice A/D runs each statistical analysis type.
| For this statistical analysis... | PSpice does this... |
|---|---|
|
Monte Carlo |
For each simulation, randomly varies all device model parameters for which you have defined a tolerance. |
|
Sensitivity/ |
Computes the probable worst-case response of the circuit in two steps:
|
Analyzing waveforms with PSpice A/D
What is waveform analysis?
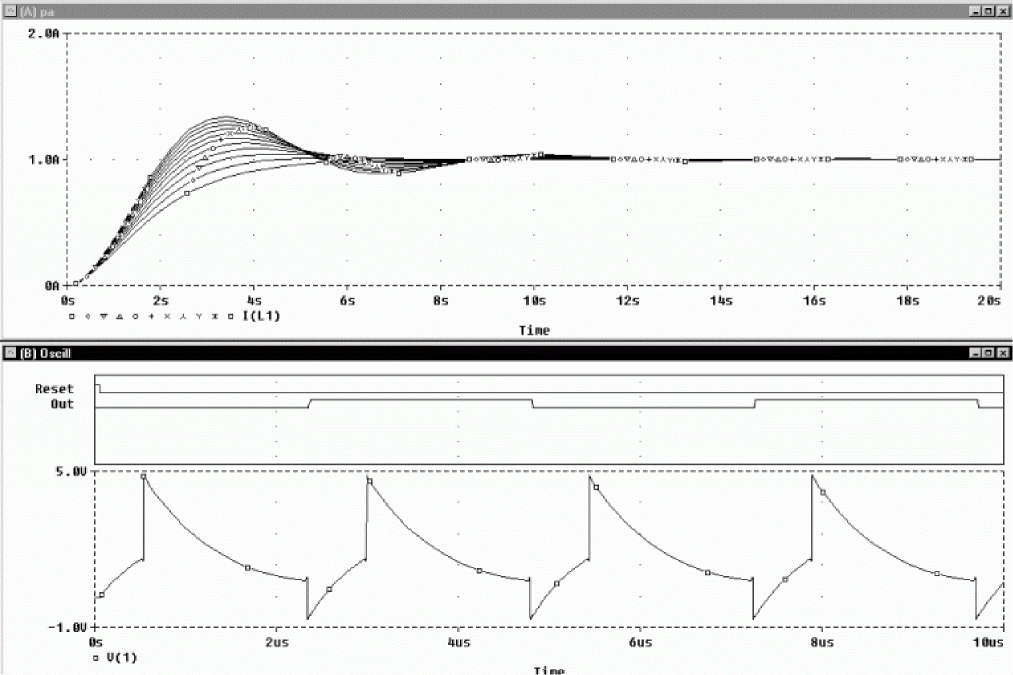
After completing the simulation, PSpice A/D plots the waveform results so you can visualize the circuit’s behavior and determine the validity of your design.
Taken together, simulation and waveform analysis is an iterative process. After analyzing simulation results, you can refine your design and simulation settings and then perform a new simulation and waveform analysis.
Perform post-simulation analysis of the results
This means you can plot additional information derived from the waveforms. What you can plot depends on the types of analyses you run. Bode plots, phase margin, derivatives for small-signal characteristics, waveform families, and histograms are only a few of the possibilities. You can also plot other waveform characteristics such as rise time versus temperature, or percent overshoot versus component value.
Pinpoint design errors in digital circuits
When PSpice A/D detects setup and hold violations, race conditions, or timing hazards, a detailed message appears along with corresponding waveforms. PSpice A/D also helps you locate the problem in your design.
Using PSpice A/D with other programs
Using design entry tools to prepare for simulation
Design entry tools such as OrCAD X Capture or Design Entry HDL are design entry programs you need to prepare your circuit for simulation. This means:
- placing and connecting part symbols,
- defining component values and other attributes,
- defining input waveforms,
- enabling one or more analyses, and
- marking the points in the circuit where you want to see results.
OrCAD X Capture also the control points for running other programs used in the simulation design flow.
concepthdl_menu.txt and concepthdl_menu_win.txt (if using Design Entry HDL in Windows mode) at site level (location pointed by $CDS_SITE) and home directory (location pointed by $HOME).What is the PSpice Stimulus Editor?
The Stimulus Editor is a graphical input waveform editor that lets you define the shape of time-based signals used to test your circuit’s response during simulation.
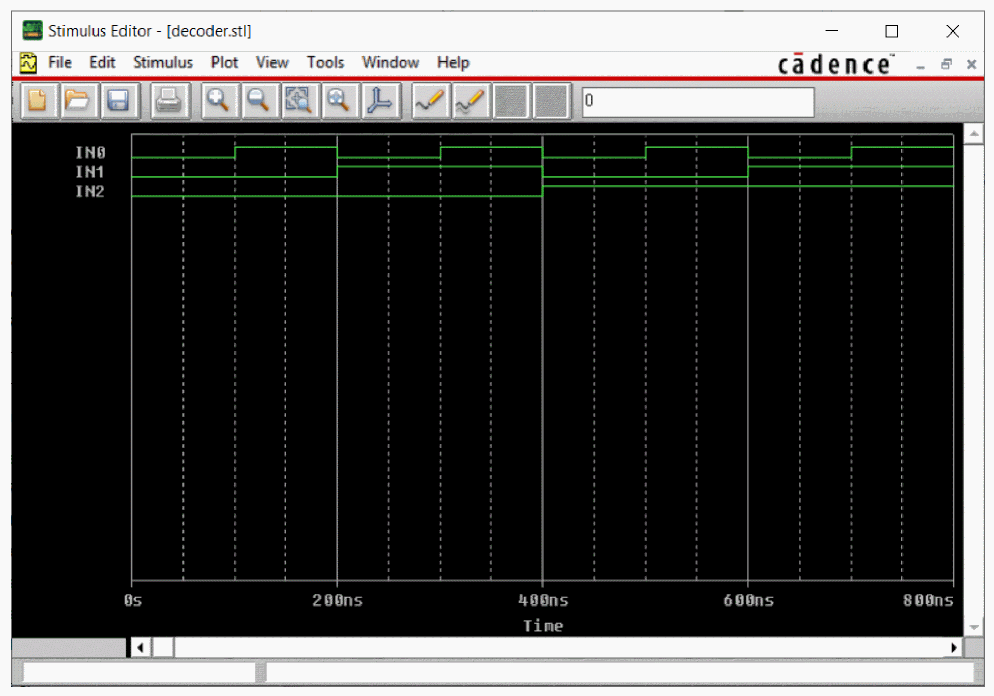
Using the Stimulus Editor, you can define:
- analog stimuli with sine wave, pulse, piecewise linear, exponential pulse, single-frequency FM shapes, and
- digital stimuli that range from simple clocks to complex pulse patterns and bus sequences.
The Stimulus Editor lets you draw analog piecewise linear and all digital stimuli by clicking at the points along the timeline that correspond to the input values that you want at transitions.
What is the PSpice Model Editor?
The PSpice Model Editor is a model extractor that generates model definitions for PSpice A/D to use during simulation.
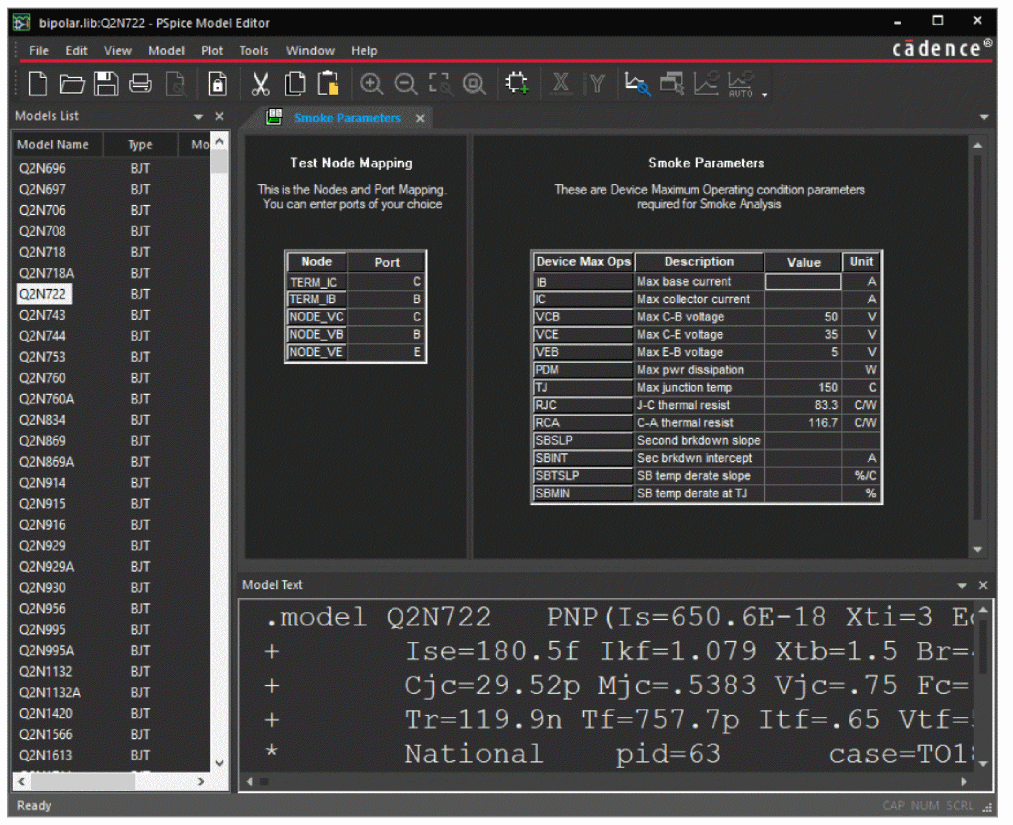
All the PSpice Model Editor needs is information about the device found in standard data sheets. As you enter the data sheet information, the Model Editor displays device characteristic curves so you can verify the model-based behavior of the device. When you are finished, the PSpice Model Editor automatically creates a part for the model so you can use the modeled part in your design immediately.
Files needed for simulation
To simulate your design, PSpice A/D needs to know about:
- the parts in your circuit and how they are connected,
- what analyses to run,
- the simulation models that correspond to the parts in your circuit, and
- the stimulus definitions to test with.
This information is provided in various data files. Some of these are generated by the design entry tool, others come from libraries (which can also be generated by other programs like the PSpice Stimulus Editor and the PSpice Model Editor), and still others are user-defined.
Files that design entry tool generates
Capture files
When you begin the simulation process, OrCAD X Capture first generates files describing the parts and connections in your circuit. These files are the netlist file and the circuit file that PSpice A/D reads before doing anything else.
Design Entry HDL files
When you begin the simulation process, Design Entry HDL generates a netlist file describing the parts and connections in your design.
In the earlier releases these files were in the cfg_analog view. But in the new format all the PSpice related files are located in the psp_sim_1 view.
Netlist file
The netlist file contains a list of device names, values, and how they are connected with other devices.
- The name that OrCAD X Capture generates for this file is:
ROOT_SCHEMATIC_name.net, if you have updated your project to the new project format. For more information on the new format for analog projects, see Conversion of old analog projects to new project format in the OrCAD X Capture Online Help and Directory structure for analog projects in Capture.
In the new project format, the netlist file is located in the directory:\<project_name>-PSpiceFiles\<schematic_name>\
design_name-ROOT_SCHEMATIC_NAME.net, if you did not update your project to the new project format. In the old format for analog projects, the netlist file is located in the project directory.
- The name that Design Entry HDL generates for this file is DESIGN_NAME
.net. The netlist file is located in the directory:<project_directory>\worklib\<design_name>\psp_sim_1\
Circuit file (Capture only)
The circuit file contains commands describing how to run the simulation. This file also refers to other files that contain netlist, model, stimulus, and any other user-defined information that apply to the simulation.
The name that OrCAD X Capture generates for this file is:
PROFILE_NAME.CIR, if you updated your project to the new project format. For more information on the new format for analog projects, see Conversion of old analog projects to new project format in the OrCAD X Capture Online Help and Directory structure for analog projects in Capture.
In the new project format, the circuit file is located in the directory:\<project_name>-PSpiceFiles\<schematic_name>\<profile_name>\
DESIGN_NAME-ROOT_SCHEMATIC_NAME-PROFILE_NAME.SIM.CIR, if you did not update your project to the new project format. In the old format for analog projects, the circuit file is located in the project directory.
The circuit file displays different groups such as text, numbers, comments, expressions, operator, and keyword in easy to read colors. You can also specify your own color schemes for the file by editing theSpiceSyntax.inifile in the<installation>/tools/pspicedirectory.
.map file (Design Entry HDL)
The .map file is used to store the name of the last profile used for a particular design. The name that Design Entry HDL generates for this file is DESIGN _NAME .MAP. The .MAP file is located in the directory:
<project_directory>\worklib\<design_name>\psp_sim_1\
.cmrk file (Design Entry HDL)
The .cmrk file contains information about the waveforms being plotted for various profiles. The name that Design Entry HDL generates for this file is DESIGN_NAME .CMRK . The .CMRK file is located in the directory:
<project_directory>\worklib\<design_name>\psp_sim_1\
A sample .cmrk file is given below:
(Analog
(DCSweep
("@clipper_lib.clipper(sch_1):page1_out" "Voltage" "On" ))(ACSweep
("@clipper_lib.clipper(sch_1):page1_mid" "Voltage" "On" ) ("@clipper_lib.clipper(sch_1):page1_out" "Voltage" "On" ))(Parametric
("@clipper_lib.clipper(sch_1):page1_mid" "Voltage" "On" ) ("@clipper_lib.clipper(sch_1):page1_out" "Voltage" "On" )))The waveforms being plotted for the profiles-DCSweep, ACSweep, and Parametric are given in the sample.
Other files that you can configure for simulation
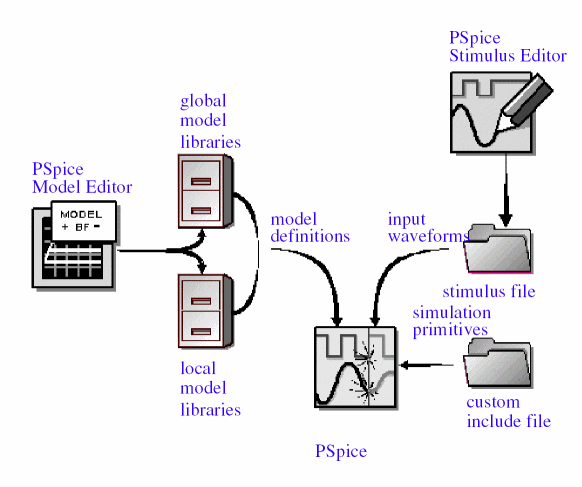
Figure 1-1 User-configurable data files that PSpice A/D reads
Before starting simulation, PSpice A/D needs to read other files that contain simulation information for your circuit. These are model files, and if required, stimulus files and include files.
You can create these files using PSpice A/D programs like the PSpice Stimulus Editor and the PSpice Model Editor. These programs automate file generation and provide graphical ways to verify the data. You can also use the Model Text view in the PSpice Model Editor (or another text editor like Notepad) to enter the data manually.
The circuit file (.CIR) that OrCAD X Capture generates contains references to the other user-configurable files that PSpice A/D needs to read.
Model library
A model library is a file that contains the electrical definition of one or more parts. PSpice A/D uses this information to determine how a part will respond to different electrical inputs.
These definitions take the form of either a:
- model parameter set, which defines the behavior of a part by fine-tuning the underlying model built into PSpice A/D, or
- subcircuit netlist, which describes the structure and function of the part by interconnecting other parts and primitives.
A subcircuit, sometimes called a macromodel, is analogous to a procedure call in a software programming language.
The most commonly used models are available in the PSpice model libraries shipped with your programs. The model library names have a .LIB extension.
If needed, however, you can create your own models and libraries, either:
- manually using the Model Text view in the PSpice Model Editor (or another text editor like Notepad), or
- automatically using the PSpice Model Editor.
See What is the PSpice Model Editor? for a description.
Stimulus file
A stimulus file contains time-based definitions for analog or digital input waveforms. You can create a stimulus file either:
- manually using a standard text editor such as Notepad to create the definition (a typical file extension is
.STM), or - automatically using the Stimulus Editor (which generates a
.STLfile extension).
See What is the PSpice Stimulus Editor? for a description.
Include file
An include file is a user-defined file that contains:
- PSpice A/D commands, or
- supplemental text comments that you want to appear in the PSpice output file (see PSpice output file).
Example: An include file that contains definitions, using the PSpice .FUNC command, for functions that you want to use in numeric expressions elsewhere in your design.
You can create an include file using any text editor, such as Notepad. Typically, include file names have an .INC extension.
Configuring model library, stimulus, and include files
PSpice A/D searches model libraries, stimulus files, and include files for any information it needs to complete the definition of a part or to run a simulation.
The files that PSpice A/D searches depend on how you configure your model libraries and other files. Much of the configuration is set up for you automatically, however, you can do the following yourself:
- Add and delete files from the configuration.
- Change the scope of a file: that is, whether the file applies to one profile only, one design only (local) or to any design (global).
- Change the search order.
Libraries are configured by editing the simulation profile. From the PSpice A/D menu in design entry tool, choose Edit Simulation Profile, click the Configuration Files tab in the Simulation Settings dialog box, then click Library in the Category field.
Files that PSpice A/D generates
After reading the circuit file, netlist file, model libraries, and any other required inputs, PSpice A/D starts the simulation. As simulation progresses, PSpice A/D saves results to two files—the data file and the PSpice output file.
Waveform data file
The data file contains simulation results that can be displayed graphically. PSpice A/D reads this file automatically and displays waveforms reflecting circuit response at nets, pins, and parts that you marked in your schematic (cross-probing). You can set up your design so PSpice A/D displays the results as the simulation progresses or after the simulation completes.
For a description of the waveform analyzer program, see What is waveform analysis?.
After PSpice A/D has read the data file and displays the initial set of results, you can add more waveforms and perform post-simulation analysis of the data. There are two ways to add waveforms to the display:
- From within PSpice A/D, by specifying trace expressions.
- From within the design entry tool, by cross-probing.
PSpce output file
The PSpice A/D output file is an ASCII text file that contains:
- the netlist representation of the circuit,
- the PSpice A/D command syntax for simulation commands and options (like the enabled analyses),
- simulation results, and
- warning and error messages for problems encountered during read-in or simulation.
Its content is determined by:
- the types of analyses you run,
- the options you select for running PSpice A/D, and
- the simulation control symbols (like VPRINT1 and VPLOT1, available in SPECIAL library) that you place and connect to nets in your design.
Example: Each instance of a VPRINT1 symbol placed in your schematic causes PSpice A/D to generate a table of voltage values for the connecting net, and to write the table to the PSpice output file.
Diagnostic Files
Diagnostic reports are generated if debug mode is set by specifying the DEBUG value as one of 1, 2, or 3 in the Options tab of the Simulation Settings dialog for Transient.
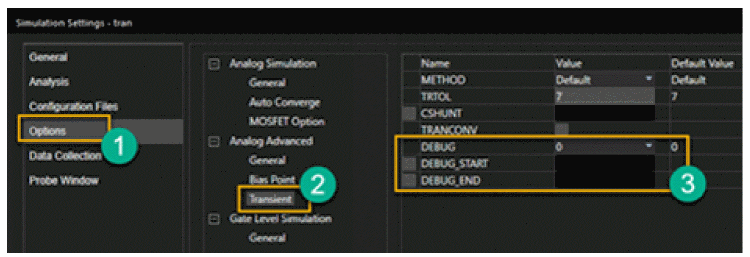
The reports are generated in CSV or Excel format. The reports help you to debug issues such as convergence errors or to better understand simulation runs by providing information about simulation setting parameters and their values, acceptance and rejection counts and reasons such as LTE or device, and worst signals.
|
PSpiceDiagnosticReport.xlsx |
This Microsoft Excel format report is generated if DEBUG value is set to either 1 or 2. The file consists of the following five worksheets:
|
|
PSpiceDiagnostic_ALL_Iteration_Data.csv |
This CSV format report is generated if DEBUG value is set to either 2 or 3. The report lists time; accepted/rejected time step; and the name old value, and value of worst signals for each count. |
|
PSpiceDiagnostic_Accepted_Data_TimeStep.csv |
This CSV format report is generated if DEBUG value is set to 3. The report lists time; accepted delta; total count of rejected steps; LTE rejected steps; device rejected steps; device causing LTE error; limiting signal name; limiting signal values over t, t-1, and t-2; and last step back time, delta, and reason. |
|
PSpiceDiagnostic_ALL_Data_TimeStep.csv |
This CSV format report is generated if DEBUG value is set to 3. This report lists all time steps with information about time; accepted delta; accepted/rejected time step; limiting signal name; limiting signal values over t, t-1, and t-2; step back reason; and limiting source name. |
|
PSpiceDiagnostic_Simulation_Settings.csv |
This CSV format report is generated if DEBUG value is set to 3. This report lists all the simulation parameters in the following categories along with value:
|
Directory structure for analog projects in Capture
The following figure shows the directory structure for analog projects.
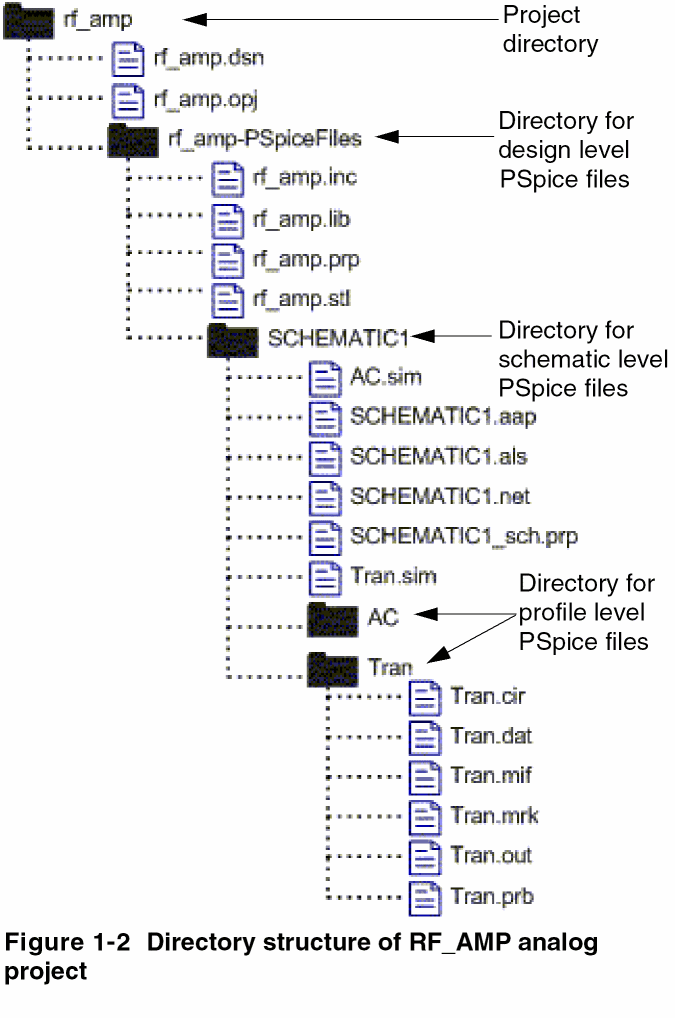
In the directory structure all the PSpice A/D related files for the rf_amp project are maintained in a directory named rf_amp-PSpiceFiles.
- The PSpice files related to the design are maintained in the
rf_amp-PSpiceFilesdirectory. For more information, see How are files configured at the design level maintained in the directory structure for analog projects?. - The PSpice files related to the schematic named
SCHEMATIC1are maintained in a sub-directory namedSCHEMATIC1under therf_amp-PSpiceFilesdirectory. - The PSpice files related to the AC and Tran simulation profiles are maintained in the
ACandTransub-directories under theSCHEMATIC1directory. For more information, see How are files configured at the profile level maintained in the new directory structure for analog projects?.
How are files configured at the design level maintained in the directory structure for analog projects?
The model libraries, stimulus files and include files configured at the design level are stored in the <projectname>-PSpiceFiles directory. For example, in the Directory structure of RF_AMP analog project figure, the model libraries, stimulus files and include files configured at the design level are stored in the rf_amp-PSpiceFiles directory. The rf_amp.stl stimulus file in the rf_amp-PSpiceFiles directory is an example of a PSpice file related to the design.
You can view the paths to the model libraries, stimulus files and include files configured at the design level in the Capture Project Manager window.
Note the following:
- If you select the Retain Old Project check box when you convert an analog project that was created using Capture version 9.2.3 or older versions to the new project format, only the files configured at the design level that have the same name as the design are copied over to the
<projectname>-PSpiceFilesdirectory in the location you specified for creating the project in the new format.
The files configured at the design level that do not have the same name as the design are not copied over to the<projectname>-PSpiceFilesdirectory because they are custom files. Instead, these files are read from their original location. You can view the path to the custom files configured at the design level in the Configuration Files tab of the Simulation Settings dialog box and in the Capture Project Manager window.
For example, suppose that your design name isrf_amp, and you have configured the following files at the design level:- rf_amp.inc
- decoder.lib
- rf_amp.lib
- rf_amp.prp
- rf_amp.stl
If you select the Retain Old Project check box when you convert the analog project to the new format, only the following files are copied over to therf_amp-PSpiceFilesdirectory in the location you specified for creating the project in the new format.- rf_amp.inc
- rf_amp.lib
- rf_amp.prp
- rf_amp.stl
Thedecoder.libfile is read from the old project location. You can view the path to thedecoder.libfile in the Configuration Files tab of the Simulation Settings dialog box and in the Capture Project Manager window.
For more information on converting analog projects from the old format to the new format, see Conversion of old analog projects to new project format in the OrCAD X Capture Online Help. - When you create a new simulation profile by importing the settings from another simulation profile that exists in another project, only the simulation settings are inherited from the source simulation profile. The files configured at the design level for the source simulation profile are not copied over to the
<projectname>-PSpiceFilesdirectory of the project in which you are creating the new simulation profile.
How are files configured at the profile level maintained in the new directory structure for analog projects?
The model libraries, stimulus files and include files configured at the profile level are stored in a directory that has the same name as the profile. For example, in Figure 1-3, the PSpice files related to the Tran simulation profile are maintained in the Tran sub-directory under the SCHEMATIC1 directory.

Figure 1-2 Directory structure of RF_AMP analog project with files configured for the Tran profile
An include file named <profilename>_profile.inc is created in the directory for the simulation profile. This file contains information on the model libraries, stimulus files and include files configured for that profile. For example, in Figure 1-3, the Tran profile directory contains a Tran_profile.inc include file that includes information on the decoder.lib model library, decoder.stl stimulus file and the Tran.inc include files configured for the Tran profile.
You must not delete the <profilename>_profile.inc file in the directory for a simulation profile.
<projectname>-PSpiceFiles directory of the project in which you are creating the new simulation profile.What happens when I convert an analog project that uses a design from another project or from another location?
If you convert an analog project (created using Capture 9.2.3 or older versions) that uses a design from another project or from another location, to the new project format, the design file and all the contents of the design are copied to the current project and maintained in the new directory structure for analog projects.
What should I do if the schematic for a converted analog project uses FILESTIMn parts from the SOURCE library?
If you have specified only the name of the stimulus file as the value of the FILENAME property on a FILESTIMn part, you must specify the path to the stimulus file in the value for the FILENAME property on the FILESTIMn part.
Design Entry HDL libraries
This section introduces you to Design Entry HDL libraries and explains the structure of libraries.
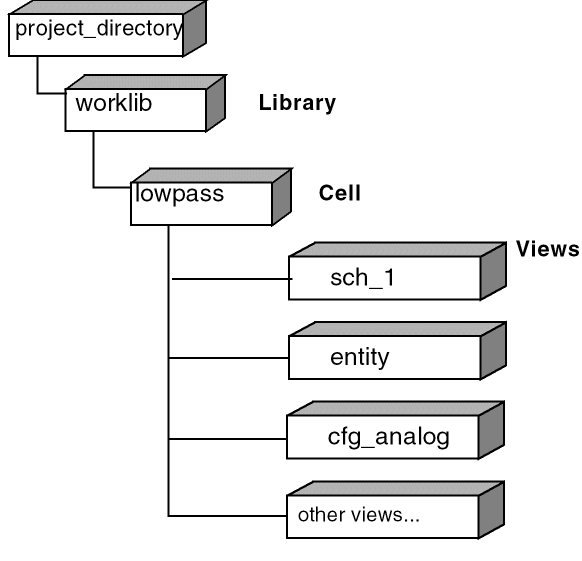
A library is a collection of cells that describe:
- Components of a single design.
- Components of the same technology or family. For example, LSTTL.
- Common components potentially used in many designs.
The organization of a library is Library>Cell>View.
A cell is a collection of views that describe an individual building block of a chip or system.
A view is a collection of files that contain information about one type of representation, such as schematic, symbolic, simulation, or layout.
Figure 1-3 Library Structure
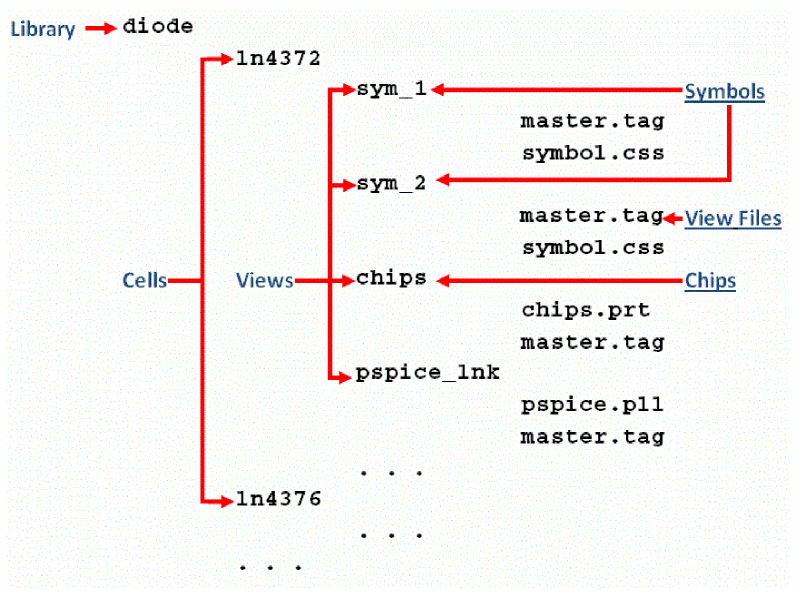
Figure 1-4 shows the Cadence Library Structure where:
- Each individual library is stored in a directory bearing its name.
For example, the Cadence’s standard DIODE library resides in the directory <install_directory>/share/library/diode/. - Under each library, there are one or more cells, each residing in a separate file system directory.
For example, the files of cells 1n4372 and 1n4376 under the diode library reside in directories <install_directory>/share/library/diode/1n4372/ and <install_directory>/share/library/diode/1n4376/ respectively. - Under each cell, there are files of different views, each set residing in a separate file system directory.
For example, the files related to the symbol view sym_1 reside in directory <install_directory>/share/library/diode/1n4372/sym_1/.
In addition, there are library-specific files that reside in the library directory.
A Design Entry HDL library can contain designs or parts, both share the same basic Library>Cell>View structure.
- A power symbol that has the
HDL_POWERandVOLTAGEproperty defined can be netlisted as a voltage source by enabling a flag in PSpice.ini. The flag contains a keyword,INCLUDE_POWERSOURCE, which should be equal to one. This flag should be added in PSpice.ini under the [NETLIST SETTING] section. - A power symbol that has the
HDL_POWERproperty and theVOLTAGEproperty, which is equal to zero, is netlisted as ground source in DE HDL-PSpice Simulator flow. - To enable user-defined ground names as valid ground sources in DE HDL-PSpice Simulator flow, define a flag in PSpice.ini under the [NETLIST SETTING] section. The flag contains a keyword,
INCLUDE_GROUNDNODES, which should have comma-separated user-defined ground names.
Reference Libraries
Cadence supplies a set of reference libraries, which contain views of parts belonging to several logic families. These libraries are usually stored in an area to which you do not have write permissions and are managed by a librarian. Figure 1-5 shows the directory structure of Design Entry HDL reference libraries.
Figure 1-4 Directory structure of Design Entry HDL Libraries
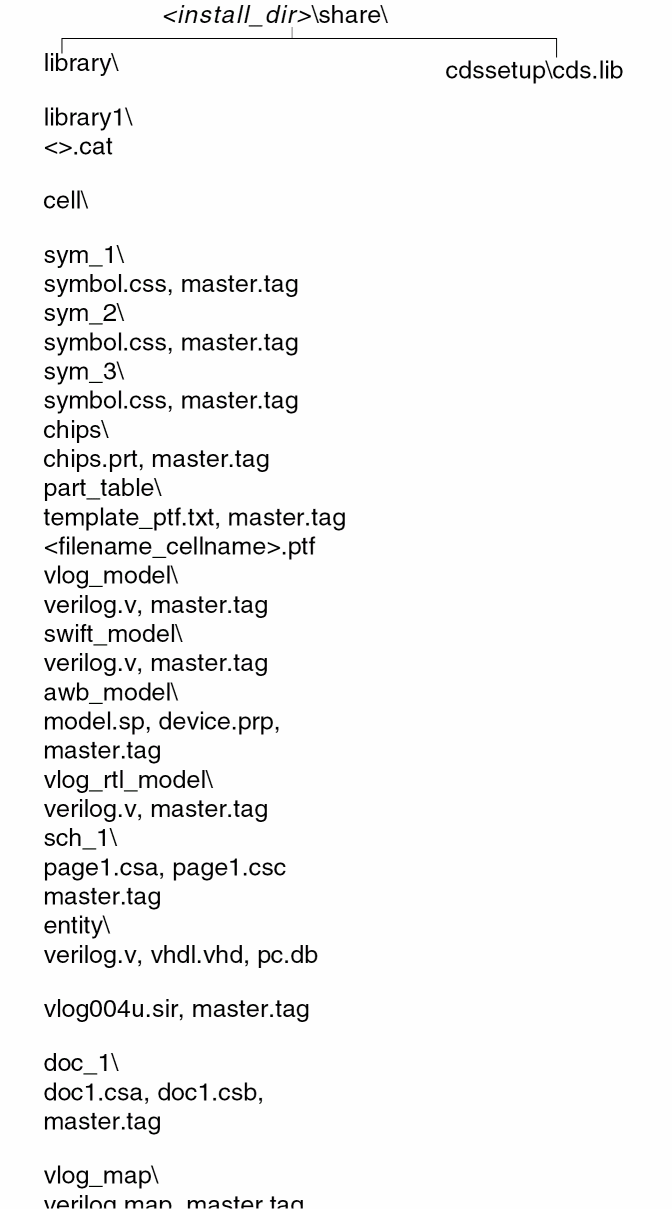
Local libraries
Local libraries (also known as design libraries) are used by designers at the local project level. You can import reference libraries and change them to suit your design requirements or you can use the reference libraries as they are.
Figure 1-5 Local Library Structure
The views in a design library are described below:
| View | Description |
|---|---|
|
sch_1 |
Contains the schematic |
|
entity |
Contains a high-level description of the design |
|
packaged |
Contains the results of packaging |
|
physical |
Contains component footprints |
|
cfg_verilog |
Default configuration for Verilog simulation |
|
cfg_package |
Default configuration for physical layout |
|
cfg_vhdl |
Default configuration for VHDL simulation |
|
cfg_pic |
Default configuration for Programmable IC simulation |
|
cfg_mixed |
Default configuration for mixed signal simulation |
|
cfg_analog |
Default configuration for analog simulation using PSpice Simulator (used in earlier releases) |
|
psp_sim_1 |
Default configuration for analog simulation using PSpice Simulator (used in the new format) |
PSpice model libraries
A model defines the electrical behavior of a part. On a schematic page, this correspondence is defined by a part’s Implementation property, which is assigned the model name. For more information on PSpice model libraries.
PSpice model libraries are located in the installation directory at \TOOLS\PSPICE\library\. The corresponding part libraries are located in the installation directory at \share\library\.
The cds.lib file
Design Entry HDL is a by-reference schematic editor. This means that Design Entry HDL references all parts in the schematic from various libraries that reside at the reference or local area.
The CDS.LIB file defines all the libraries used in your schematic design and maps them to their physical locations.
The contents of a typical CDS.LIB file is given below:
DEFINE analog ../../library/analog
DEFINE diode ../../library/diode
DEFINE source ../../library/source
DEFINE sourcstm ../../library/sourcstm
Encrypting PSpice Models
You can encrypt PSpice models so that users can simulate the models but cannot view the contents of your models. The encryption utility can be used from the command prompt by using the PspiceEnc command. You can also run the encryption utility from Model Editor.
PSpice A/D uses the following two encryption algorithms:
- 256-bit AES encryption algorithm
- 16-bit DES encryption algorithm
By default, AES is used for encryption. During simulation, models encrypted using either algorithm are decrypted automatically.
Note the following for the encryption utility:
- Probe does not show any internal nodes from encrypted subcircuits.
- Encrypted parameters in
.SUBCKTand.MODELstatements in a library file are not visible in the out file. - If a PSpice model contains a subcircuit, its internal nodes are visible in probe. However, if the PSpice model is encrypted, even its internal subcircuit nodes are hidden from probe, irrespective of whether the subcircuit itself is encrypted or not.
- Encrypted data from Crash log is not exposed.
- Auto-inserted devices, such as D2A converters, A2D converters, and Power blocks are hidden if they are inserted between encrypted components.
- For auto-inserted components, circuit text is hidden from the out file to hide the node names.
- Model data is not written in the Output file if the model is associated with a hidden device.
- For
.ACCT, device summary is hidden if encrypted devices exist in the design. .OPTIONS NODEdoes not show nodes from encrypted blocks and hidden devices in connectivity of visible nodes.
The encryption utility does not check for syntax error in a library.
Using PSpiceEnc
To launch and use the encryption utility from the command prompt:
- Open the command prompt.
- Navigate to <installation_directory>
\tools\bin. - Specify the command:
PSpiceEnc -[<options>] -[m <n>] <inputFilePath> <outputFilePath> - Press Enter.
The encryption utility encrypts the library file and saves the file at the specified location, that is, <outputFilePath>.
Command <options> are:
| Option | Description |
|---|---|
|
e/E |
Encrypts a PSpice library file if the file is not already encrypted. |
|
i/I |
Indicates that only model text should be encrypted. This option is always used with the |
|
n/N |
Indicates that only model text should be encrypted and the interface should be hidden. Always used with the |
|
p/P |
Indicates that the file should be partially encrypted. The content of the input file between the |
|
c/C |
Indicates that the comment text will be displayed in the encrypted library. |
m or M signifies the mode of encryption
The syntax is m <n> or M <n>, where n can be 0, 2, 3, or 4 as described below:
|
0 |
Uses the release 16.5 encryption scheme. The keyword, |
|
2 |
Uses the DES encryption with advanced data security (available in release16.5). The keyword is |
|
3 |
Uses the AES encryption. This is the default for 16.6 and later releases. The keyword is |
|
4 |
Uses the AES encryption with user-defined keys. Environment variable |
<inputFilePath>
Specify the location of the library file to be encrypted.
<outputFilePath>
Specify the folder location of the encrypted output file.
Using AES Encryption with User-Defined Keys
To encrypt your library using the AES encryption with user defined keys, do the following:
- Set following environment variable:
CDN_PSPICE_ENCKEYS
Value: <path of .csv file with .csv file name>
Example:D:\1727\test_ccr.csv - Specify the encryption key in this
.csvfile as per the following format. Key value must be of 31 characters.
Syntax:
<path and name of encrypted library>; <key>
Example:D:\1727\1_shot_enc.lib ; 123456789abcdefghijklmnopqrstuv - Run the command:
PSpiceEnc.exe -m 4<path-and-name-of-library>
Example:PSpiceEnc.exe -m 4 D:\1727\1_shot.lib D:\1727\1_shot_enc.lib
Difference between mode 3 and mode 4 of encryption
|
Mode 3 |
Mode 4 |
|---|---|
|
Uses the AES encryption with a default key |
Uses the AES encryption with user-defined keys |
|
|
|
|
If user-defined key is defined, then also default key is used. |
If user-defined keys are not defined, default key is used. |
|
The keyword is |
The keyword is The keyword is |
Using Model Editor
You can launch the encryption utility from PSpice Model Editor to encrypt a library file. It uses the 256-bit AES encryption algorithm.
To encrypt a library from the Model Editor menu:
- From the File menu, select Encrypt Library to open the Library Encryption dialog box.
- In the Library to be encrypted text box, specify the path to the library file to be encrypted.
- In the Encrypted Library Folder text box, specify the path to the folder where the encrypted library should be saved.
- Select the Partial Encryption option if you want to encrypt the library partially. To partially encrypt a library, specify the identifier
$CDNENCSTARTat the beginning and the identifier$CDNENCFINISHat the end of the text to be encrypted. - Select the Show Interfaces option to encrypt only model text and show the interfaces. The Show Interfaces option is disabled if you select the Partial Encryption check box.
- Click OK.
The encrypted library is placed in the folder specified in the Encrypted Library Folder text box.
In this guide, design entry tool is used for OrCAD X Capture and Design Entry HDL. Any differences between the two tools is mentioned, if necessary. Depending on the license available, you will access either PSpice A/D or PSpice Simulator.
View the next document: 02 - Simulation Examples (Part 1)
If you have any questions or comments about the OrCAD X platform, click on the link below.
Contact Us