03 - Managing Libraries on OrCAD X OnCloud
Overview
With the OrCAD X Professional Plus (POX300), OrCAD X Professional (POX200), and OrCAD X Standard (POX100 Standard) licenses, you can create component libraries for your teams by creating new components from scratch or adding them from content providers.
This complete part authoring solution provides the following functions:
- Place components from content providers in OrCAD X Capture designs
- Search for components in content provider libraries
- Create local libraries by adding components from external libraries
- Create new components in a local workspace
- Link a manufacturer part number with an existing library component
- Create shared workspaces
- Collaborate with other team members on projects by publishing components to shared workspaces
Placing Components on Schematic
You can place components on a schematic page from the Cadence-supplied PSpice library, CIS part database, Cadence-supported content providers— SamacSys, Ultra Librarian, SnapMagic, or a workspace with previously-added parts from these sources.
Placing a Component from PSpice Library
To place a component from PSpice library on your schematic, do the following steps:
- From the main menu of Capture, choose Place – Component.
The Component Explorer tab opens.
By default, the PSpice node is selected and the components from PSpice libraries are listed in the part browser.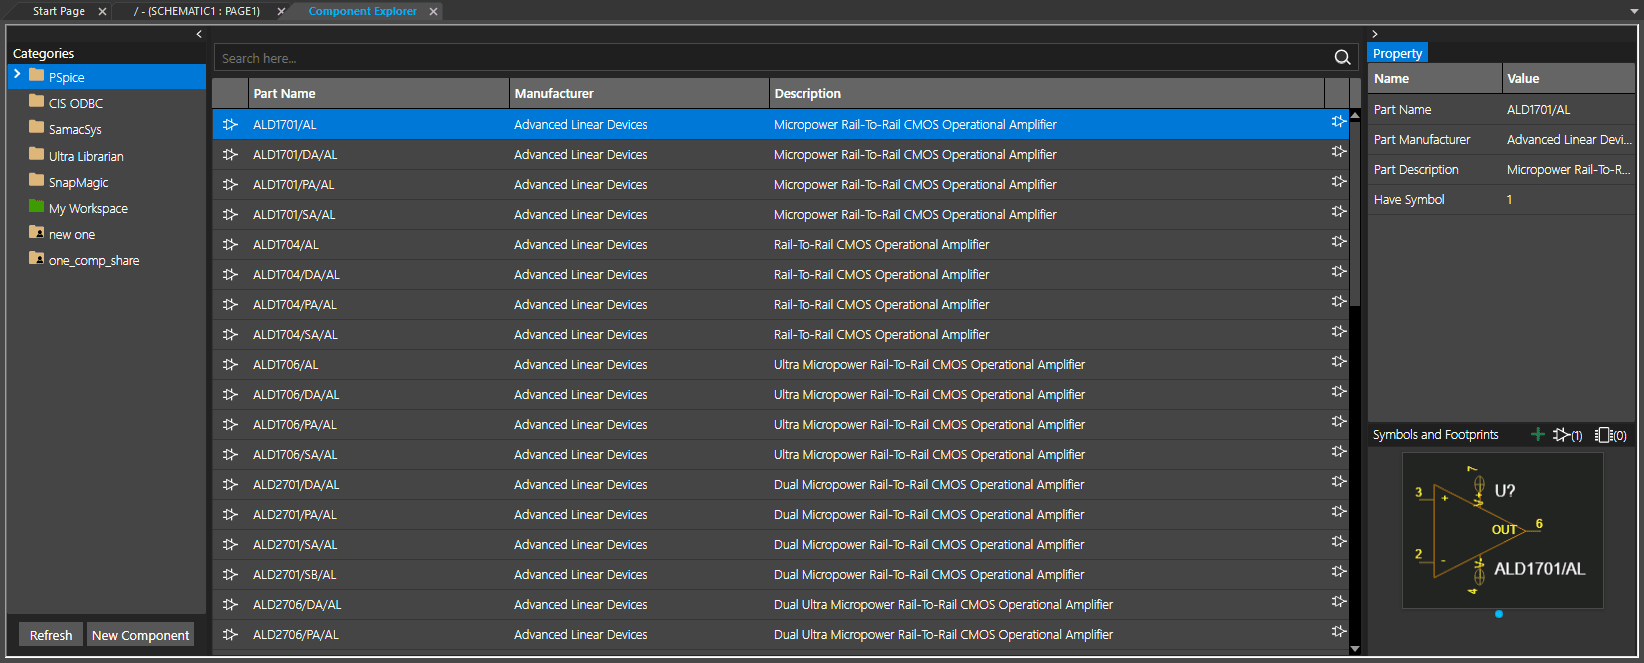
- Double-click a component row in the part browser to place it on the schematic canvas. Alternatively, use one of the following ways to place a component:
- Right-click a component and choose Place.
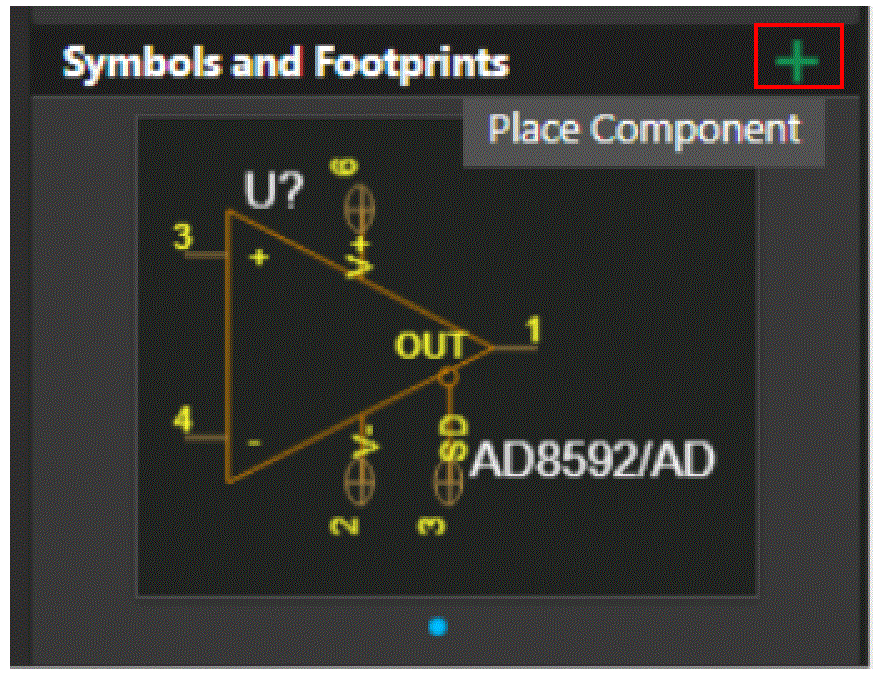
- Select the component and click the Place Component button on the Symbols and Footprints bar in the properties browser.
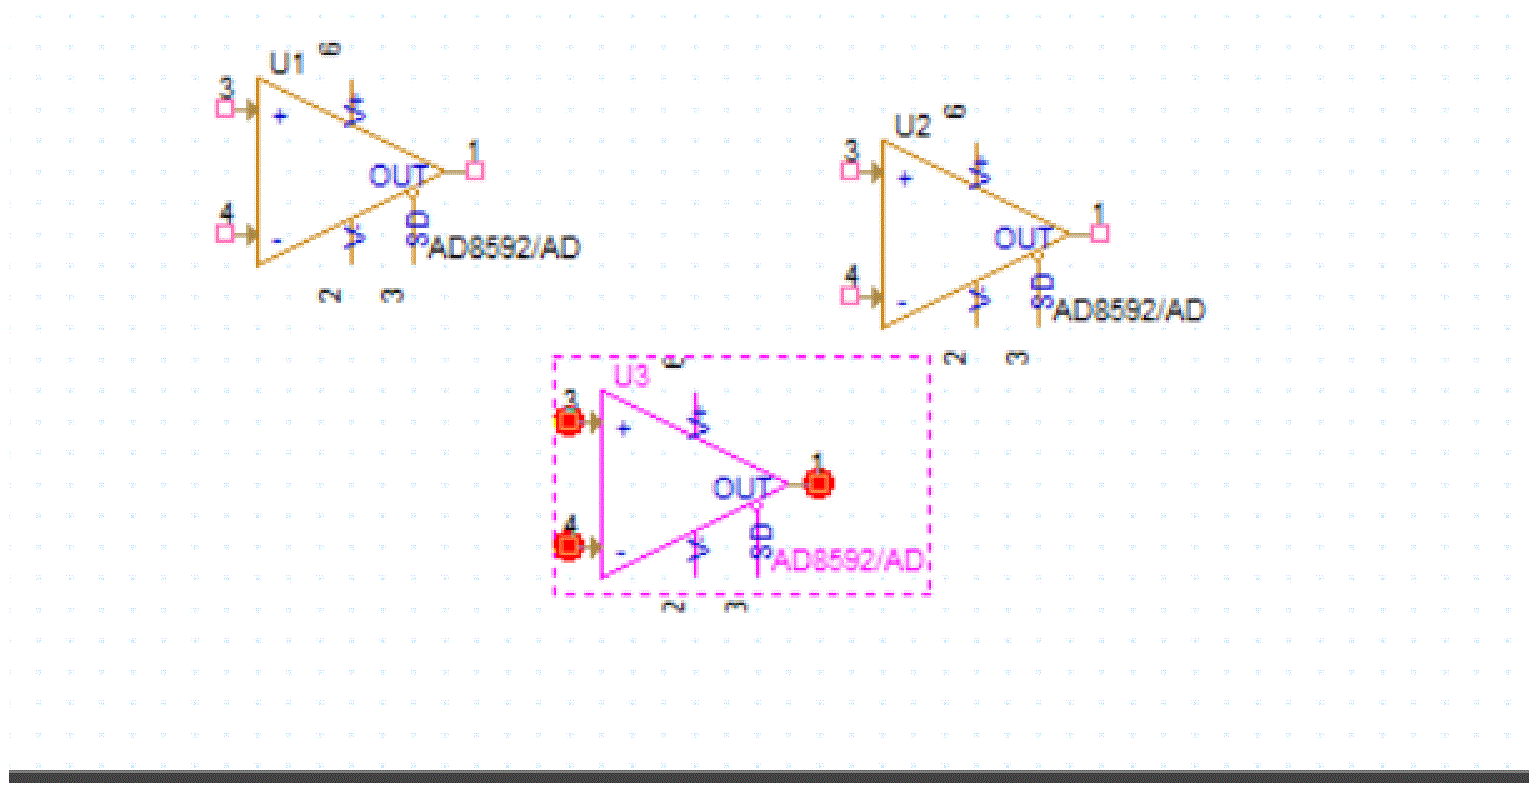
The schematic page tab opens and the selected component is attached to the cursor.
If a part has multiple symbols, the symbol that appears in the Symbols and Footprints view at the time of selection, is placed.
- Click anywhere on the schematic to place an instance of the component.
- Continue clicking to place as many instances of the component as required and press ESC when done.
Placing a Component from CIS Database
Similarly, you can add components from the CIS part database or one of the Cadence-supported content providers—SamacSys, Ultra Librarian, and SnapMagic.
To place components to a Capture design from the CIS part database, do the following steps:
- Select CIS ODBC in the left pane of the Component Explorer interface.
The CIS Explorer window opens.
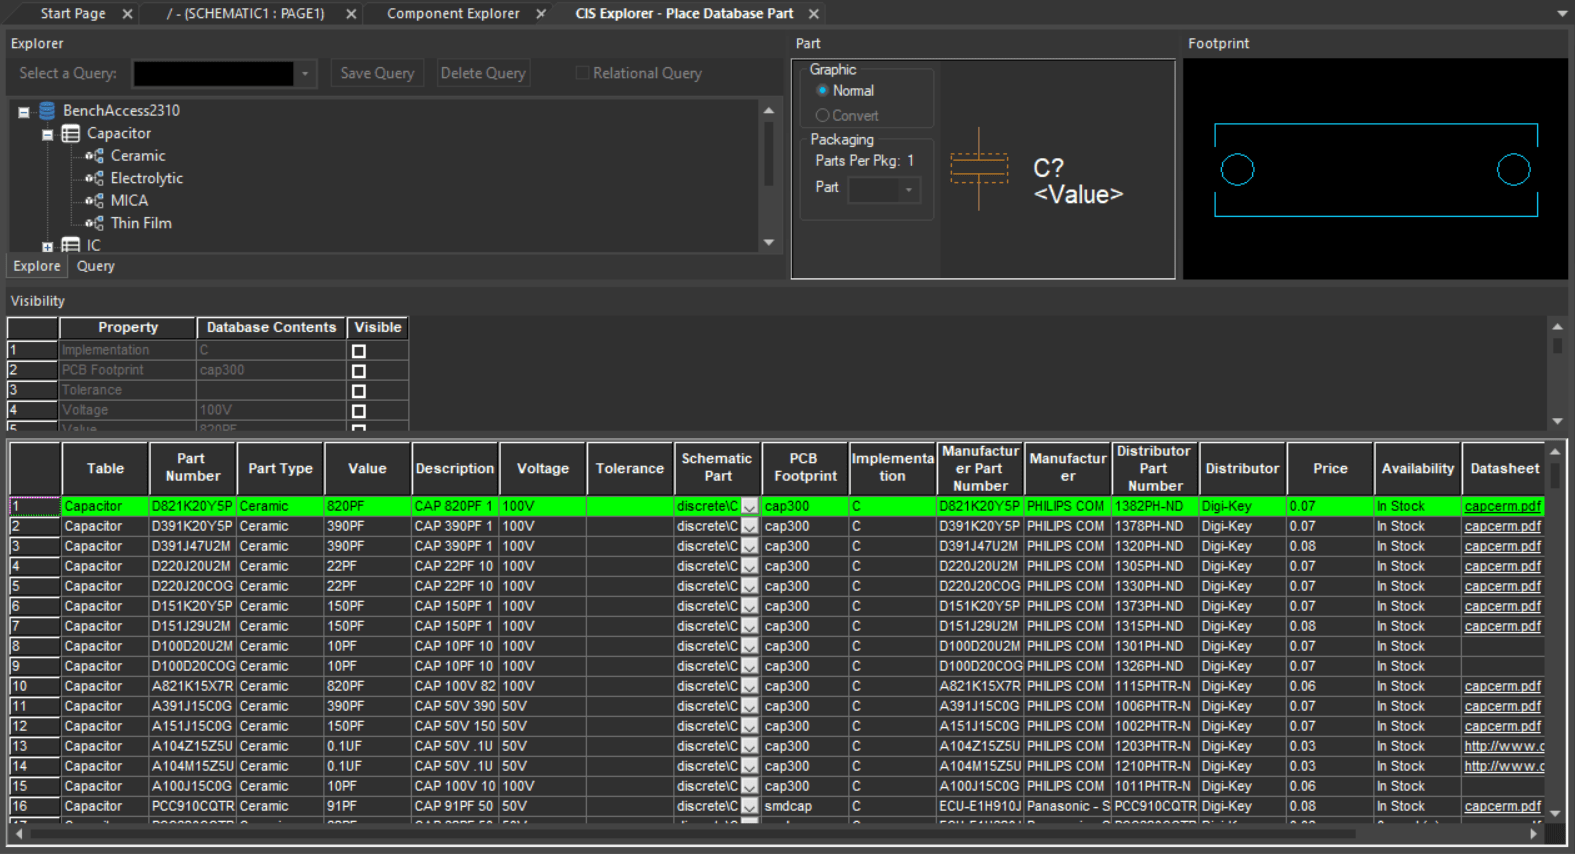
-
Right-click the part you want to place and choose Place Database Part.
The schematic page tab opens and the selected component is attached to the cursor.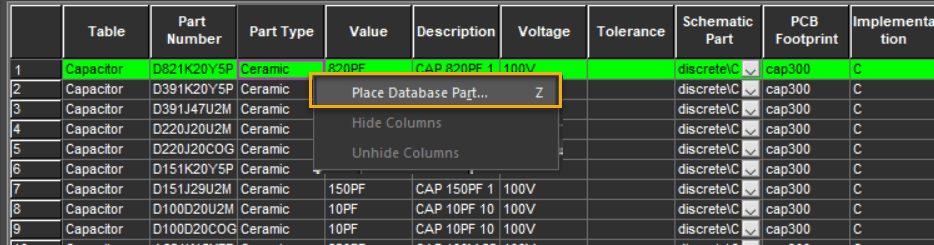
- Click anywhere on the schematic to place an instance of the component.
- Press Esc to end the operation.
Placing a Component from Content Providers
To place components in a Capture design from a Cadence-supported content provider, do the following steps:
- Select SamacSys, Ultra Librarian, or SnapMagic in the left pane of the Component Explorer interface.
-
For Ultra Librarian, provide your login credentials and click Sign In or create an account, if you do not have one.
The components from SamacSys can be accessed with your cadence.com account. Access to the SnapMagic content requires a one-time registration. After you have registered and logged in, you are not prompted to supply login credentials for SamacSys and SnapMagic. For Ultra Librarian, you need to specify exclusive Ultra Librarian account credentials. The valid credentials are good for a session of Capture.
All the components in the selected source are displayed. Note that the availability status of the symbol, footprint, and a 3D image is available for each component along with the link to the datasheet associated with the component. In the Symbols and Footprints bar in the right pane, you can view the symbols and footprints associated with the component.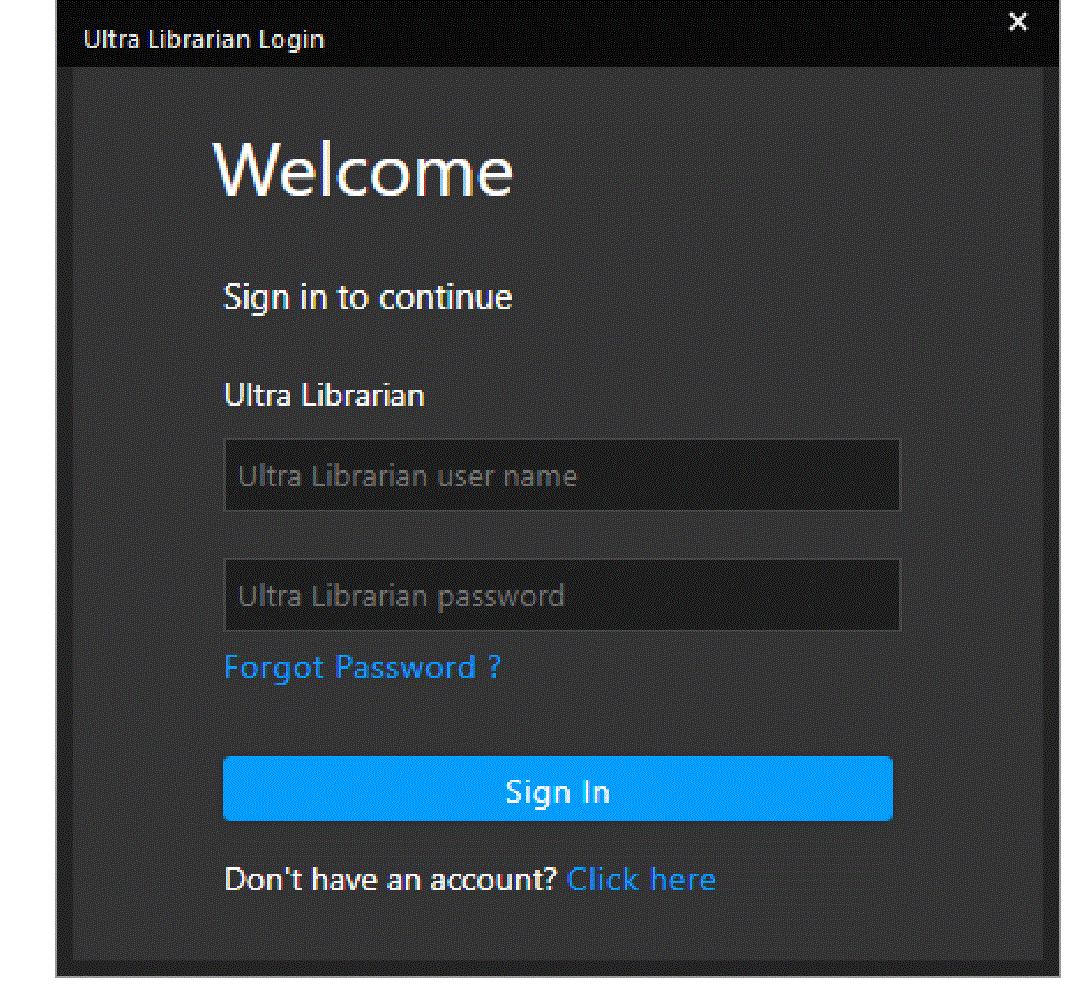
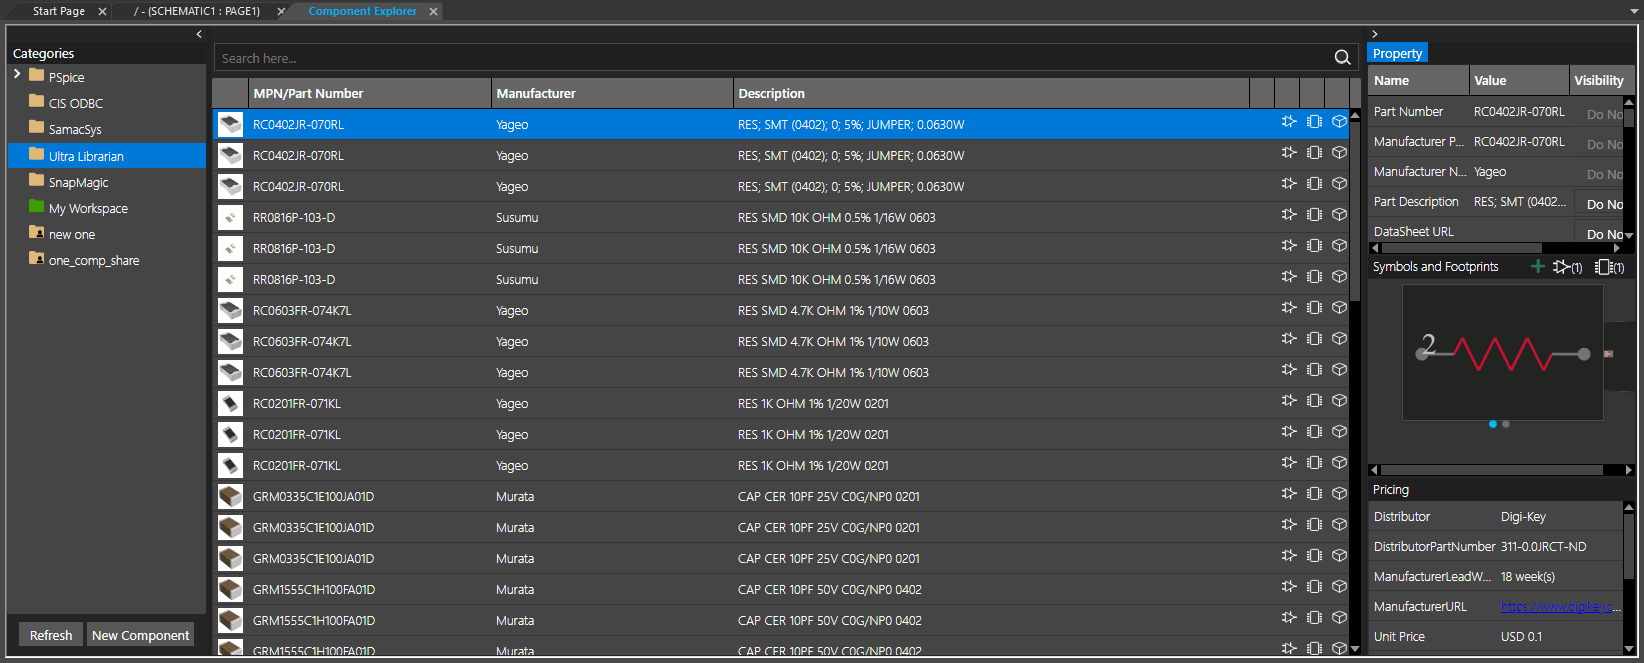
- Double-click the required component in the part browser to download it and place it on the canvas.
The component is downloaded and attached to the cursor for placement on the schematic. - Click anywhere on the schematic to place an instance of the component and press Esc when done.
Searching for Components
The Search feature provides a quick and convenient way to find and place parts from PSpice libraries, external libraries, and local and shared workspaces.
The Search feature supports the following ways to find required components:
- Free text Search
- Field-based search
- Using SQL Query Syntax - Only supported for searching components in My Workspace.
To search components, do the following:
- In Component Explorer, select the source, such as PSpice or SamacSys, to look for a specific component in the Categories pane.
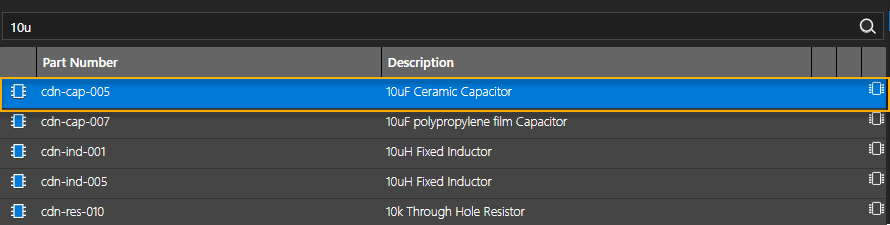
- Specify the name or a search string in the Search here text box and press Enter, or click the magnifying glass icon.
All the fields displayed in the part browser grid, such as Part Name and Description, are searched for the specified search string.
The following table lists various search string combinations:
Search Type Keyword Examples Free text search Any information known about the component An exact match: STPS1045B
A substring: LDC1612
Search all parts with specific field name
Name of the field part_description:Pulse Width Modulator Search all parts with OR Clause
OR part_description:N Channel MOSFET OR part_description:Pulse Width Modulator Search all parts with AND Clause
AND part_description:140mA part_description:Signal MOSFET search all part with NOT clause
NOT part_description:MOSFET NOT Small Signal MOSFET Combine FTS Query with SQL Query SQL Query to be enclosed in square brackets part_description:MOSFET AND [part_description NOT LIKE 'N Channel MOSFET']
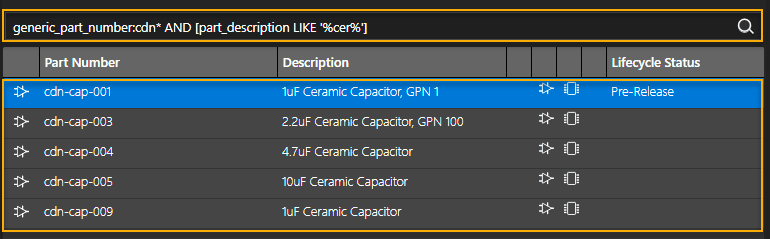
generic_part_number:cdn* AND [part_description LIKE '%cer%']
A filtered list of components matching the specified search string or query is displayed in the part browser.

Creating Local Components From External Sources
You can add components from Cadence-supported content search providers— SamacSys, Ultra Librarian, and SnapMagic to your local workspace and create your own local libraries with accurate and up to date part information.
To add a component to the local workspace, My Workspace, do the following:
- Click the node of the desired content search provider in the Categories pane and provide the login credentials when prompted:
- When you select SamacSys or SnapMagic, your Cadence credentials are used to access the libraries and you are not prompted for any additional credentials.
- When you select, Ultra Librarian, you need to sign in with a valid user name and password to access the libraries.

- Right-click the desired component and choose Add to Library.
The component is downloaded and the Component dialog box opens. Before adding the component to your workspace, you can customize its attributes or modify other part details, such as part number, Lifecycle, and add or modify any properties.
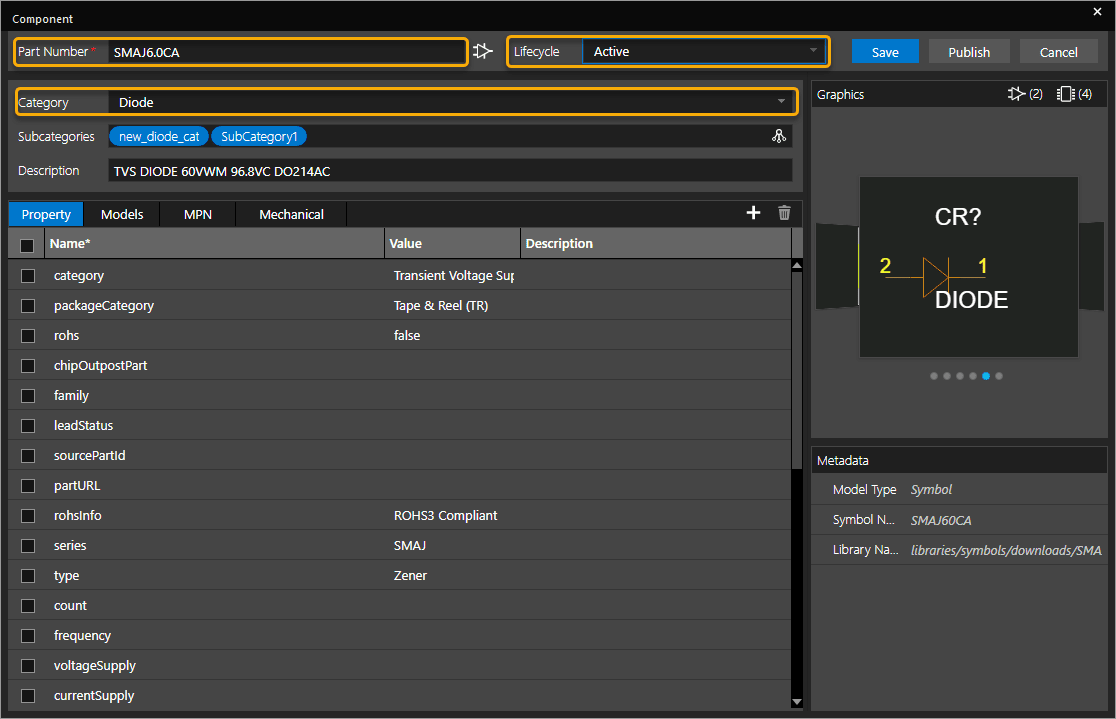
You can either click the Publish button to save the component and or click Save to save it to My Workspace.
- Click Save.
The component is added to the My Workspace node. - Click My Workspace.
The newly-added component is listed in the local workspace.
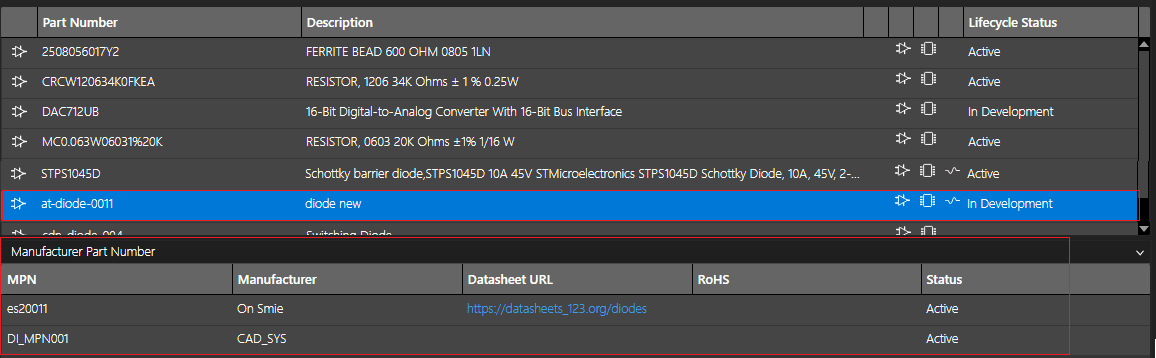
Assigning Manufacturer Part Details
A manufacturer part number (MPN) is assigned to a component as a unique identifier from a specific manufacturer. You can assign an MPN to a component or link an existing MPN in a content provider’s database to any component in your local workspace.
Assigning Manufacturer Part Number
To assign an MPN to a component, do the following:
- Open My Workspace.
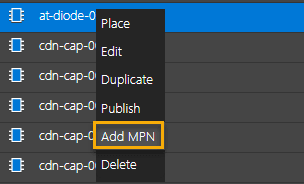
- Right-click a component in the part browser and choose Add MPN.
- In the resultant MPN Part Number dialog box, specify an MPN and manufacturer name for the part.
You can add or modify properties as required.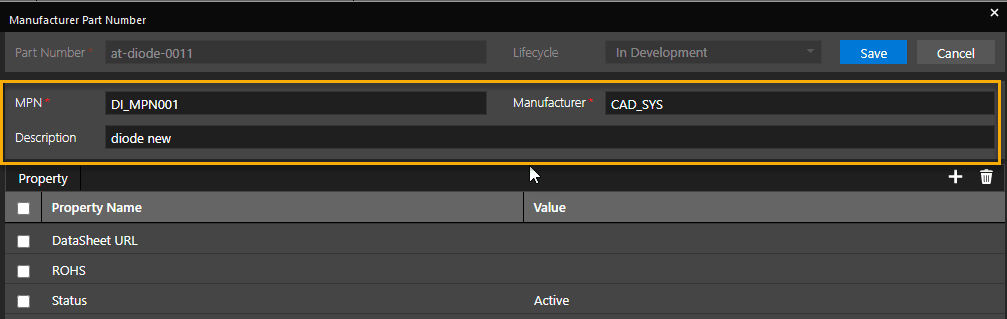
- Click Save.
The MPN details corresponding to the component display in the Manufacturer Part Number section.
Linking an MPN to a Component in Database
To link the existing MPN in a content provider’s database to any component in your local workspace, do the following:
- Click the required content provider node in the Categories pane.
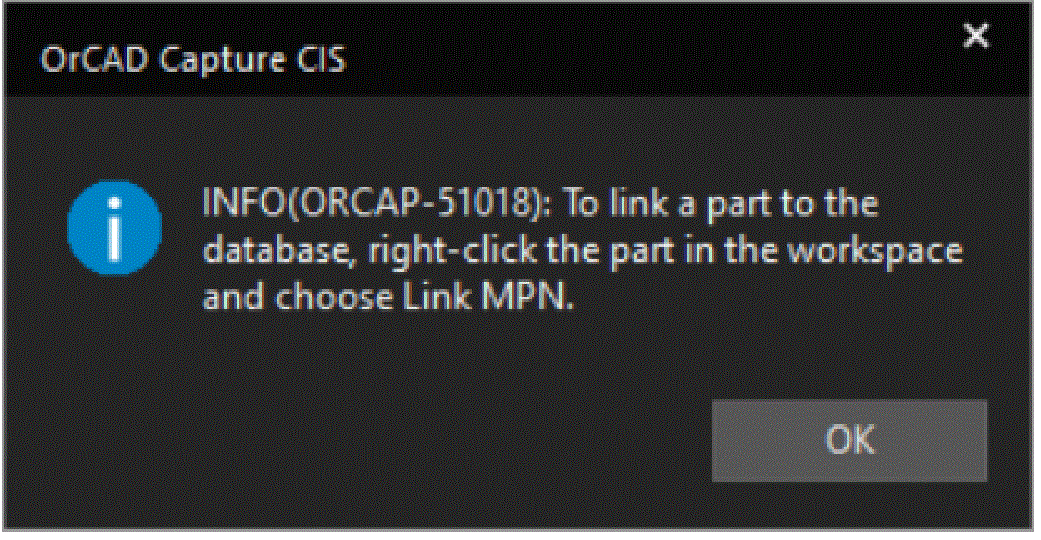
- Right-click the desired MPN and choose Link to Part.

A message pops up informing about the next step.
- Click My Workspace.
- Right-click the component to be linked and choose Link MPN.
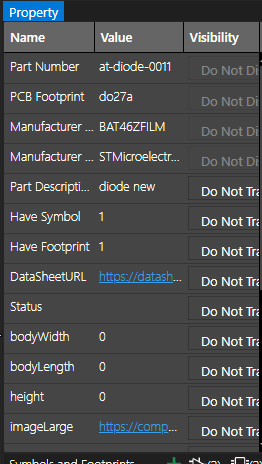
The Manufacturer Part Number dialog box opens. You can use the data as is or modify the details, including the MPN, manufacturer name, and property values.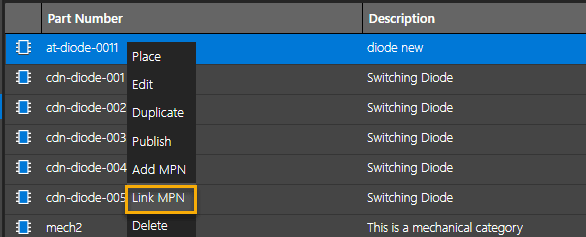
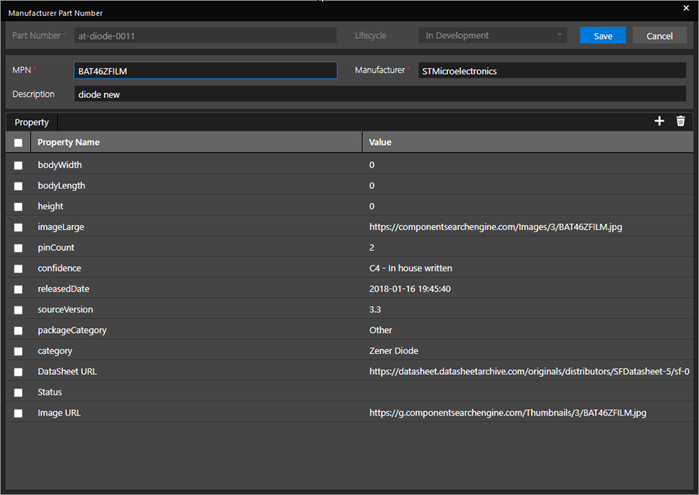
- Click Save.
The MPN from the content provider gets linked to the selected workspace component.

Similarly, you can link multiple MPNs to a component. The shortcut menu on a linked MPN provides options to place, edit, duplicate, and delete the MPN.
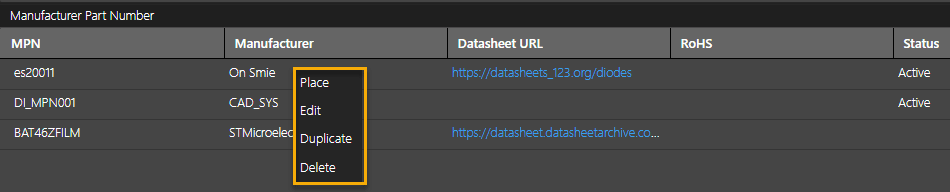
When you click a linked MPN, the properties browser is populated with the properties of the MPN in addition to the part properties.
Editing Components
You can modify the details of a components, create copies of existing components, or delete components in Component Explorer.
Modifying Component Details
You can edit a component in the Component dialog box using the following steps:
- Click My Workspace.
- In the part browser, right-click the component and choose Edit.
The Component dialog box opens. - Modify paart detils as required.
You can also edit the part number in the Component dialog box. - Click Save.
Copying Components
To create a copy of an existing component in the workspace, you can duplicate the component.
- With the My Workspace node displayed, right-click the component in the part browser and choose Duplicate.
The Component dialog box opens an exact replica of the selected component. - Specify a new part number.
- Modify part details as required and click Save.
A new component is added to the workspace.
Deleting a Component
To remove a component from the workspace, right-click the component and choose Delete.
The component is removed from the workspace.
Managing Database Components
You can replace a placed schematic part and its properties with a workspace component by linking the schematic part to a matching workspace component. You can also view the placed part against the linked workspace component and sync the two if any differences are found.
Linking Database Components
To link a schematic part to a component in the component library (My Workspace), do the following steps:
- On the schematic canvas, select a part.
- Right-click and choose Link Database Component.
Alternatively, right-click a part in Part Manager and choose Link Database Component.

When you run this command, the component is accessed from the default workspace database.
The Component Explorer tab opens and matching components, if found in the local component library, are listed in the part browser.
If no match is found in the local library, a No Match Found message is displayed in the middle pane.

- Locate a suitable component to associate with the schematic part.
- Double-click the component.
Alternatively, right-click the component and choose Link Database Component.
A successful linking message is displayed: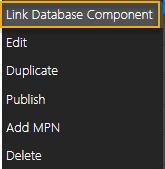
The part is replaced by the component selected in the part browser.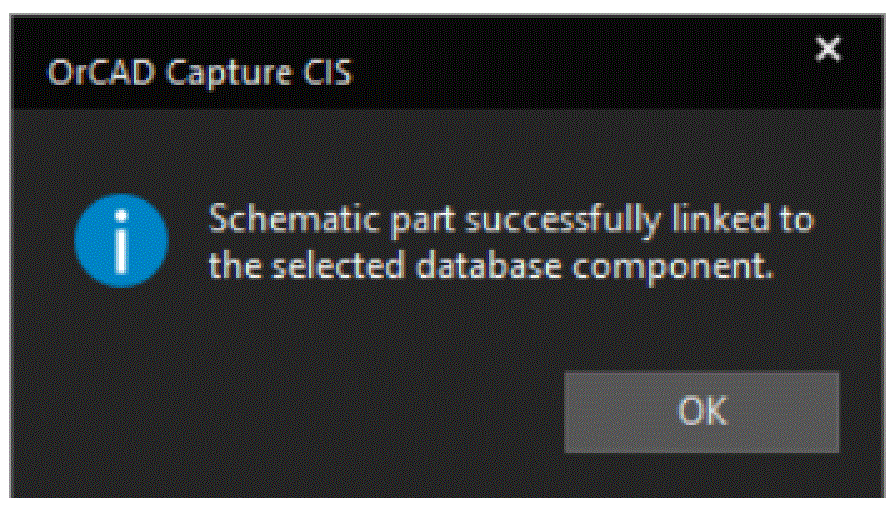
- Click OK.
Viewing Database Components
If any changes are made to the library component, you can view the changes and update the schematic part instance.
To view the differences between a schematic part and the library component it is linked to, do the following steps:
- On the schematic canvas, select the part linked to the database component.
- Right-click and choose View Database Component.
Alternatively, right-click a part in Part Manager and choose View Database Component.
The View Database Component dialog box displays a table comparing the property values of the database component with the property values of the part instance on the schematic. The changes are highlighted in the table.

- To update the schematic part with the database properties, click Update.
The updated property values are displayed on the schematic canvas. - Select the part on the canvas, right-click and choose View Database Component.
Both the schematic part and the database component appear in sync.
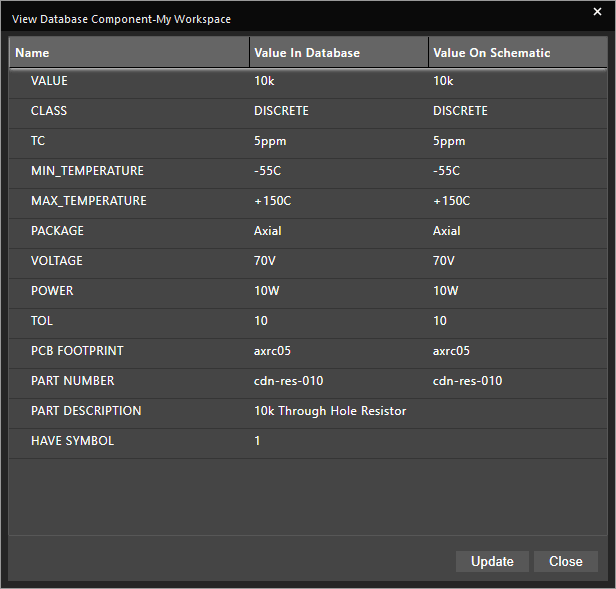
- Click OK to close the dialog box.
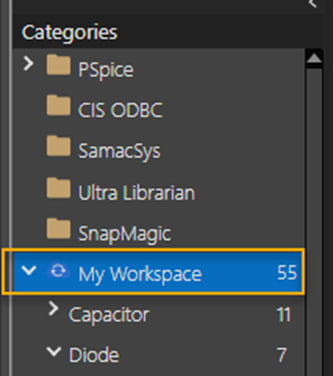
Managing Shared Workspaces
With the OrCAD X Professional and OrCAD X Professional Plus licenses, OrCAD X Capture provides a comprehensive part development environment where you can create shared workspaces containing work-in-progress components, designs, libraries, board files, and all the other project related files. You can manage the files in workspaces from File Manager and components from Component Explorer.
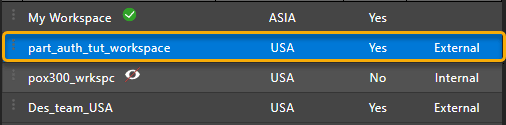
Component Caching
You can enable component caching from the Workspace Configuration dialog box.
When component caching is enabled, components are cached in the local database from the OnCloud server to improve performance and provide quick access to the components.
Data Synchronization between OnCloud Server and Local Database
As soon as the caching is enabled, data synchronization starts between the OnCloud server and the local database.
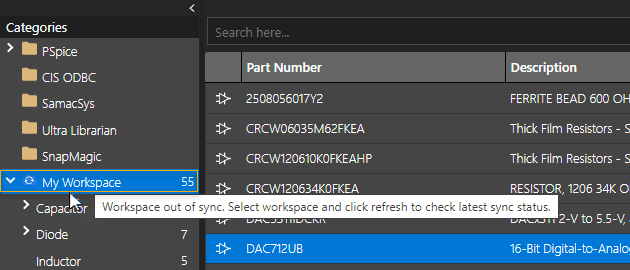
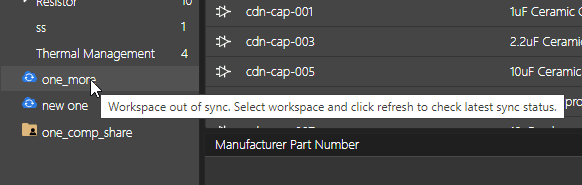
While data is fetched from the OnCloud server to the local database, a Sync icon appears before the label.
The Sync icon on a workspace node indicates that the workspace data is not completely synchronized yet. The shared workspace takes about one minute to get the data synced. While the data is getting synchronized, hovering the mouse pointer over the workspace name reveals a tooltip, which provides the instructions to refresh the status.
After the components are cached, when you search for a component or click a workspace, the time to fetch the data is reduced significantly.
Caching Shared Workspace
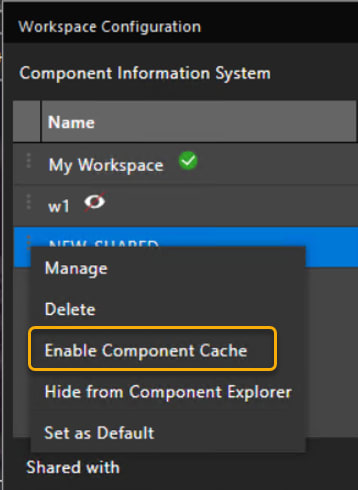
You can change the caching preference for a shared workspace in the Workspace Configuration dialog box.
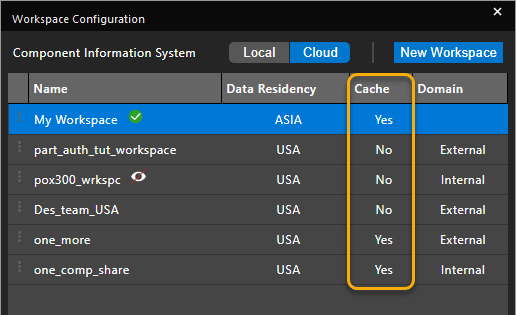
To cache a shared workspace, do the following:
- Choose View – Workspace – Configuration.
The Workspace Configuration dialog box is displayed. - Right-click the required workspace and choose Enable Component Caching.
Component caching is now on for the workspace.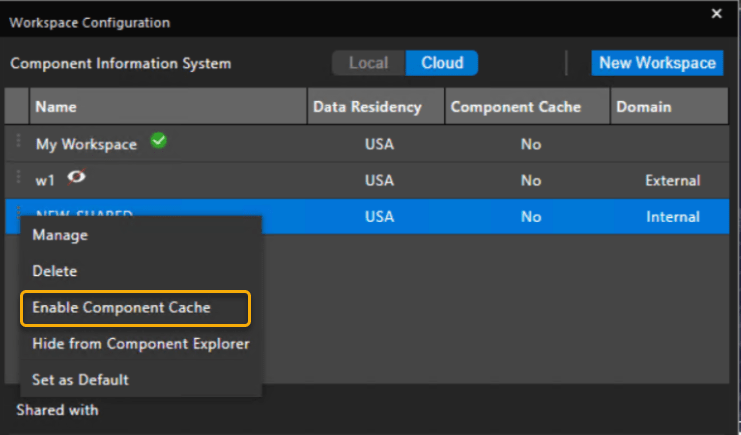
You can also disable caching on My Workspace.
If a shared workspace is cached, the data is read from the local cache. Regardless of the cached status of a shared workspace, the data is always written to the OnCloud server.
View the next document: 04 - Managing Parts
If you have any questions or comments about the OrCAD X platform, click on the link below.
Contact Us