20 - Display Bias Points in Capture
Introduction Displaying bias point values Controlling the display of bias points Moving bias points Updating bias point values Menu commands for bias point display Toolbar controls for bias point display Toggling a specific current bias display Toggling a specific voltage bias display Toggling a specific power bias display
Introduction
Bias conditions are used to set up the correct operation of a circuit. If the results of a simulation are not what you expect to see, the bias conditions are the first parameters you should check.
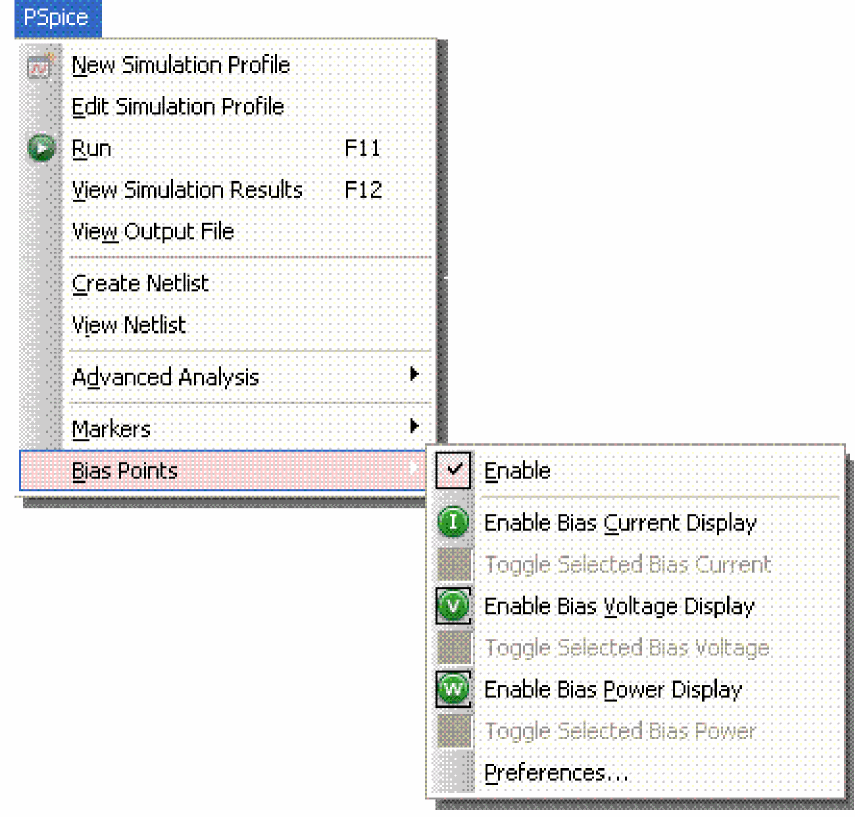
After simulating with PSpice A/D, you can display bias point information on your schematic page in Capture. Bias voltages are displayed next to their corresponding nets (nodes), bias currents are displayed next to their corresponding device pins and the bias powers are displayed next to their corresponding power sources. By seeing this data on your schematic, you can quickly focus in on potential problem areas of your design. PSpice A/D calculates and saves the bias point current, voltages and powers for every simulation. Capture reads all of this information and can display currents on all pins that have models, voltages for every net in your circuit or powers for every power source in your circuit.
You can choose to display bias point information in the following ways:
- currents on all modeled pins throughout the design
- currents on only selected modeled pins
- voltages on all wires throughout the design
- voltages on only selected wires
- powers on all power sources throughout the design
- powers on only selected power sources
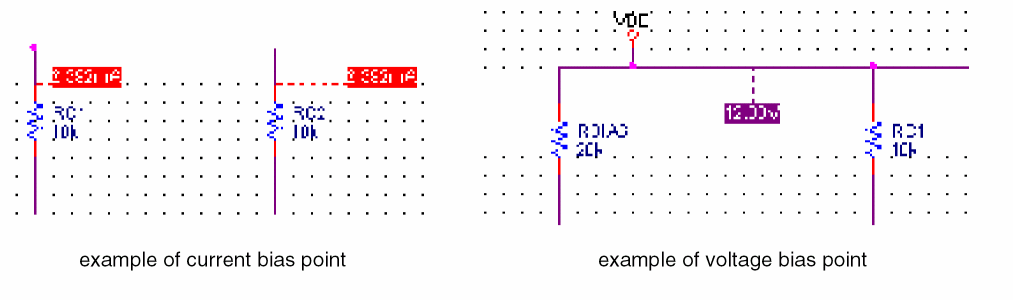
For currents on pins, a "+" value for the bias point means current is flowing into the pin, while a "-" value means current is flowing out of the pin. By default, only voltages are displayed. You can toggle the currents on or off by using the corresponding toolbar buttons or menu commands.
How bias information is stored and updated
Not all pins and nets will have bias information. Buses, for example, do not have bias information, since they are not distinct wires. Bias point data and the locations of the displayed values are saved as part of the schematic page. Distinct bias point information is saved for each simulation profile. The data is updated whenever you open a schematic page, when you resimulate, when you activate a different simulation profile, or when you change the display characteristics of the labels (such as color, font or precision).
If a page is reused (hierarchical subcircuits), the position of the bias point will be stored with the page and will be the same for all occurrences of that page, although the values will be different for each to accurately reflect the hierarchy of the circuit.
Bias point data for multiple analyses
If you have set up more than one analysis, you should keep in mind the following:
- Capture will always display the bias information for the last analysis you ran. PSpice A/D runs analyses in this order: DC, AC, Transient. This means that if you perform a multi-run analysis like Parametric, Monte Carlo, Sensitivity/Worst-case or Temperature, you will see bias values for the last run only.
- A given voltage or current source can have a different DC value and initial transient value at TIME=0. This means that the initial transient bias calculation can be different from the DC (small-signal) bias point.
- For a Transient analysis, only the initial transient bias values are shown.
Displaying bias point values
You have the option of enabling the display of bias information for all nets, pins and power sources in the circuit, or of enabling only selected nets, pins and power sources. You can also disable bias point display all together for situations such as large digital designs where the legibility of the schematic might be reduced.
To enable or disable the display of all bias information
- In Capture, from the PSpice menu, choose Bias Points. A submenu appears (see figure).
- From the submenu, select Enable.
By clearing this option, you disable the bias display feature entirely. The presence of the check mark indicates that this option is enabled. (The default setting is to have this option enabled.)
To enable or disable the display of all bias points
- In Capture, from the PSpice menu, choose Bias Points. A submenu appears.
- From the submenu, select:
Enable Bias Current Display or click the toolbar button ( ).
).
-or-
Enable Bias Voltage Display or click the toolbar button ( ).
).
-or-
Enable Bias Power Display or click the toolbar button ( ).
).
By checking this option, you enable the corresponding bias display feature. The presence of the check mark indicates that this option is enabled. (The default setting is to have this option disabled.)
To turn on or off the display of selected bias points
- In Capture, click on a pin, or hold the CTRL key and click on several pins to select them. You can also click on a part to select all of the pins for that part.
- From the PSpice menu, choose Bias Points. A submenu appears.
- From the submenu, select Toggle Selected Bias Current.
-or-
Click the toolbar button ( ) after selecting the pins.
The presence of the check mark indicates that this option is turned on. (The default setting is to have this option turned off.)
To turn on display of bias points after turning off selected bias point displays
- From the Edit menu, choose Select All.
- Click the toolbar button three times: Once to toggle on the bias displays that were previously turned off; once more to turn off all bias displays, and a third time to turn them all back on.
Controlling the display of bias points
You can set the precision of the bias point value that is displayed, and you can change the color or font of the label. You can also define whether bias point data should be printed with the schematic. These settings are all defined using the Bias Point Preferences dialog box (see figure below).
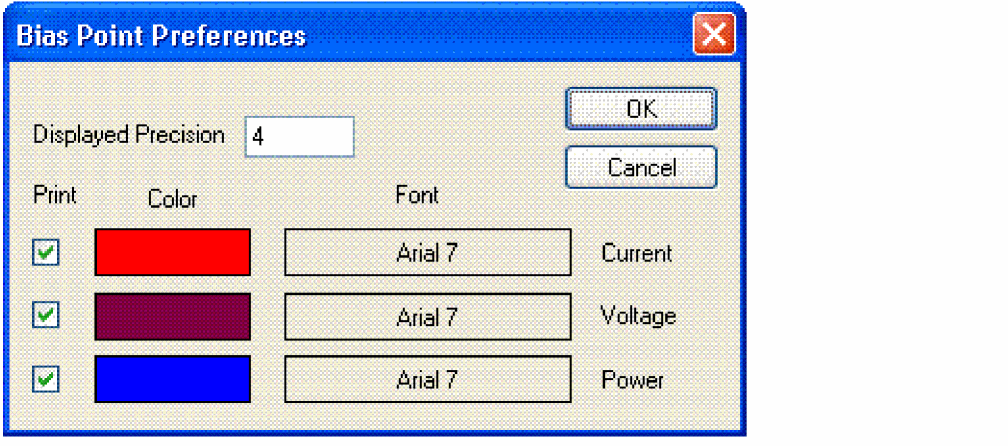
To set the precision of the bias point values:
- In Capture, from the PSpice menu, choose Bias Points. A submenu appears.
- From the submenu, select Preferences. The Bias Point Preferences dialog box appears.
- In the Displayed Precision text box, enter the number of decimals you wish to display for the bias point values.
- Click OK.
This setting applies globally to all current, voltage and power bias points in your design. (The default setting is 4.)
To set the color of the bias point values:
- In Capture, from the PSpice menu, choose Bias Points. A submenu appears.
- From the submenu, select Preferences. The Bias Point Preferences dialog box appears.
- Click in the Color box for current, voltage or power and select the color you wish to display from the color palette.
- Click OK.
These settings apply globally to all current and voltage bias points in your design.
To set the fonts for the bias point values:
- In Capture, from the PSpice menu, choose Bias Points. A submenu appears.
- From the submenu, select Preferences. The Bias Point Preferences dialog box appears.
- Click in the Font box for current, voltage or power and select the font type, style, and size you wish to display from the font dialog box.
- Click OK.
These settings apply globally to all current, voltage and power bias points in your design. (The default setting is Arial 7.)
To print the bias point values:
- In Capture, from the PSpice menu, choose Bias Points. A submenu appears.
- From the submenu, select Preferences. The Bias Point Preferences dialog box appears.
- Click the Print check box for current, voltage or power. The bias point values will then print with the schematic page.
- Click OK.
These settings apply globally to all current, voltage and power bias points in your design. The presence of the check mark indicates that this option is enabled. (The default setting is to have this option enabled.)
Moving bias points
Bias points have a default position near their corresponding wire or pin. You can select the bias point labels and relocate them to make the schematic page more legible. A dashed leader line extends from the label to the wire or pin it is associated with to indicate where the label belongs.
To move a bias point label:
- Click on the label you wish to move to select it.
- While holding down the left mouse button, drag the label to the new location.
Once you move a label, the new location will be saved with the schematic page so the bias point will be displayed there again the next time you open that page.
Updating bias point values
The bias point values displayed in Capture reflect the data from the last simulation that was performed in PSpice A/D. In some cases, these may not be the most recent values, depending on when they were last updated. There are three ways to update the values.
To update the bias point values by resimulating:
- In Capture, from the PSpice menu, choose Run.
By re-running the simulation in PSpice A/D, you update the bias points to the correct values.
To update the bias point values by changing profiles:
- In Capture's Project Manager, under the File tab, double-click on the Simulation Profiles folder to see all the defined profiles for this project.
- Right-click on the profile you want to make active. A shortcut menu appears.
- From the shortcut menu, select Make Active.
By opening a new simulation profile, you update the bias points to reflect the correct values that were last calculated for that profile.
To update the bias point values by changing the display:
- In Capture, from the PSpice menu, choose Bias Points. A submenu appears.
- From the submenu, select Preferences. The Bias Point Preferences dialog box appears.
- Click OK without changing any settings.
By opening the Preferences dialog box, you force Capture to update the bias points with the correct values.
Menu commands for bias point display
The following table explains the menu commands for bias point display. You can access these commands by selecting Bias Points from the PSpice menu in Capture.
To see a map of these commands as they appear under the PSpice menu in Capture, click Bias Point menu.
| Menu command... | Function... |
|---|---|
|
Enable |
Enables or disables the bias point display capability. |
|
Enable Bias Current Display |
Enables or disables the display of current bias points for all modeled pins in the entire design. |
|
Toggle Selected Bias Current |
Turns on or off the display of current bias points for selected modeled pins. |
|
Enable Bias Voltage Display |
Enables or disables the display of voltage bias points for all wires in the entire design. |
|
Toggle Selected Bias Voltage |
Turns on or off the display of voltage bias points for selected wires. |
|
Enable Bias Power Display |
Enables or disables the display of power bias points for all wires in the entire design. |
|
Toggle Selected Bias Power |
Turns on or off the display of power bias points for selected wires. |
|
Preferences |
Provides controls for displaying the precision, color, font and printability of the bias point values. |
Toolbar controls for bias point display
The following table explains the control buttons in the Bias Point toolbar buttons on the Pspice toolbar.
The Bias Point toolbar buttons on the Pspice toolbar in Capture

| Toolbar Icon | Description |
|---|---|
|
Enable Bias Voltage Display |
Enables or disables the display of voltage bias points for all wires in the entire design. |
|
Toggle Selected Bias Voltage |
Turns on or off the display of voltage bias points for selected wires. |
|
Enable Bias Current Display |
Enables or disables the display of current bias points for all modeled pins in the entire design. |
|
Toggle Selected Bias Current |
Turns on or off the display of current bias points for selected modeled pins. |
Toggling a specific current bias display
To turn on the display of a specific current bias point:
- In Capture, from the Edit menu, choose Select All.
- Click the Toggle Selected Bias Current button in the Bias Point toolbar (
 ). This will either turn off all current bias values for every pin on the schematic page, or they will all be turned on, depending on the previous state. Click the button again, if necessary, to turn everything off. If there is no change in the display either way, be sure that Enable Bias Current Display is checked.
 - Click the mouse on an empty area of the schematic page to deselect everything.
- Click the specific pin you want to display the current on, in order to select it.
- Click the Toggle Selected Bias Current button in the Bias Point toolbar (
 ).
).
You should now see only the current bias point value for the specific pin you are interested in. All other current bias points on the schematic page should be turned off.
Toggling a specific voltage bias display
To turn on the display of a specific voltage bias point:
- In Capture, from the Edit menu, choose Select All.
- Click the Toggle Selected Bias Voltage button in the Bias Point toolbar (
 )
)
This will either turn off all voltage bias values for every net on the schematic page, or they will all be turned on, depending on the previous state. Click the button again, if necessary, to turn everything off. If there is no change in the display either way, be sure that Enable Bias Voltage Display is checked. - Click the mouse on an empty area of the schematic page to deselect everything.
- Click the specific net you want to display the voltage on, in order to select it.
- Click the Toggle Selected Bias Voltage button in the Bias Point toolbar (
 ).
).
You should now see only the voltage bias point value for the specific pin you are interested in. All other voltage bias points on the schematic page should be turned off.
Toggling a specific power bias display
To turn on the display of a specific power bias point:
- In Capture, from the Edit menu, choose Select All.
- Click the Toggle Selected Bias Power button in the Bias Point toolbar (
 )
)
This will either turn off all power bias values for every power source on the schematic page, or they will all be turned on, depending on the previous state. Click the button again, if necessary, to turn everything off. If there is no change in the display either way, be sure that Enable Bias Power Display is checked. - Click the mouse on an empty area of the schematic page to deselect everything.
- Click the specific power source you want to display the voltage on, in order to select it.
- Click the Toggle Selected Bias Voltage button in the Bias Point toolbar (
 ).
).
You should now see only the voltage bias point value for the specific pin you are interested in. All other voltage bias points on the schematic page should be turned off.
View the next document: A - Setting Initial State
If you have any questions or comments about the OrCAD X platform, click on the link below.
Contact Us