Grab A Coffee And Let Optimizer In PSpice Do The Work For You! (Part 2 of 4)
Anyone who designs complex circuits and claims they don’t use the Optimizer in their circuit design is most likely a super-genius with an IQ of 250.
"Infinite Monkey Theorem translates to the idea that any problem could be solved, with the input of sufficient resources and time". Optimization is just like having infinite monkeys at your disposal. Use it properly and you're The Man, abuse it and you're wasting time and resources.
In Part 1 of this blog series we analyzed our design using the Sensitivity Analysis. Once you get the results you’re looking for, you can apply the Optimizer tool to improve performance! Note that, the Optimizer works most efficiently when used on fewer components. And with the help of the Sensitivity analysis, we’ve got our components shortlisted. Thus, we are using Optimizer in this blog after Sensitivity analysis is performed on a circuit. A good circuit designer should make use of this powerful combination!
Let's look at the importance of Optimizing any circuit in order to meet your design goals.
Importance of Optimizer:

In this blog, we will run the Optimizer tool on the same RF Amplifier circuit that we used in Part 1 of this series (see Figure 1 below)
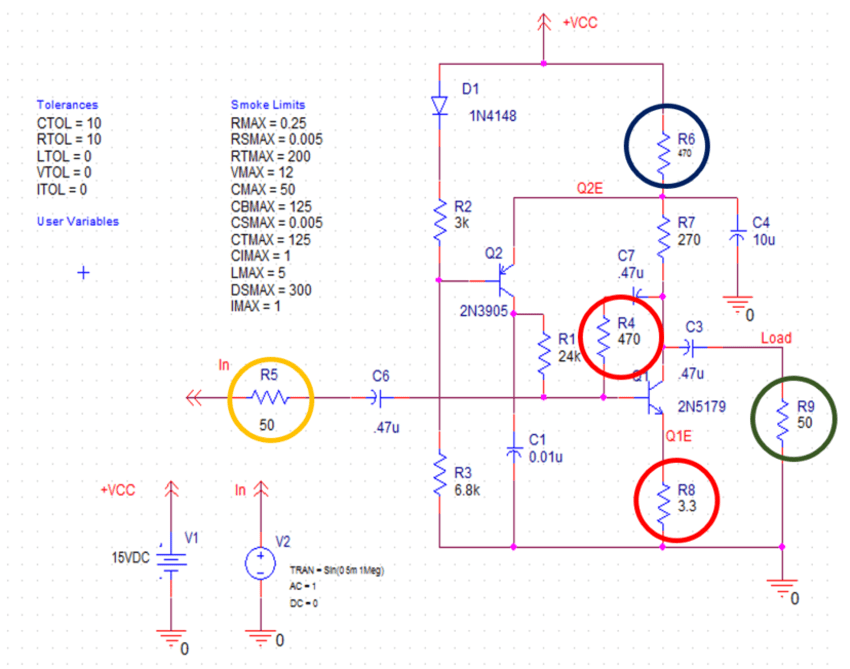
Figure 1: Sample RF Amplifier circuit (Circled are the critical components identified from Sensitivity Analysis)
In Part 1 of the series, we identified components R5, R4, R8, R9 and R6 affect Bandwidth, Output Noise and Gain the most. So, it makes sense to just Optimize those components.
But note that, since R5 and R9 are used for Input and Output matching purposes, we will choose not to Optimize them. Rather we'll Optimize the following components: R4, R8 and R6.
Let's look at the steps you need to follow to perform Optimization in OrCAD X Capture tool. These steps are the same as Sensitivity Analysis, so we do not need to redo them again. Run the Optimizer tool directly from the Advanced Analysis Environment.
Flow for using Optimizer:

Optimizer Environment:
There are 3 types Engines available in the Optimizer:
- Modified LSQ Engine: to rapidly converge on an optimum solution.
- Random Engine: to pick a starting point that avoids getting stuck in local minima when there is a problem converging.
- Discrete Engine: to pick commercially available component values.
(Optimization on our RF Amplifier circuit was first performed with Modified LSQ Engine and then with Discrete Engine)
Optimization with Discrete Engine is generally performed at the end of the Optimization cycle. The output window environment will look like Figure 2 (below).
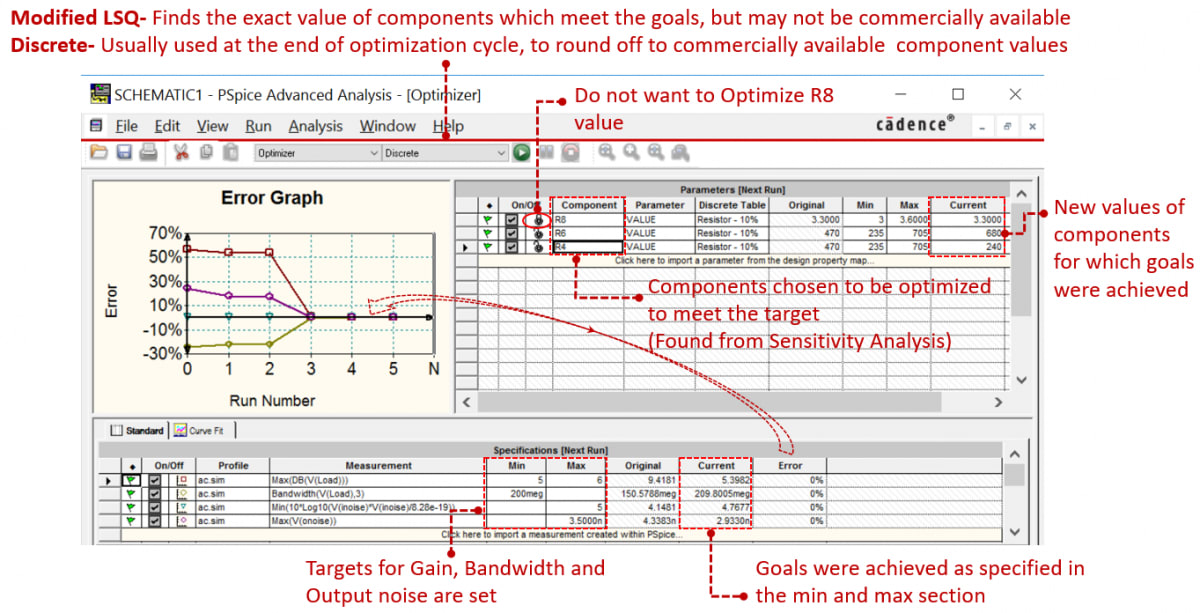
Figure 2: Output window of the Optimizer
In Figure 2 (above), note that the goals were set, and later met using the Optimizer tool with 0% error.
Now, let’s make the changes to the component values of R6 and R4 which helped us to meet our goals.
Circuit Changes after Optimization:

Figure 3: Component value change
Now, let's recap what we did in Part 1 (Sensitivity Analysis) and Part 2 (this blog).
Recap:


After achieving all the goals, you may think you are all set to fabricate the circuit. But, wait! What if your product gave you problems in the long run? You must have heard about so many recalls in the Automotive and Cellphone industry nowadays. You need to avoid those recalls to save your money! Consequences of product recalls on a company have been well articulated here.
So, to make sure your product doesn't run into reliability issues in the future, utilize Smoke Analysis feature available within PSpice Advanced Analysis. In the upcoming Blog Three of this series, we'll perform Smoke Analysis on the optimized version of the RF design. Stay tuned!
Video reference: Leverage PSpice Advanced Analysis to reduce design cost, improve design reliability, engineer's productivity and manufacturing yield.
Try the OrCAD X free trial yourself and start applying these Advanced Analysis capabilities on one of the many demo designs available in there.
Up Next, Check Out the Third Blog of the Series:
3. Make Reliable Designs That Won’t Fail In The Real World!- Use Smoke Analysis In PSpice (Part 3 of 4)