01 - Constraint Sets
Overview
You can constrain an object by referencing a Constraint Set (CSet) or setting a constraint value directly on the object. A CSet is a named, reusable collection of constraint values.
The Electrical, Physical, Spacing, and Same Net Spacing domains support Constraint Sets (CSets). CSets are not supported in the Design domain.
You define generic rules in the Constraint Set object folder. These generic rules can subsequently be applied to objects in the Net, and Region folders.
As design requirements change, you can
- edit the CSet constraints. All objects that reference the CSet will automatically inherit these changes.
- assign a different CSet, one that reflects a different rule-set, to the object.
-
specify override properties on individual objects. The text in cells with overrides are colored blue.
A CSet can be referenced by any number of objects (Bus, Differential Pair, Xnet, Net, Net Class, Net Class-Class, Region, Region Class Region Class-Class) but an object may reference only one CSet per domain.
Types of CSets
- Physical, Spacing, and Same Net Spacing CSets
A Physical CSet consists of one value per layer for each physical constraint. A Spacing CSet (SCSet) consists of one value per layer for each spacing constraint. SCSets are further classified into net-to-net and same net domains. In all designs, Constraint Manager provides one Physical (PCSet), one Spacing (SCSet), and one Same Net Spacing CSet (SNSCet), named DEFAULT, which you cannot delete or rename; however, you can modify the DEFAULT CSet constraints to suit your design requirements. - Electrical CSets
With an Electrical CSet (ECSet), you define the constraints in the set. There is no pre-defined configuration, nor any pre-defined values. You can delete Electrical CSets.
In certain worksheets in the Electrical domain, the children of an object reflect the results of an analysis and are not used for the constraint precedence hierarchy. These result-objects are not differentiated from the normal constraint hierarchy but will be maintained for reading. You cannot edit these constraints.
Creating Constraint Sets
Follow the steps for the Constraint Set that you want to create:
- Creating a Physical CSet
- Creating a Spacing CSet
- Creating a Same-Net Spacing CSet
- Creating a High Voltage CSet
- Creating an Assembly CSet
- Creating an Empty Electrical CSet
Creating a Physical CSet
To do this task, follow these steps:
- In the Objects column, select an existing Physical CSet.
- Choose Objects – Create – Physical CSet.
Alternatively, right-click and choose Create Physical CSet from the pop-up menu.
The Create Physical CSet dialog box appears and the seed constraint is identified by copy constraints from. - Enter a name for the Physical CSet.
- Click OK.
Constraint Manager creates a new Physical CSet with the values of the seed object. - Change constraint values as desired.
- Assign the Physical CSet to net-based objects (see Objects – Constraint Set References).
Creating a Spacing CSet
To do this task, follow these steps:
- In the Objects column, select an existing Spacing CSet.
- Choose Objects – Create – Spacing CSet.
Alternatively, right-click and choose Create Spacing CSet from the pop-up menu.
The Create Spacing CSet dialog box appears and the seed constraint is identified by copy constraints from. - Enter a name for the Spacing CSet.
- Click OK.
Constraint Manager creates a new Spacing CSet with the values of the seed object. - Change constraint values as desired.
Assign the Spacing CSet to net-based objects (see Objects – Constraint Set References).
Creating a Same-Net Spacing CSet
To do this task, follow these steps:
- In the Objects column, select an existing Same Net Spacing CSet.
- Choose Objects – Create – Same Net Spacing CSet.
Alternatively, right-click and choose Create Same Net Spacing CSet from the pop-up menu.
The Create Same Net Spacing CSet dialog box appears and the seed constraint is identified by copy constraints from. - Enter a name for the Same Net Spacing CSet.
- Click OK.
Constraint Manager creates a new Same Net Spacing CSet with the values of the seed object. - Change constraint values as desired.
Assign the Same Net Spacing CSet to net-based objects (see Objects – Constraint Set References).
Creating a High Voltage CSet
To do this task, follow these steps:
- Choose Objects – Create – High Voltage CSet.
Alternatively, right-click and choose Create High Voltage CSet from the pop-up menu.
The Create High Voltage CSet dialog box appears and the seed constraint is identified by copy constraints from. - Enter a name for the High Voltage CSet.
- Click OK.
Constraint Manager creates a new High Voltage CSet with the blank values. - Change constraint values as desired.
Assign the High Voltage CSet to net-based objects (see Objects – Constraint Set References).
Creating an Assembly CSet
To do this task, follow these steps:
- Choose Objects – Create – Assembly CSet.
Alternatively, right-click and choose Create Assembly CSet from the pop-up menu.
The Create Assembly CSet dialog box appears and the seed constraint is identified by copy constraints from. - Enter a name for the Assembly CSet.
- Click OK.
Constraint Manager creates a new Assembly CSet with the blank values. - Change constraint values as desired.
For information about assigning the Assembly CSet to objects, see Objects – Constraint Set References.
Creating an Empty Electrical CSet
To do this task, follow these steps:
- In the Electrical Constraint Set folder or in the Net folder, select a workbook, or a worksheet within a workbook.
- Choose Objects – Create – Electrical CSet.
Alternatively, right-click and choose Create Electrical CSet from the pop-up menu.
The Create Electrical CSet dialog box appears. - Ensure that copy constraints from is deselected.
- Enter a name for the Electrical CSet.
- Click OK.
Constraint Manager creates the Electrical CSet where it can be selected in the Objects column. - Specify the desired constraint parameters.
- Assign the Electrical CSet to net-related objects (see Objects – Constraint Set References).
| Command | Description |
|
Objects – Constraint Set References |
Use this command to associate a Constraint Set (CSet) with a net object. |
Copying Constraints across CSets
You can copy constraints in one CSets to another CSet in the same domain for PCSets and ECSets and (additionally) from SCSets and Same Net SCSets. Similarly, you can copy constraints from PCSets and ECSets in the spacing and same net spacing domains.
To copy constraints from one CSet to another:
- Right-click in the Objects column for a PCSet, ECSet, SCSet, or Same Net SCSet, and choose Copy Constraints.
Depending on the domain, the Select Object dialog box is populated with the appropriate CSets:
In the following example, an SCSet is copied to an Same Net SCSet (Same Net Spacing) domain.
- In the Same Net Spacing domain, right-click an Same Net SCSet in the Object column and choose Copy Constraints.
- Select Spacing CSet from the Type drop-down list.
- Select the SCSet from the list and click OK.
For the SCSet, the default type of source object is Same Net Spacing CSet and the list of the objects contains all the Same Net SCSets. For the Same Net SCSet, the default type is SCSets. When you copy constraints from an SCSet to Same Net SCSet, constraint names are mapped and the SN_ prefix is added to the constraint name.
LINE_TO_LINE_SPACINGis copied asSN_LINE_TO_LINE_SPACINGThe Same Net SCSet is updated with the SCSet. Constraints are copied in the merge mode, which implies that any existing constraint in the target CSet remains intact if it is not present in the source CSet.
Editing Constraints Sets
Editing Multiple Constraints
You can edit multiple constraints in the Spacing, Physical, and Same Net Spacing worksheets with a single click.
- Select the object.
The entire row is selected except the cells which have different design unit values. - Select an editable cell.
The value in the cell is selected automatically. - Type the new value of design unit and press ENTER.
The new value is applied to all the selected cells after data validation.
You can also select multiple objects using the Ctrl key.
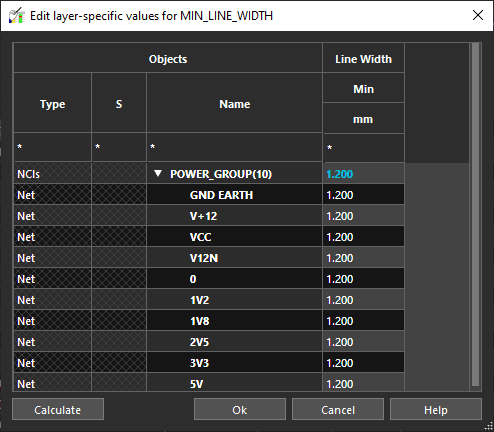
If the constraint has different values per layer, clicking the editable cell opens the Edit layer-specific values dialog box where you can edit layer-specific values for the constraint.
Limitations
You can edit constraints in CSets by selecting multiple cells.
However, editing multiple cells together is not possible in following scenarios:
- Selected cells have different data types.
For example, if two cells have integer and float as a data type, they cannot be edited as a multi selection. - Values in selected cells are represented as an array and a single value.
For example, if two cells have values as 1.2:3.0 and 1.2, they cannot be edited as a multi selection. - Selected cells have different units of measurement.
- Selected enumerations have different enum values.
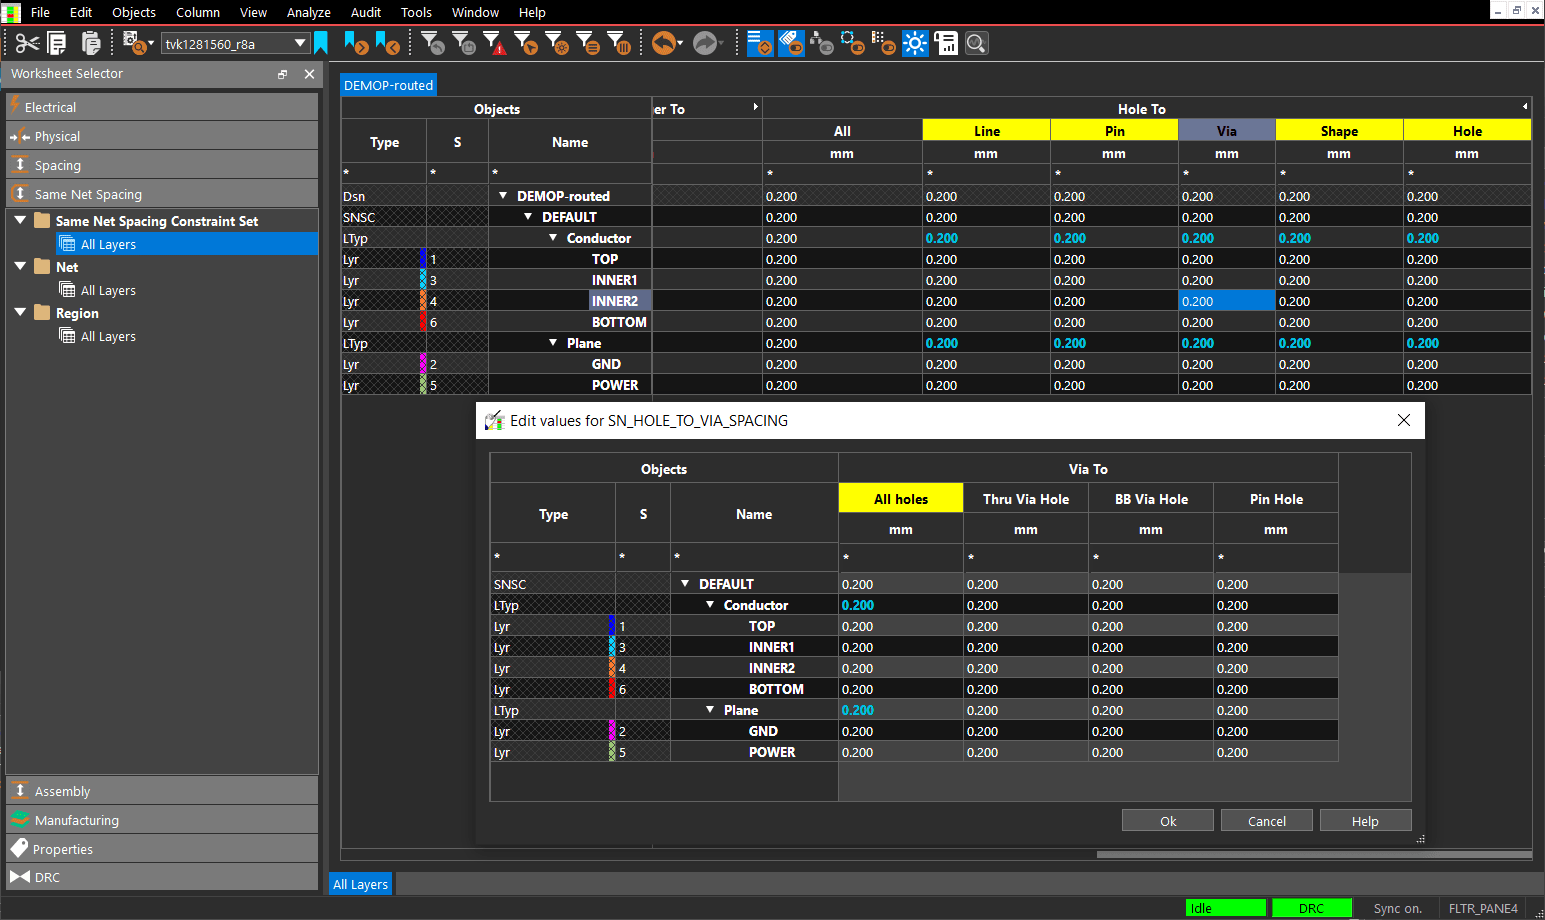
Editing Hole To Hole Constraints
You can expand the Hole To checks to edit separate values for Thru Via Holes, Blind/Buried Holes, Micro Via Holes and Pin Holes in both Spacing and Same Net Spacing domains.
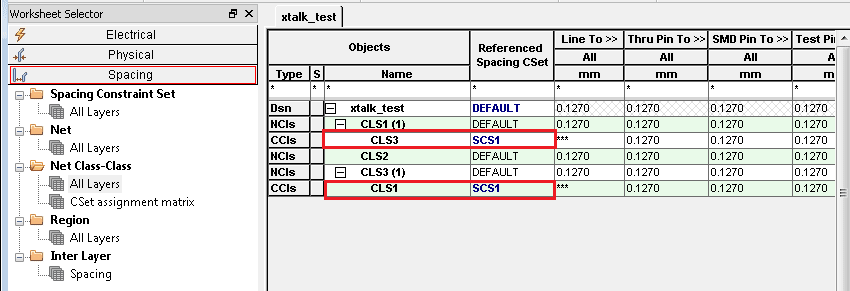
Creating Spacing Class-Class
The Cset assignment matrix spreadsheet in the Spacing domain presents a matrix of Net Classes where SCSets are available for selection in the cells from a drop-down list. Using this spreadsheet, you can add or delete a Class-Class relationship by adding or removing the SCSet reference. Adding an SCSet reference defines a Class-Class relationship for that row and column.
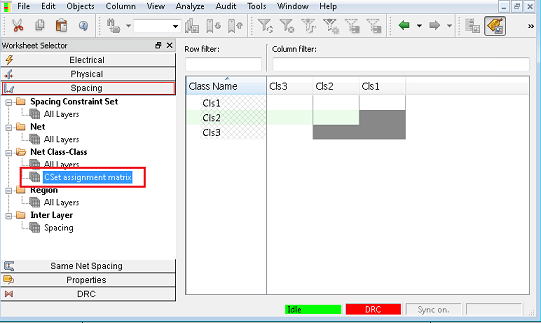
Selecting a cell for example, Cls1XCls3 and referencing a SCset Scs1 creates a spacing class-class between Net Classes Cls1 and Cls3.
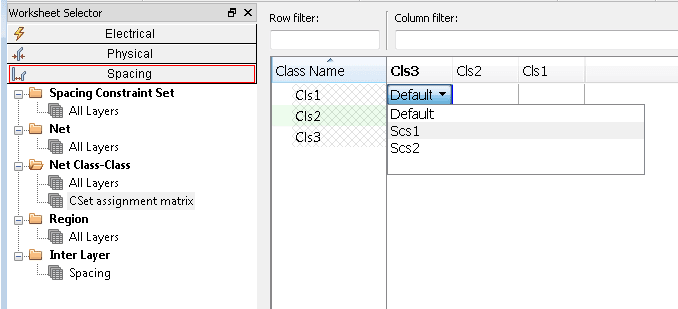
The class-class relationship is created dynamically in the Net Class-Class workbook.
You can also create multiple class-class relationships by selecting a Net Class in the column and referencing an SCSet.

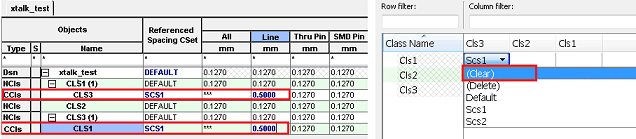
Removing an SCSet reference deletes a class-class relationship for that row and column.
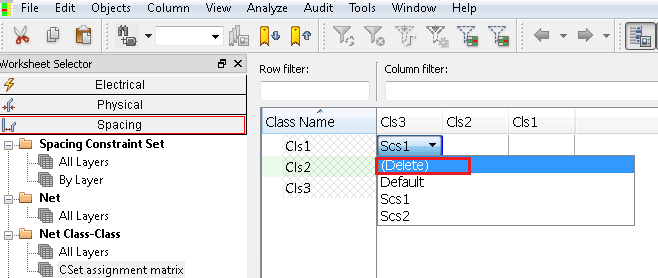
If the class-class relationship has directly-set values, you can either clear the SCSet assignment or delete the class-class relationship.
Clicking any of the cells under the Hole To columns opens the Edit values for dialog box for the column where you can edit the granular Hole To constraint values for the all the layers.
View the next document: 02 - ECSets and Topology Templates
If you have any questions or comments about the OrCAD X platform, click on the link below.
Contact Us