Drafting Skills for the PCB Designer
One of the many hats worn by a board designer is that of a draftsperson. Before settling into a position doing layout, I had a contract to create drawings on vellum - with a pencil! Before they turned me loose, the Manager asked me to write my name and phone number on a piece of paper. That was all it took; get to work. Ever since seventh grade drafting class, my normal handwriting has been in all caps. We no longer need legible handwriting to land a job but some of the things I learned at Cavro Scientific have stuck with me all of these years.
Dimensions and Tolerances
The electronic data by itself is enough to fabricate a board most of the time. Whether it’s an omnibus file like IPC-2581 or a collection of Gerber and drill data, the hole size and locations are provided along with the circuit pattern. Why take the time to use the dimensioning tool? Here’s why. Somebody has to inspect the PCB before it leaves the fabrication shop. Someone else inspects it on the way into the factory. All of the fab and assembly drawings are inspection documents.

Image Credit: Extreme Tech - The PCB hugs the connector on three sides, all of which are critical dimensions.
The design intent can be lost without the effort made to establish a bolt pattern or other feature that is critical to the design. So-called “mid-mount” connectors are nested into a slot. That slot may have a very tight tolerance. The datasheet for the connector may even have a unilateral tolerance that allows the slot to grow but not to shrink from the nominal value.
Without the dimension and the tolerance, the “assumed tolerance” will take the nominal width of the slot and give plus or minus the usual allowance for deviation from the title block of the drawing. That may be fine for the rest of the board outline but could lead to issues if it is not properly controlled.
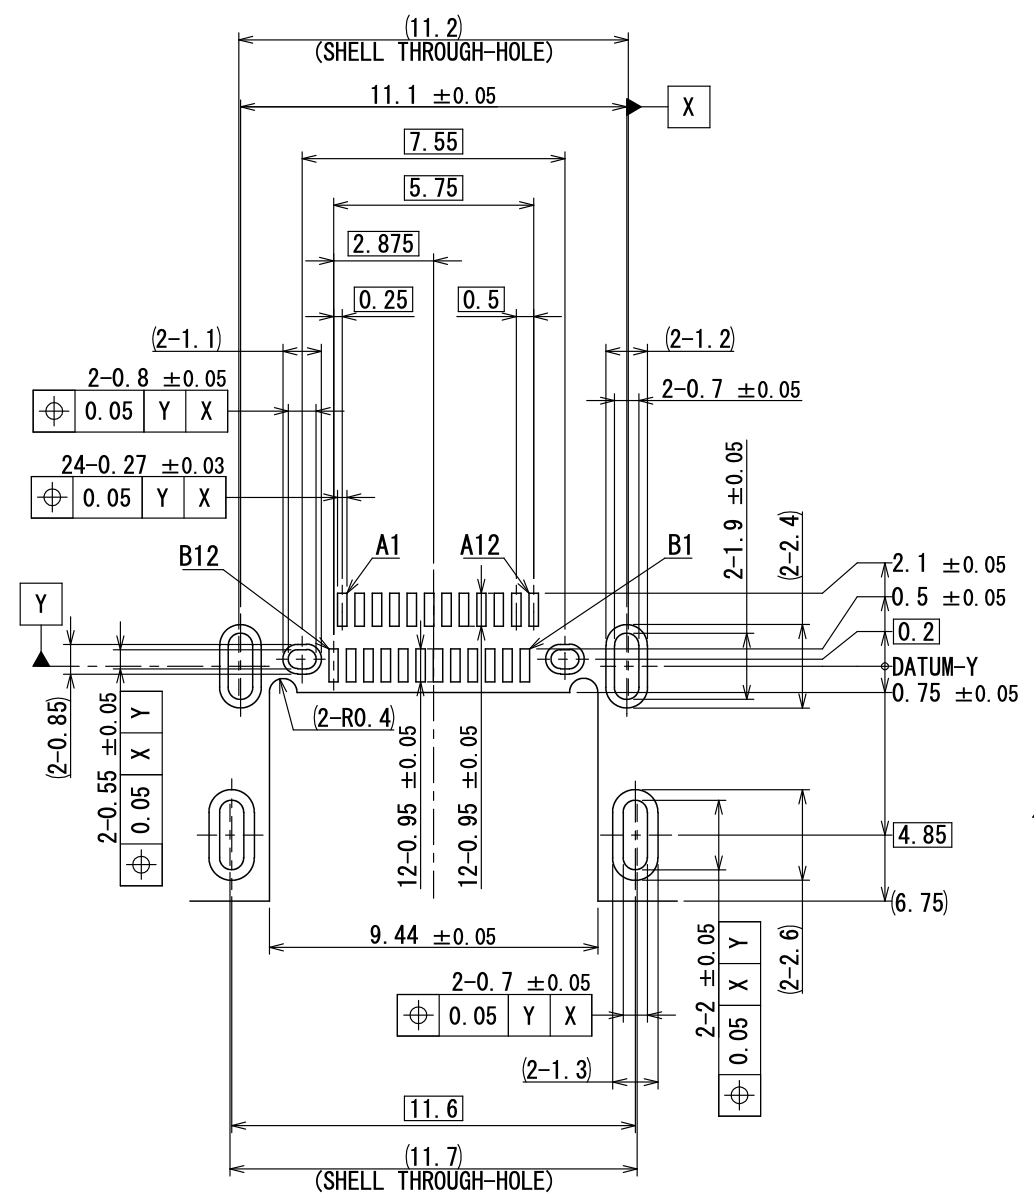
Image Credit: Mouser - A typical mid-mount connector often used on phones and other slim form factors where the connector height above the PCB would be too much.
I would draw some of these critical dimensions on the board dimension layer and the rest of them on the package dimension layer. It’s a good idea to dimension the footprints to make checking easier and to avoid mistakes in the first place. I’ve caught my own mistakes that way. Taking the time to dimension the features in much the same way as the drawing is a nice little insurance policy.
Details and the Big Picture.
We use details whenever the feature is too small or oddly located for normal dimensions to cover the geometry. The bevel on an edge connector is one such feature. The “mouse bite” around the assembly sub-panel is another one. Since you’re not reinventing the wheel every time out, it’s a good idea to keep a scrapbook full of common design elements so that they can be reused when it’s appropriate.
We use details for a number of other things. Impedance will be called out on a layer-by-layer basis and at the same time support numerous impedance values for each signal layer. Reference planes for each one would also be noted. It’s natural to set up a chart that allows the interested parties to cross reference the design against the design rules. We use another chart for the various drill sizes, tolerances, quantities and plating specifications. High Density Interconnects (HDI) will make use of several boxes of data broken out for each layer pair. The different stack-up regions of a flex or a rigid/flex also could be depicted in this form or potentially broken out as separate details for modular reuse. Next, I’ll discuss a less obvious way that tables can come in handy.
Tabular Drawings, a Chance to Save Some Paper and Time
There are types of drawings that can cover more than one board. One instance that comes to mind is a flex circuit that amounts to a bespoke connector. Let’s say that there’s a ZIF (zero insertion force) connector on one end and a stacking connector at the other with a pattern of lines and shapes running from end to end.
It is quite possible that the same connector pair can be used for different interconnects in a system of boards. You could have various lengths called out with a separate dash number for each length. Down the road, more examples could be added with little effort.
In this way, the same fabrication and assembly drawings can support numerous sets of artwork. You have two detailed images of the ends of the flex with a jagged pair of lines separating the two. A dimension from end to end would refer to a table that indicates the overall length.
Notes: Unless Otherwise Specified.
This could be a topic in its own right. The written instructions we give to the fabrication and assembly groups can be insufficient and overkill at the same time. Process data does not belong on an inspection document. That is what we generate at the end of each cycle. Sampling plans, solder profiles, and other how-to items should go into separate documents to be referenced by the fabrication and/or assembly notes.
The inspector should be able to look at the product and the documentation and draw a conclusion as to whether it meets the requirements. Provided that I’m not color blind, I can see the color visually. I can measure the thickness of the soldermask with a cross section. I cannot tell if it was cleaned with “ultra-pure” water prior to application of the mask. What I can do is determine if it passes the soldermask “tape test” according to IPC-TM-650 Test Method 2.4.28.1. That’s what actually matters. That’s what can be evaluated and that’s what you should be using for your notes.
If the product is meant to adhere to IPC 6012 Class 2 standards, then that should be written out in the notes. That specification covers a lot of ground and there is no need to repeat what is already conveyed by that one note. What you would need to call out are exceptions to the rules set forth by the IPC classes. For instance, the via-break-out of 90 degrees may not be desirable. A follow-on note stating that tangency is the minimum requirement would make sense.
The thing is that it is now up to the designer (you and me) to create padstack geometry and hole size/tolerance that support the kind of fabrication we require. If, for instance, the product requires a tight flatness spec and you turn in artwork with unbalanced copper loads from, your fabricators are unlikely to yield sufficient numbers to make it a viable product. Perhaps, they can bake it in a press to get it to go flat. Guess what happens when the board subsequently goes through another heat cycle for assembly. It turns right back into a potato chip!
The point is this: Don’t let your notes write checks that your layout cannot cash. Use your CAD tools to ensure that the amount of copper on each layer is essentially a mirror image from the center core outward. Whether it comes to copper thieving on the signal layers or flooding every layer with ground, you must give your vendors a chance to succeed so that your product can succeed. QED. That is what I came here to say.