Opening and Creating a Design in OrCAD X
Key Takeaways
-
Learn how to open and set up a new project in OrCAD X Capture and OrCAD X Presto.
-
Customize page properties, design templates, and preferences.
-
Explore the benefits of using OrCAD X workspaces for collaboration and file management.
Opening and creating a design in OrCAD X is straightforward, but the process varies depending on whether you're working on a schematic with OrCAD X Capture or a PCB layout with OrCAD X Presto. Each tool is tailored for specific stages of the design process, providing an efficient workflow for schematic capture and board design.
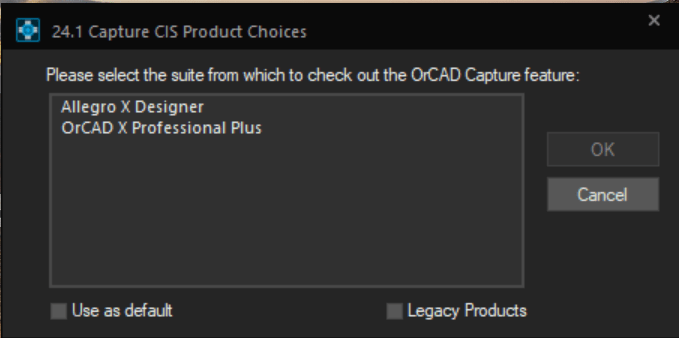
OrCAD X Capture Product Choice GUI displaying available licenses.
Below, we explore what you need to know about opening and creating a design in OrCAD X. From the start menu, select your application of choice - for schematics, select OrCAD X Capture CIS or for board layouts select OrCAD X PCB Presto. Choose an available license, and click OK to launch the software.
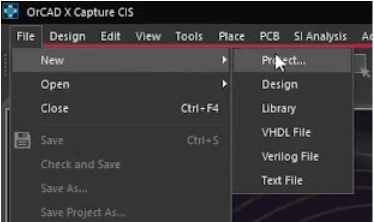
In OrCAD X Capture, Create a new project through: File > New > Project
Creating a Design in OrCAD X Capture
|
Step |
How to Do It |
|
Launch OrCAD X Capture |
Open OrCAD X Capture by clicking the Start menu or double-clicking the desktop shortcut. Choose an available license, and click OK to launch the software. |
|
Start a new project |
On the Start page, either click the New shortcut or navigate to File – New – Project. In the pop-up, name the project and press OK to create it. |
|
Familiarize yourself with the interface |
Explore panels like the Project Panel (right side) for project files and layout, helper windows (bottom) for errors and logs, and menu items (top) for commands. Rearrange panels if needed, or keep them at default. |
|
Customize the page properties |
Edit the title block (in the bottom right by default) by double-clicking it to set a title, document number, and revision. To apply these changes as defaults, go to Options – Design Template – Title Block Tab. |
|
Adjust the page size |
Change the page size by navigating to Options – Design Template – Page Size Tab, selecting a size (e.g., "B"), and pressing OK. |
|
Set preferences for the design environment |
Go to Options – Preferences – Colors/Print Tab to customize the UI theme (e.g., dark mode) and set colors for wires, properties, and other elements. Explore other tabs for grid, zoom behavior, or other settings. |
|
Save and organize your project |
Save the project and organize your schematic pages as needed. Use drag-and-drop to reorder the pages if necessary. |
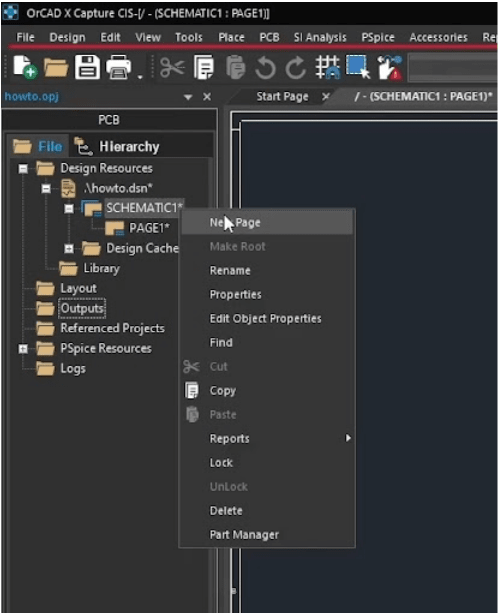
To create a new page, Right-click your SCHEMATIC file in the file explorer, and select New page.
Opening a Design in OrCAD X Capture
|
Step |
Description |
|
Launch OrCAD X Capture |
Start the application from the Start menu or desktop shortcut. (Alternatively, look for the .dsn file in the Projects folder of your workspace or in the location where you saved it and double-click it in your file explorer.) |
|
Select the Project File |
Go to File – Open – Project. A dialog box will appear. |
|
Browse for the Design |
Navigate to the folder containing the project file, typically with a .dsn extension. |
|
Select the File and Click Open |
Choose the desired .dsn file and click Open. The design schematic will load. |
|
Review the Design |
Verify the loaded schematic in the Project Panel, including pages and file associations, before making any changes or exporting the design. |
OrCAD X Workspaces for Creating Designs
In OrCAD X Capture, workspaces are cloud-based environments designed to manage your projects, libraries, and associated files efficiently. Each user is provided with a default workspace, called My Workspace, and can create additional workspaces to collaborate with team members, such as engineers or librarians.
Key features of workspaces include:
-
Cloud and Local Synchronization: Workspaces store files in the cloud while maintaining a synchronized local copy on your machine for offline access.
-
Collaboration: Workspaces allow users to invite collaborators and assign roles, such as librarian, designer, or administrator, ensuring streamlined teamwork.
-
Centralized Organization: All project files, symbols, and footprints are neatly organized in the workspace, making it easy to manage and access components.
Configuring and Using Workspaces
-
Setting Up Workspaces:
-
Go to the View menu and navigate to Workspace – Configuration.
-
Ensure the data source is set to Cloud instead of Local for cloud-based syncing.
-
Use the configuration dialog to create new workspaces or add collaborators by typing their OrCAD X Cloud email and assigning roles.
File Management in Workspaces:
-
Access the Workspace File Manager via the View menu. Here, you can view the structure of your workspace files.
-
Symbols, footprints, and projects are organized under respective folders, which can be opened in the Windows File Browser for direct access.
-
Add files like symbol libraries (.OLB) or footprints (.DRA, .PSM) to the relevant folders, ensuring they sync with the cloud using the refresh icon in the File Manager.
Data Residency and Accessibility:
-
Specify the data residency of a workspace during creation to set the geographical location of the workspace data or server domain.
-
Indicate whether the workspace is for internal use only or allows external access by selecting the Provide Access to Users of External Domains checkbox.
-
Use the Shared With section in the Workspace Configuration dialog to review which users or domains have access to the workspace.
Managing Workspace Visibility:
-
Control the visibility of workspaces in the File Manager and Component Explorer.
-
Hide a workspace by right-clicking on it in the Workspace Configuration dialog and selecting Hide.
-
Show a hidden workspace by selecting it, right-clicking, and choosing Show in Component Explorer.
-
Workspaces with visibility turned on will appear in both the Component Explorer and File Manager.
After launching OrCAD X Presto, you’ll be greeted with this panel.
Creating a Design in OrCAD X Presto for Board Layouts
|
Step |
Description |
|
Launch OrCAD X Presto |
Open OrCAD X PCB Presto 24.1 from the Start menu on your Windows system. This opens the Cadence Product Choices dialog box. |
|
Select a product license and start the software |
In the Cadence Product Choices dialog box, choose your desired product license and click OK. The Start Page will open. |
|
Create a new blank board design file |
Navigate to File – New – Board. This creates a new .brd file named Untitled.brd with a default rectangular outline, opening in a tab. |
|
Save the new board design with a custom name and location |
Go to File – Save As, specify the name and path for the file, and save it. The file name appears in the tab, and hovering shows its path. |
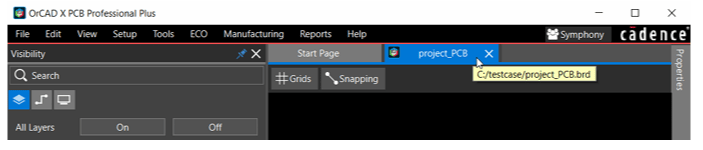
You can see the location of your board by hovering over its name in the tab near the top of your screen.
Opening a Pre-existing Design in OrCAD X Presto
|
Step |
Description |
|
Launch OrCAD X Presto |
Open the software via the Start menu or desktop shortcut. Check the .brd file in the Boards folder of your workspace or in the location where you saved it. |
|
Access the File Menu |
Go to File – Open and select Board from the dropdown menu. |
|
Locate the Design File |
Navigate to the directory containing the .brd file you want to open. |
|
Select the File and Click Open |
Choose the .brd file and click Open. The selected design will open in a new tab. |
|
Verify the Design |
Review the layout, including component placements, traces, and layers, to ensure everything is as expected before making modifications. |
Opening and creating a design in OrCAD X is simple for both schematic capture and PCB layout. Explore how Cadence’s comprehensive PCB design and analysis software supports your workflows, from project setup to final verification. Learn more about OrCAD X to improve your design process today.
Leading electronics providers rely on Cadence products to optimize power, space, and energy needs for a wide variety of market applications. To learn more about our innovative solutions, talk to our team of experts or subscribe to our YouTube channel.