12 - Creating Reports
A report contains relevant information about the parts in your design. You can customize the report to include both database and placed part properties.
Part ambiguities must be resolved before you create a bill of materials report.
If you want mechanical (non-electrical) parts to be included in CIS reports, you must place these parts on the root schematic of the design or on a schematic that is referenced by a hierarchical block on the root schematic.
CIS supports standard bills of materials that you create completely within CIS. It also supports advanced reports that you generate from within CIS using templates created in Crystal Reports. Crystal Reports is a powerful, dynamic, and widely-used report design software solution from SAP BusinessObjects. You can use Crystal Reports in conjunction with Capture CIS to make customized report templates with more advanced features than the standard CIS bill of materials, including precision formatting and formulas that total filter and analyze data for highly specific results. You must have Crystal Reports installed on your system with CIS to create Crystal Reports templates beyond what is supplied with Capture CIS.
CIS also supports variant reports that list differences between the core design and selected BOM variants.
Creating a Standard CIS Bill of Materials
A bill of materials lists all the parts in your design. You can use the standard CIS bill of materials feature to create multiple, named report templates so that you can generate separate bills of materials for the different requirements of engineering, purchasing, and manufacturing. The report can be generated for an entire design or some selected sections of the design.
Also, you can generate BOMs that list all the mechanical parts (heatsinks, fans, screws, etc.) and assemblies (cables, transformers, jumpers, LED sockets, etc.) associated with an electrical part in a design. For example, a TO-220 package MOSFET would have an associated heatsink and drain screw for mounting.
Do not use the Bill of Materials command from the Tools menu to create your reports. This command does not use your part database information to produce the bill of materials. Only the CIS Bill of Materials commands from the Reports menu use your part database information.
To create a standard CIS bill of materials, do the following:
1. From the part manager’s Reports menu, choose CIS Bill of Materials - Standard. The Standard Bill of Materials dialog box displays.
You can also access the CIS Bill of Materials commands from the project manager using the ![]() BOM button.
BOM button.
2. In the Template Name text box, type in a name for the template, or select one from the drop-down list.
You can create multiple, named templates and define a different format for each. However, since a bill of materials file is, by default, saved using the design name and a .BOM extension, you’ll have to save each report under a unique filename using the part manager’s Save As command (from the File menu).
3. Select a part property you want in the bill of materials and click the Add button. The part property moves to the Output Format list. You can also double-click a property to move it from one side to the other.
The Select Properties list only includes schematic properties that you have configured to be transferred from the database. If you want to include a schematic property in your bill of materials that is not in your part database, you must type in its exact name and then choose the Add button. If you want to delete an added schematic property from the Select Properties list, select the property and click the Delete User Property button.
The property types that appear in the Select Properties list box include the following:
| Icon | Description |
|---|---|
|
|
Default CIS property names |
|
|
Properties transferred from placed parts on schematics |
|
|
Properties transferred from database parts |
|
|
Title block property names Title block property information is read from the first schematic page in the design and displayed in the report. |
You specify the properties that are transferred from the database to your placed parts when you configure CIS. This includes:
- Repeat step step 3 until all the properties you want in the bill of materials appear in the Output Format list box. he order of the items in the Output Format list box determines the order in which they appear in the report. To change the order of an item, select it and move it using the up or down arrow buttons to the right of the Output Format list box.
-
Select at least one property in the Output Format list box then select the Keyed option. You must do this to specify how CIS matches and groups records in the report. Normally, you should set Part Number to Keyed, so that parts with the same part number will be grouped in the report
Keyed properties that are missing from the placed part or have blank contents are not grouped, but remain as distinct items in the report. This is so that undefined parts display as separate line items.
- Select the Allow Saving Title Block Properties option if you want to save the title block property information along with the BOM information when you save the BOM report as a .BOM, .CSV, or .FWC file.
-
Select the List Relational Data Fields option to view the all relational fields defined in the relational database.
When you select this option, the relational fields in your database are populated in the Select Properties list.
Each relation field in the Select Properties list is fully qualified with the table name and field name as TableName: FieldName. This display prevents any conflict if two relational tables have the same field name.
This option is only available if you have configured your CIS parts database as a relational database.
-
Select one of the Part Reference Options from the following table:
Action Option Group parts with matching keyed properties on a single line
Standard
Put each part on a separate line 1
Standard – Separate Line Per Part
Allow part ranges (such as R1–R14)
Compressed
- In the List Separator drop-down list, choose:
- Space, if you want the part references in the report to be separated by spaces.
- Comma, if you want the part references in the report to be separated by commas.
- In the Exclude Prefixes field, specify part reference prefixes for parts you do not want to include in the report. Typically, you use this to omit parts that are not purchased for manufacture. To exclude more than one prefix, enter the prefixes separated by spaces.
-
Select one of the Relational Data Displayed options from the following table:
Action Option To display the relation data horizontally (in the same row)
Select Horizontal Output option
To display the relation data vertically (one line item per related data)
Deselect Horizontal Output option
Maximum number of related child items to output
Max Rows
- You have the option of creating the report for the entire design or for a selected portion of the design. In the Scope group, select the Process Entire Design option (default selection) to create a report of the entire design.
Alternatively, select certain sub-parts of the design, at page or folder level, and then open the Standard Bill of Materials dialog box. Now in the Scope group if you select the Process Selection option, the report is generated for only the selected sub-parts of the design. -
If you want to export your report to spreadsheet format and open it automatically in MS Excel, select the Export BOM Report to Excel checkbox.
If your design has design variants, you will have the option of selecting the variants whose part information CIS will use to generate the bill of materials. See the CIS online help for more information about creating bills of materials for design variants.
- If you want your report to include any variant "parts not present", choose Variant "Not Stuffed" Qty 0 Displayed option. These parts will be displayed in the report with zero quantity.
- In the Variants list, select one or more BOM variants. If you select more than one BOM variant, the Merge BOM Reports check box is selected by default. If you do not want to merge BOM variants in the report, clear the check box.
- Click the OK button. CIS automatically adds the template name for the bill of materials you have designed to the Template Name list so that you can use the template again the next time you want to generate a bill of materials.
CIS checks for parts that are grouped (by having the same part number, for example), but that have different properties or packaging or have duplicate part references between instances of the parts.
CIS creates a report of the entire physical design regardless of the schematics and pages selected in the project manager.
If any design errors are encountered during report creation, a dialog box prompts you to view the errors in the session log.
If no design errors are encountered during report creation, the bill of materials report appears in a window.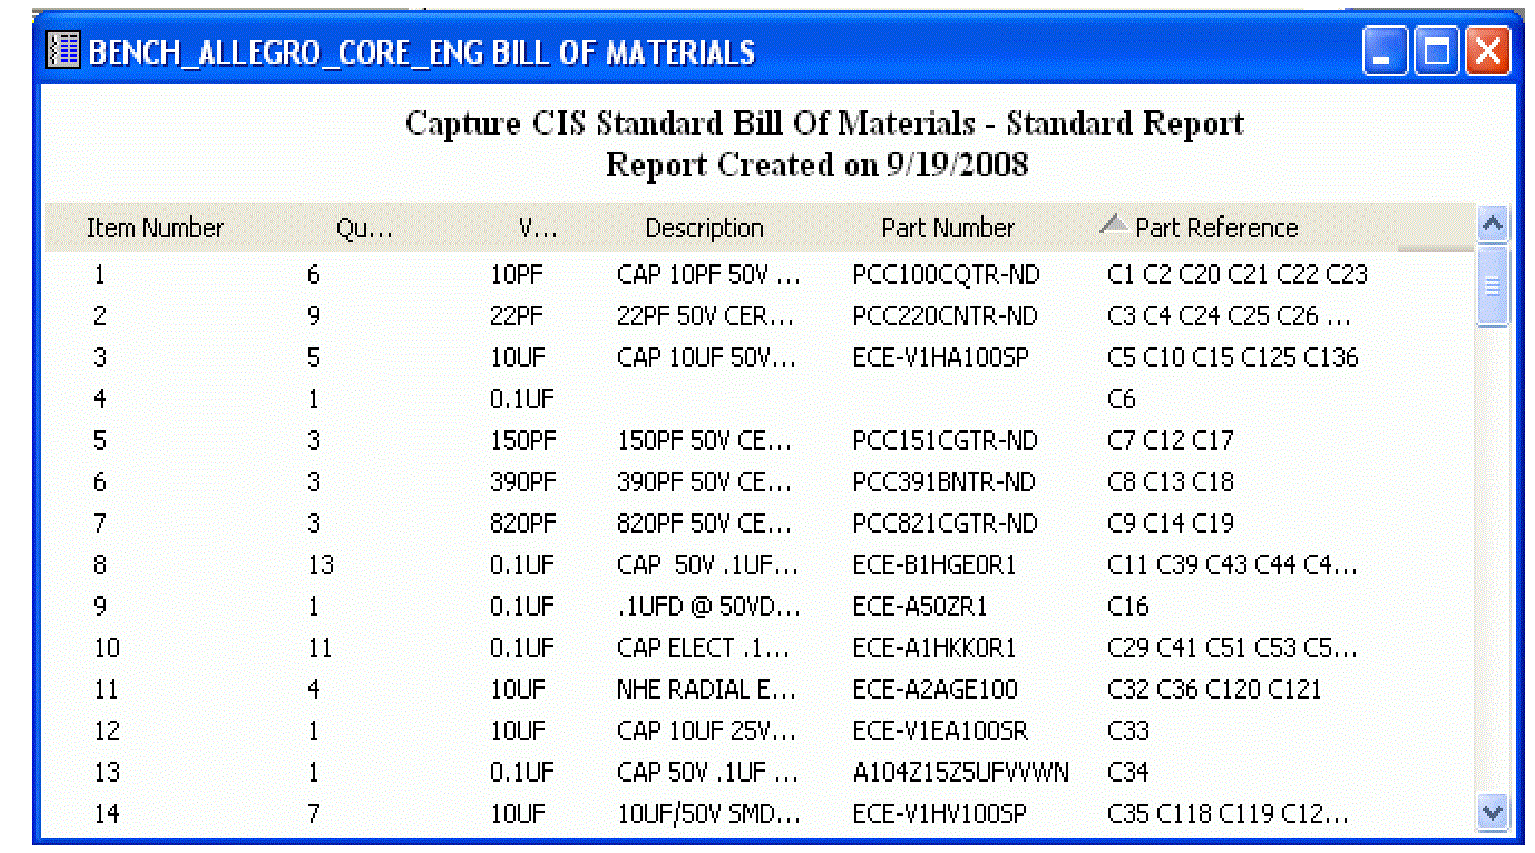
You can choose a column heading to sort the rows by the values in that column, and choose the same column heading again to reverse the sort order. You can adjust the column widths by dragging the vertical lines between the column heading names to the left or right. If you save the bill of materials, it is saved with the current sort order
If you have included properties in your report that are configured as browsable, CIS will hyperlink (blue underline) the part values for those properties. You can click on the hyperlinks to display the latest version of the source file.
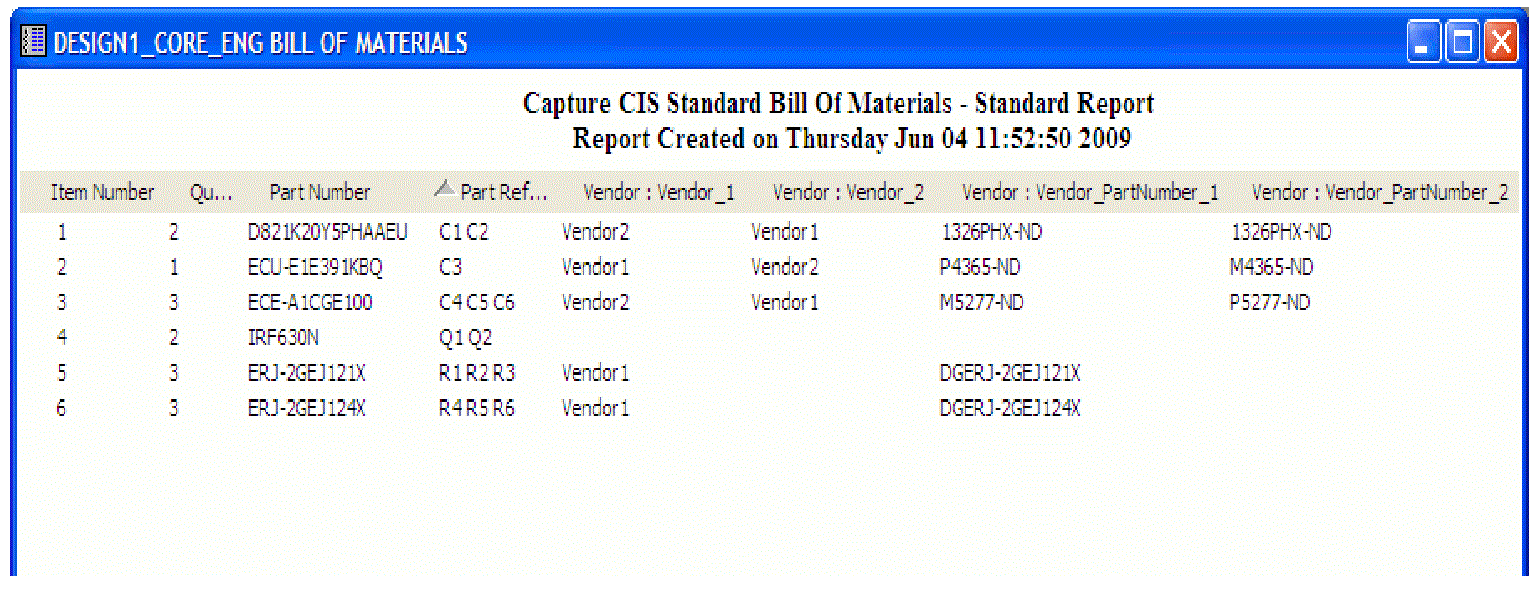
If you add relational fields to your report and choose the Relational Data Displayed option, you can view the relational data either vertically (default) or horizontally.
Horizontal View:
Vertical View: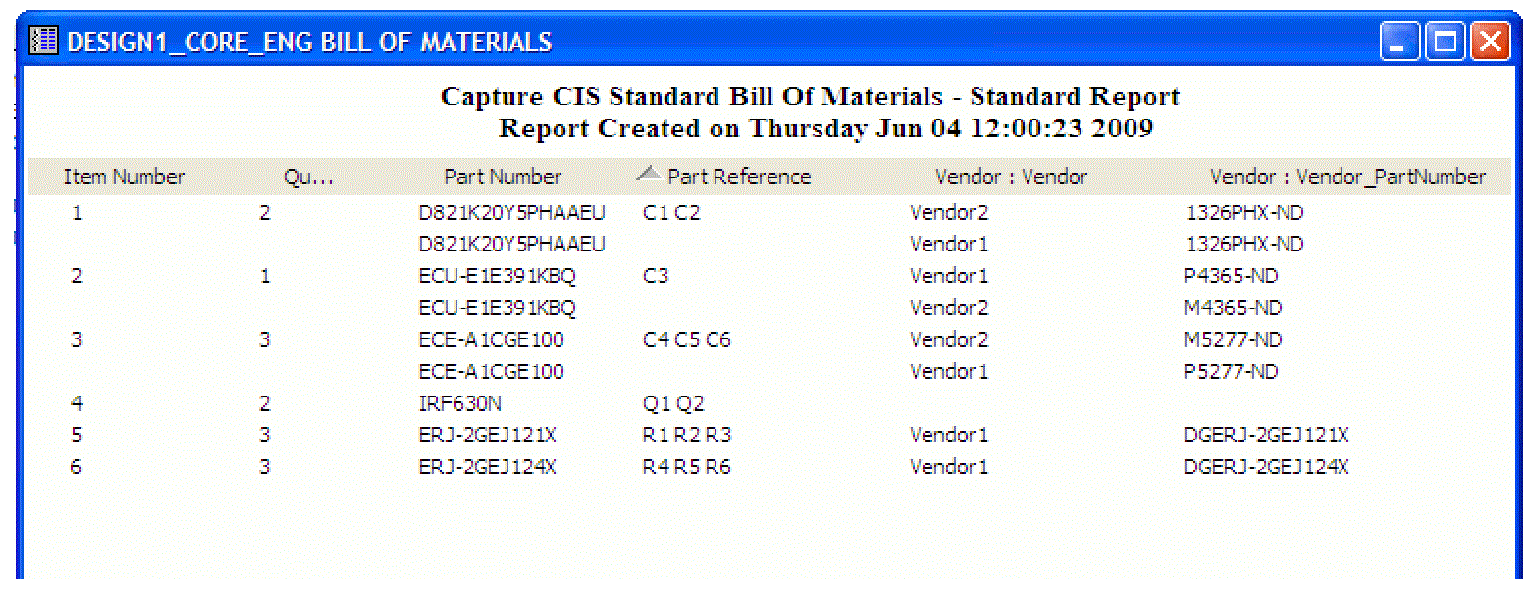
-
To save the report, select one of the save options from the following table:
Action Option Save the report into the design folder using the default file name 2. Note that you will overwrite any report previously saved using this default file name.
From the File menu, choose Save.
Save the report using a new file name into the directory of your choice.
From the File menu, choose Save As.
You can use a spreadsheet application to sort the exported output by multiple keys.
While saving the report, do not use these wild card characters * and ?.
- Specify a filename, save location, and format type. By default, CIS saves the report in tab-delimited format, but you can choose any of the following formats:
- TAB - Tab Separated Format
- (Excel) CSV - Comma Separated Format
- Access - Compatible with Microsoft Access as well as Crystal Reports.
- Formatted comma delimited file (*.FWC)
Currently in Capture CIS, it is very difficult to find out the quantity of mechanical parts (heatsinks, fans, screws, ect.) and assemblies (cables, transformers, jumpers, LED sockets, ect.) associated with an electrical part in a design. By including this information in your Standard CIS BOM it will help in better costing and an error-free production cycle.
Now, you can use the Standard CIS Bill of Materials dialog box to generate a BOM that lists all the mechanical parts and assemblies associated with an electrical part in your design. However, you have to complete the steps mentioned in the following sections to use this functionality.
Addition of Mechanical Part and Assembly Details in Part Database
First, you need to add information about all the mechanical parts and assemblies used in your design. The information comprises of mechanical part number, part type, and description. You can store these details either in a separate table or add it to an existing part table. You must ensure that you specify the Part Type for a mechanical part as Mechanical Part and an assembly as Mechanical Assembly.
A sample table containing the mechanical part and assembly details is shown as follows:
| Part Number | Part Type | Description |
|---|---|---|
|
CADEMECH1236 |
Mechanical Part |
Fan |
|
CADEMECH1237 |
Mechanical Part |
Screw |
|
ASEMM1 |
Mechanical Assembly |
Assembly |
|
ASEMM2 |
Mechanical Assembly |
Assembly |
In addition to the above columns, the table must also contain the Schematic Part and Value columns.
If you are creating a new table for storing the mechanical part details then you can specify a table name as per your choice.
Mapping Electrical Parts with their Associated Mechanical Parts and Assemblies
After you have added description about all the mechanical parts and assemblies in your design, you must create a new table in your part database (.DB) that maps all the electrical parts in your design with their associated mechanical parts and assemblies. For example, If your design has a TO-220 package MOSFET electrical part, which has a heatsink and drain screws associated with it. Then, in the table, the Part Number of the electrical part (TO-220 MOSFET) will be mapped to the Part Number of the mechanical parts associated with this electrical part along with the mechanical part quantity. You can specify a table name as per your choice.
The table must have the following property columns in addition to the other required columns like, Schematic Part and Value:
- Part Number: is the electrical part number.
- Part Type: can be Mechanical Part or Mechanical Assembly.
Make sure that you specify the Part Type for a mechanical part as Mechanical Part and assembly as Mechanical Assembly.
- MechPartID: is the mechanical part number.
- MechPartQuantity: is the mechanical part and assembly quantity.
You can specify a name of your choice for the property columns, MechPartID and MechPartQuantity.
The following is a sample table showing the mapping between a electrical part and mechanical parts/assemblies:
| Part Number | Part Type | MechPartID | MechPartQuantity |
|---|---|---|---|
|
A100J15C0GHVVWA |
Mechanical Assembly |
ASEMM1 |
2 |
|
A100J15C0GHVVWA |
Mechanical Part |
CADMECH1234 |
4 |
|
A100J15C0GHVVWA |
Mechanical Part |
CADEMECH1236 |
2 |
|
ASEMM1 |
Mechanical Part |
CADMECH1236 |
3 |
|
ASEMM1 |
Mechanical Part |
CADEMECH1238 |
2 |
In the table, the electrical part Capacitor (A100J15C0GHVVWA) is mapped to two mechanical parts (CADMECH1234 and CADMECH1236) and an assembly (ASEMM1) using the key property Part Number and MechPartID. The table also contains details about the mechanical parts within the assembly (ASEMM1).
Mapping electrical parts with their associated mechanical parts and assemblies include the following tasks:
Setting up the Configuration File
You can create a new or modify an existing database configuration file (.DBC) so that CIS works properly with your updated part database. However, make sure that you specify the following in the CIS Configuration dialog box:
- Assign an OrCAD X property to the newly created property columns, which in this case are, MechPartID and MechPartQuantity.
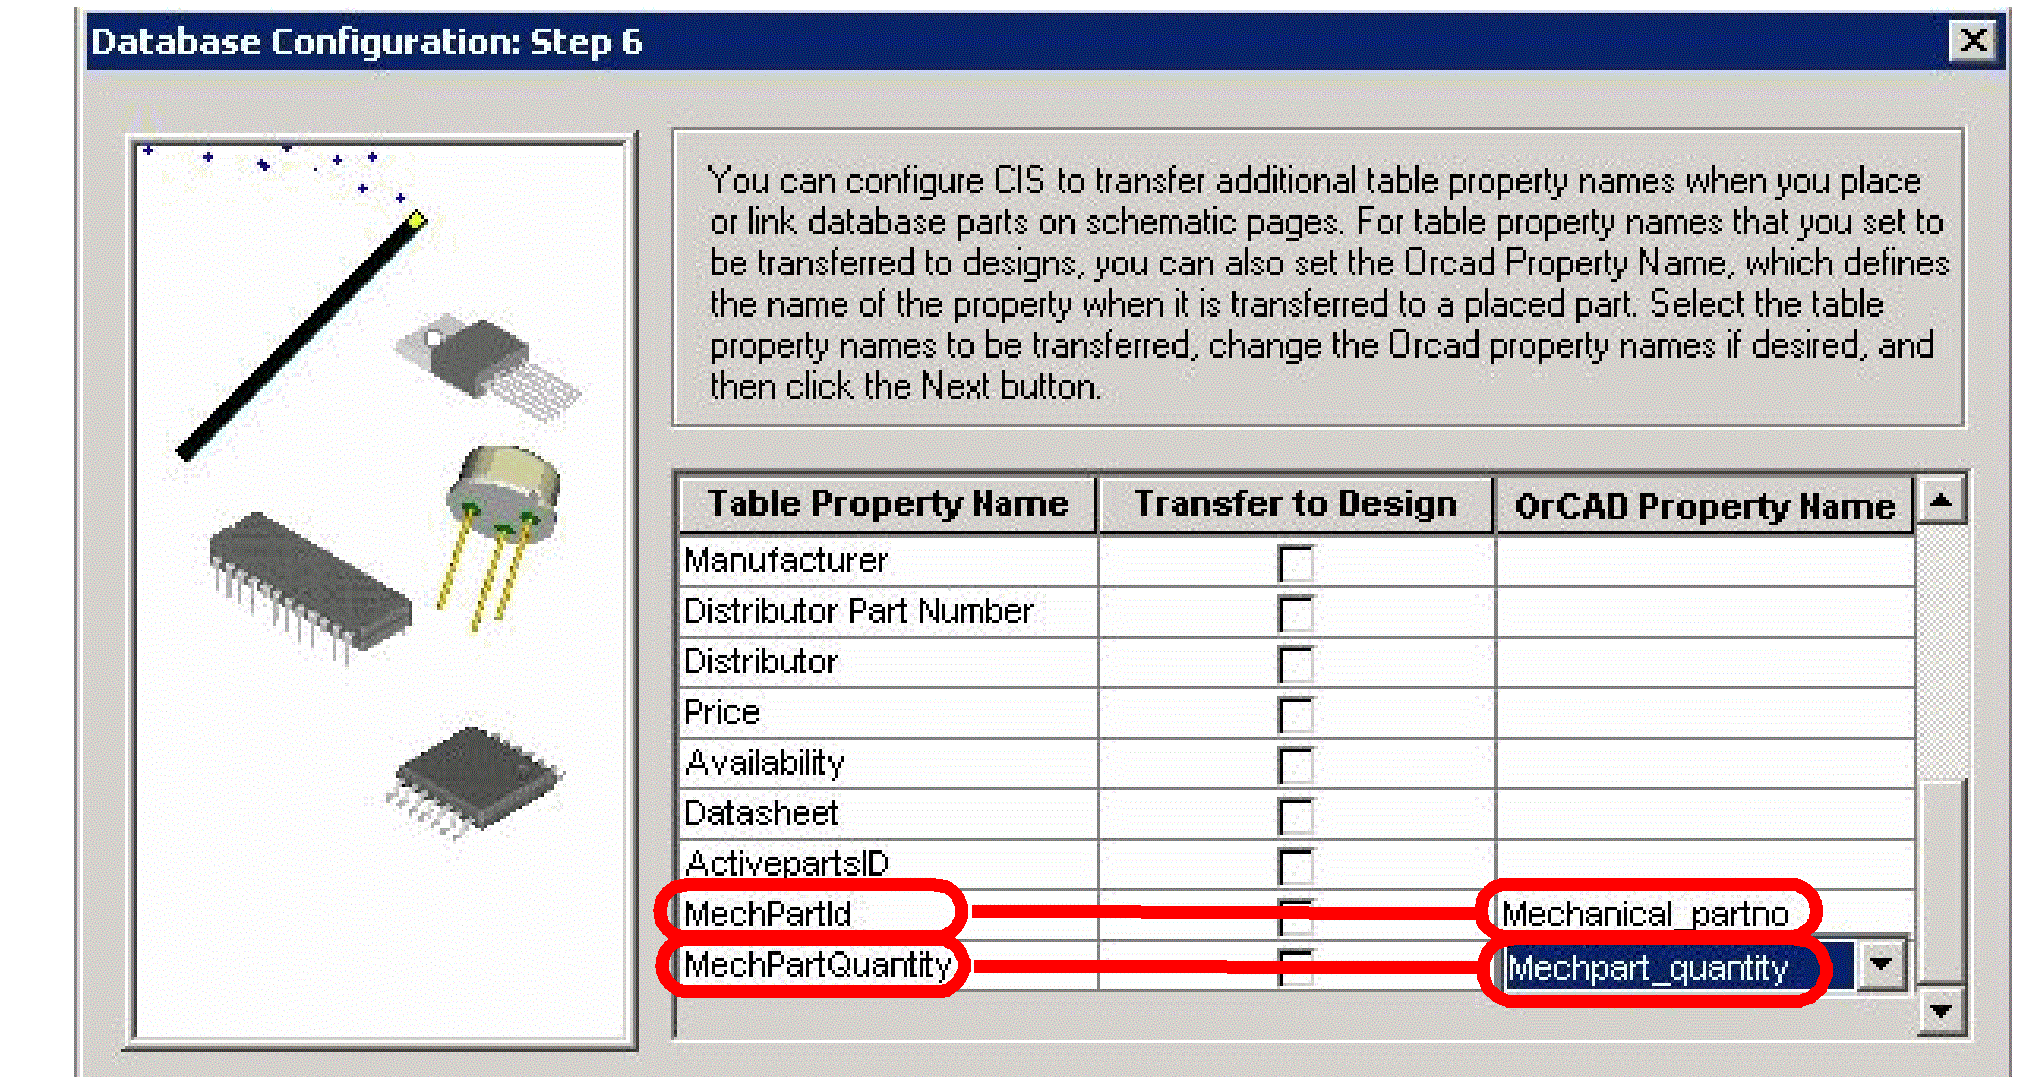
Capture CIS has added support for the following two properties: Mechanical_partno and Mechpart_quantity.
-
- For the Table Property Name, MechPartId, select the Mechanical_partno OrCAD X property from the OrCAD X Property Name drop-down list.
- For the Table Property Name, MechPartQuantity, select the Mechpart_quantity OrCAD X property from the OrCAD X Property Name drop-down list.
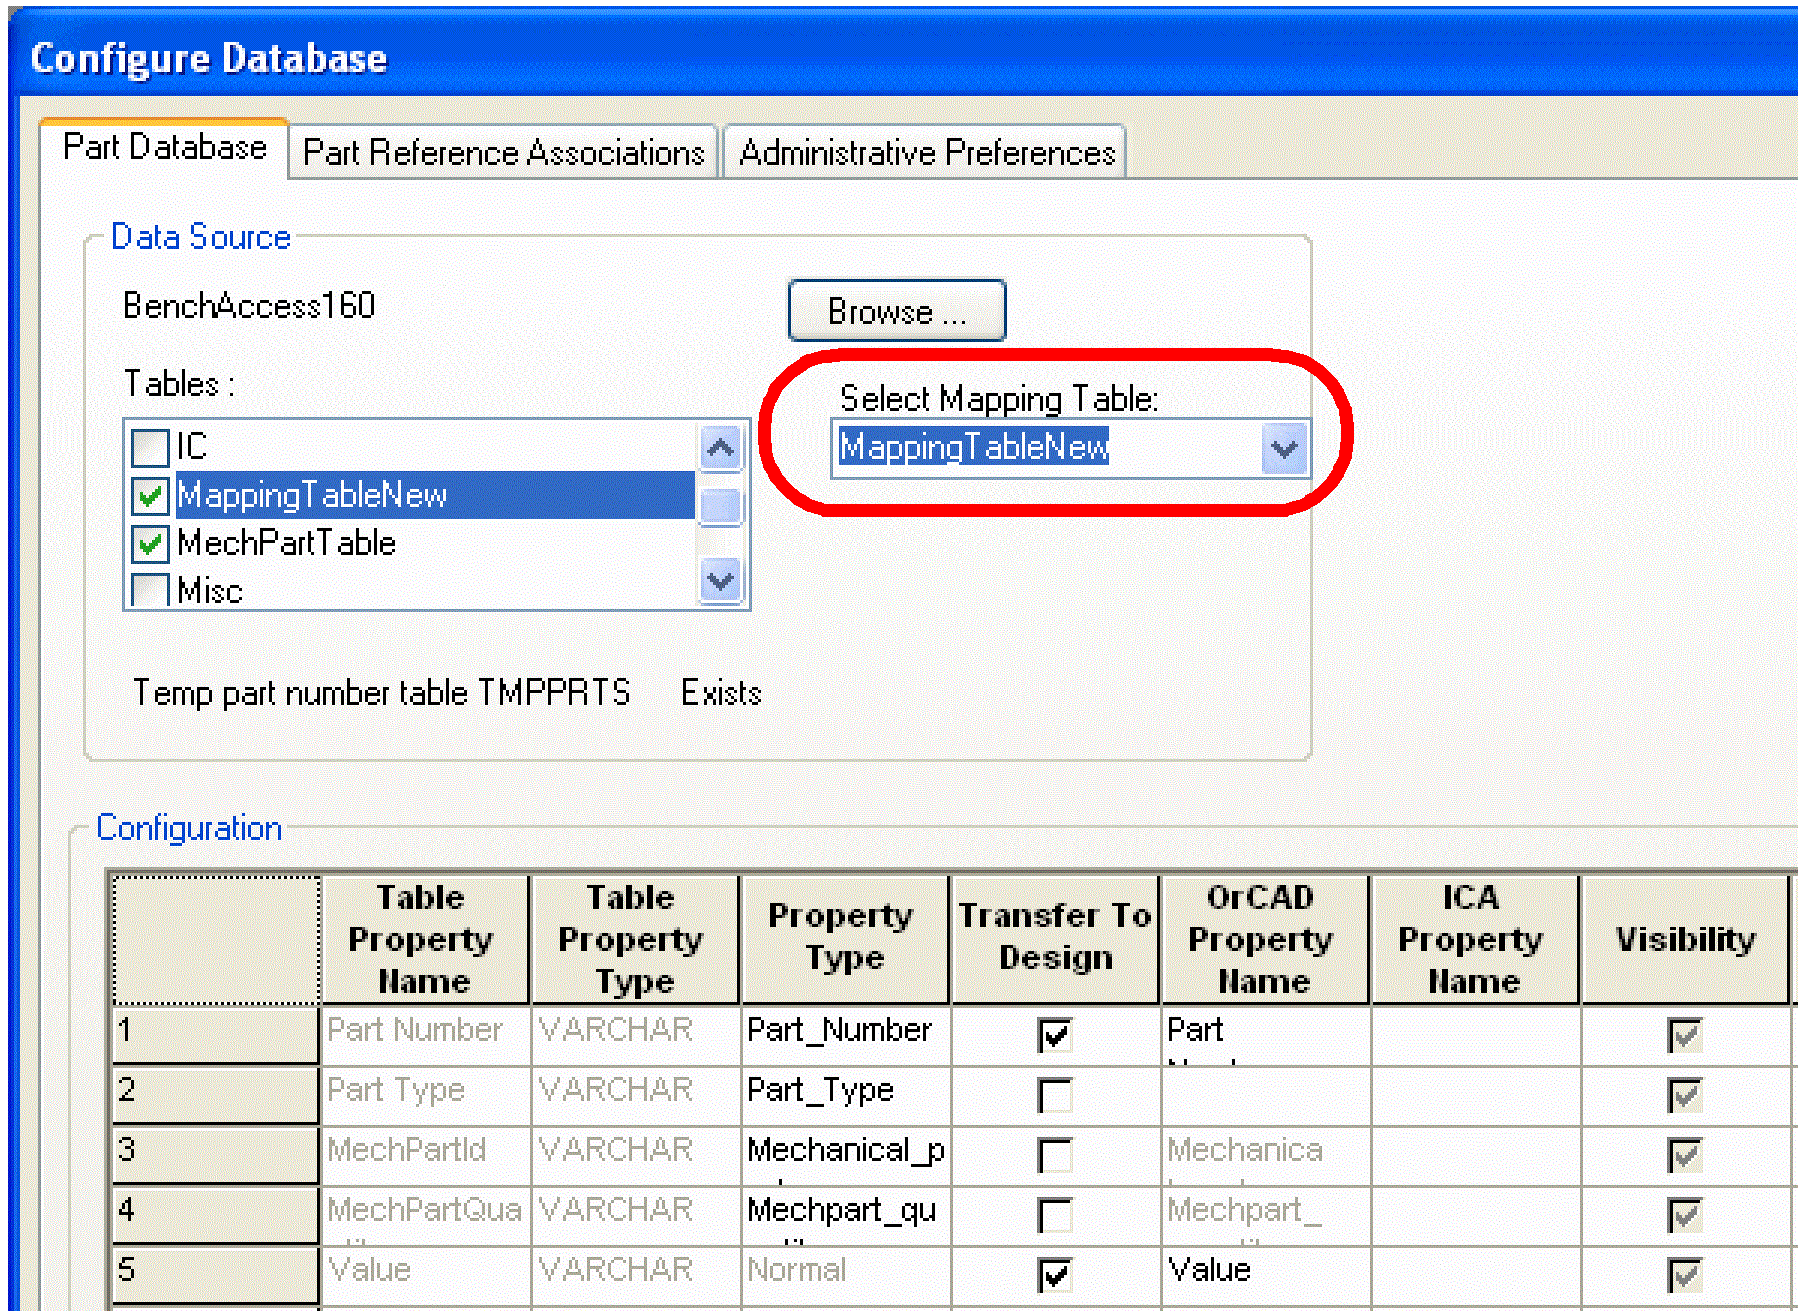
- Configure Capture CIS to use the mapping table that you created. In the CIS Database Configuration dialog box, select the mapping table from the Select Mapping Table list box as shown in the following figure:
After you have set up the configuration file, you can create standard CIS bill of materials with information about mechanical parts and assemblies associated with the electrical parts.
Creating Standard CIS BOM
To create a standard BOM with information about mechanical parts and assemblies, do the following:
- From the part manager’s Reports menu, point to CIS Bill of Materials and choose Standard. CIS displays the Standard Bill of Materials dialog box.
- In the Template Name text box, type in a name for the template, or select one from the drop-down list.
- Select or type in the following part properties: Mechpart_quantity, Mechanical_partno, and Description and click the Add button. The selected part properties move to the Output Format list.
You can also double-click a property to move it from one side to the other.
The order of the items in the Output Format list box determines the order in which they appear in the report. - To change the order of an item, select it and move it using the up or down arrow buttons to the right of the Output Format list box.
- Select Include Mechanical Part Data check box to enable the corresponding options.
- Select the Mechanical parts only option, if you want the BOM to display the quantity all the mechanical parts including the ones that are in assemblies.
Or
Select the Both Mechanical parts and assemblies option, if you want the BOM to display only those mechanical parts and assemblies that are available at the root level of your design. In this case, mechanical parts within the assemblies will not be displayed.
You can also export your report to spreadsheet format and open it automatically in MS Excel, select the Export BOM Report to Excel checkbox. Additionally, you can create BOM variant reports with information about mechanical parts and assemblies in the design variants. - Click OK. CIS automatically adds the template name for the bill of materials you have designed to the Template Name list so that you can use the template again the next time you want to generate a bill of materials.
If any design errors are encountered during report creation, a dialog box prompts you to view the errors in Session Log.
If no design errors are encountered during report creation, the bill of materials report appears in a window as shown in the following image: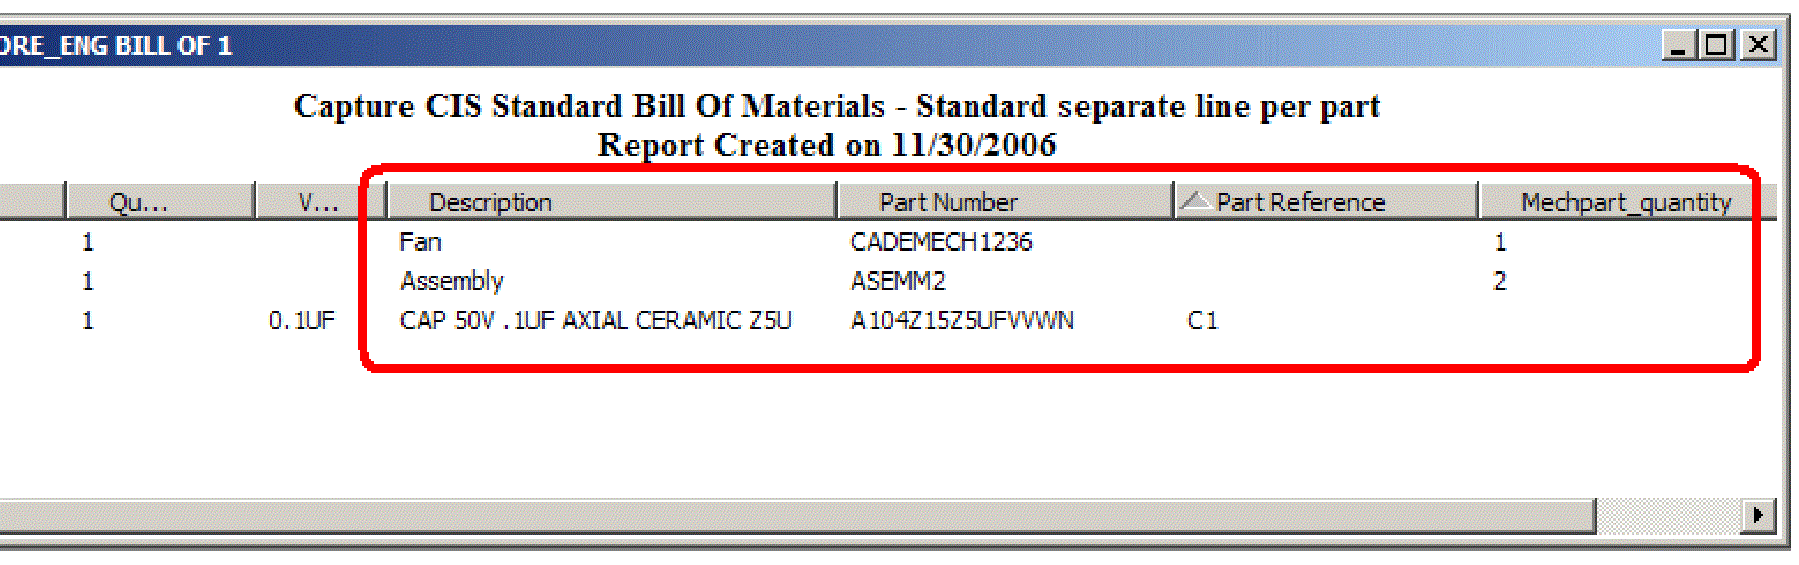
Mechanical Parts and Assemblies in Standard CIS BOM
The following illustration and the table description explain the use model of this feature: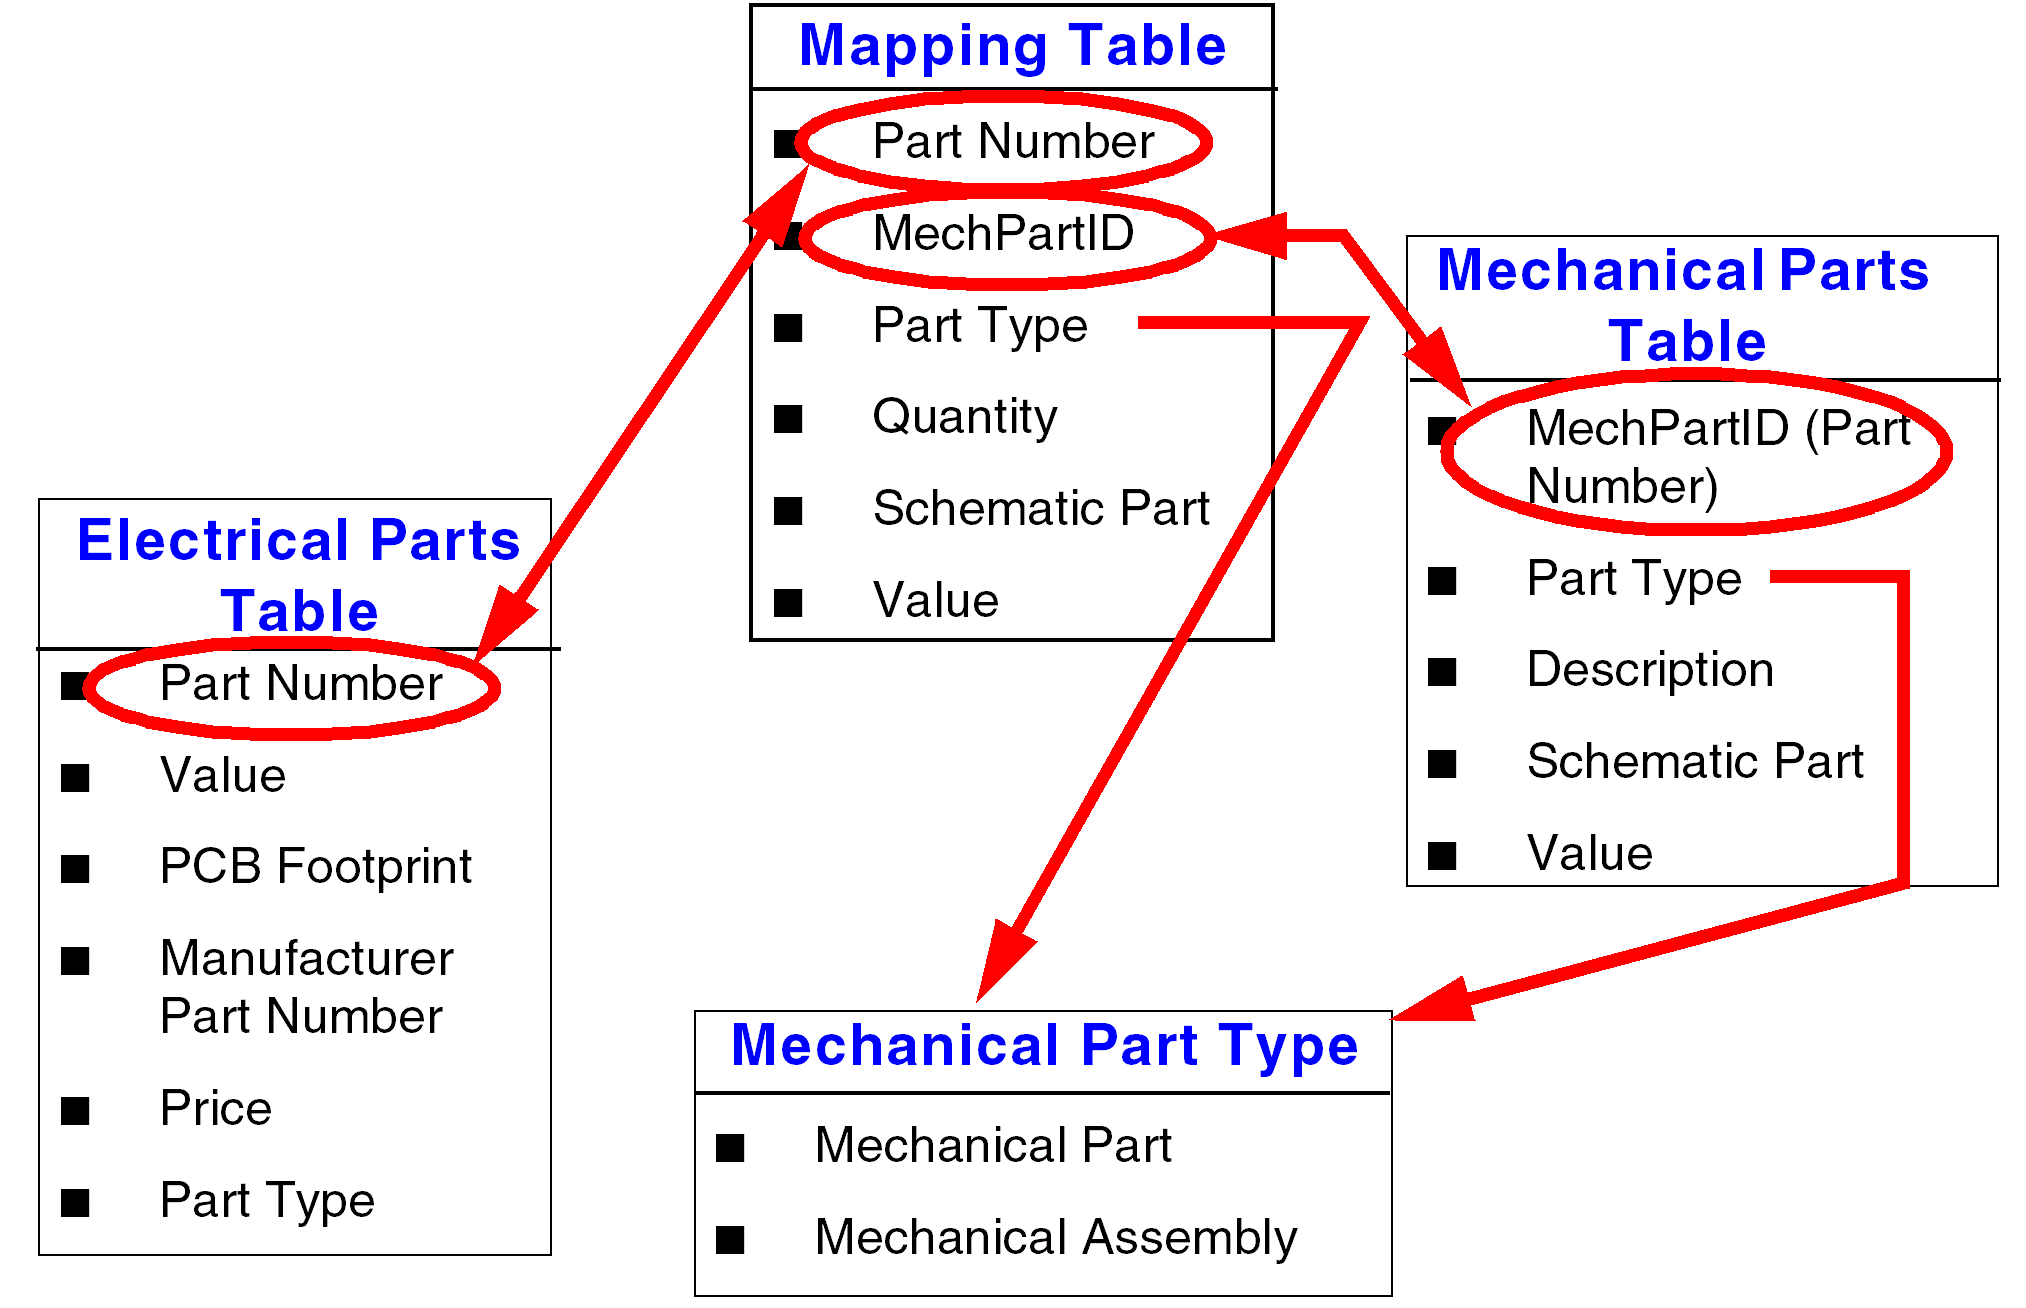
Electrical Parts Table
| Part Number | Value |
|---|---|
|
Part100 |
A100 |
|
Part101 |
A101 |
Mechanical Parts Table
| Part Number (MechPartID) | Part Type | Description |
|---|---|---|
|
Mechpart_1 |
Mechanical Part |
Fan |
|
Mechpart_2 |
Mechanical Part |
Screws |
|
Assembly_1 |
Mechanical Assembly |
Assembly |
In addition to the columns, the Mechanical Parts table must also contain the Schematic Part and Value columns.
Mapping Table
| Part Number | Part Number (MechPartID) | Part Type | MechPartQuantity (Quantity) |
|---|---|---|---|
|
Part100 |
Mechpart_1 |
Mechanical Part |
3 |
|
Part100 |
Mechpart_2 |
Mechanical Part |
1 |
|
Part101 |
Assembly_1 |
Mechanical Assembly |
1 |
|
Assembly_1 |
Mechanicalpart_1 |
Mechanical Part |
3 |
|
Assembly_1 |
Mechanicalpart_2 |
Mechanical Part |
1 |
In addition to the above columns, the Mapping table must also contain the Schematic Part and Value columns.
Based on the table descriptions, Capture CIS interprets the table information as follows:
- The electrical part (Part100), which has the Value of A100 has two mechanical parts with the following MechPartQuantity associated with it:
- 3 x Mechpart_1 (fan)
- 1 x Mechpart_2 (screws)
- The electrical part (Part101), which has the Value of A101 has one assembly associated with it with the following MechPartQuantity:
- Assembly_1, which in turn has two mechanical parts:
- 3 x Mechpart_1 (fan)
- 1 x Mechpart_2 (screws)
- Assembly_1, which in turn has two mechanical parts:
Before you can start creating BOMs with information about mechanical parts and assemblies, you must do the following:
- Add in your part database (.DBA) description about all the mechanical parts and assemblies used in your design.
- Create a new table in your part database (.DB) that maps all the electrical parts in your design with their associated mechanical parts and assemblies.
- Create a new or modify an existing database configuration file (.DBC) so that CIS works properly with your updated part database.
Creating a Report using a Crystal Reports Template
In addition to the standard CIS bill of materials, the print preview, print, and export functions of the Crystal Reports software have been integrated into CIS to allow you to use Crystal Reports templates without having to install the software on your system. You only need access to the template files on your local drive or a network to generate your custom reports.
You can distribute reports you create in Crystal Reports in many ways, including the following:
- Print and distribute by hand
- Export in Crystal Reports Designer format (.RPT)
- Attach to an e-mail message in MS Word (.DOC) or Excel (.XLS) format
- Export to HTML and publish on the Internet
If you have Crystal Reports 11.x installed, you can also distribute the reports by posting them in an MS Exchange folder in MS Word (.DOC) or Excel (.XLS) format.
When you export a report to a different file format, you may lose some or all of the formatting. The export function can only preserve as much formatting as the export format allows.
To select and setup a predefined Crystal Reports template, do the following:
1. From the part manager’s Reports menu, point to CIS Bill of Materials and choose Crystal Reports. CIS displays the Crystal Reports Bill of Materials dialog box.
You can also access the CIS Bill of Materials commands using the Reports menu.
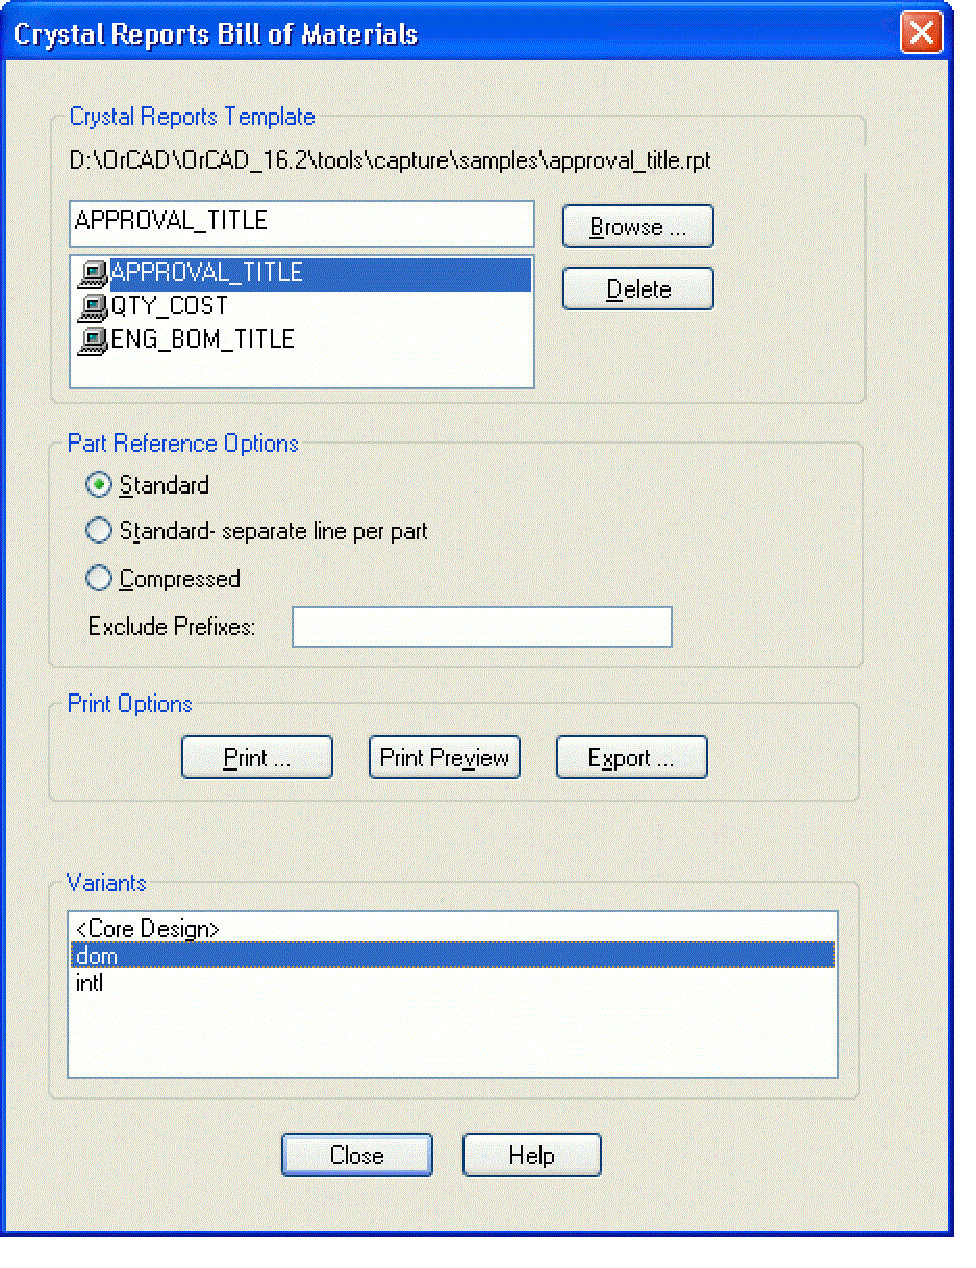
Note: The Crystal Reports Bill of Materials sorts by part reference by default, but you can set it to sort by part number in the Administrative Preferences tab of the Configure Database dialog box.
2. In the Crystal Report Template list, select a report name, or click the Browse button and locate another template. Sample Crystal Reports templates (.RPT files) are provided in <install_directory>\tools\capture\samples. These templates are designed to be used only with the BENCH.DB sample part database. You must create your own Crystal Reports templates to work with your preferred parts database.
3. Select one of the Part Reference Options from the following table:
| Action | Option |
|---|---|
|
Group parts with matching keyed properties on a single line |
Standard |
|
Put each part on a separate line |
Standard – Separate Line Per Part |
|
Allow part ranges (such as R1–R14) |
Compressed |
4. In the Exclude Part Reference Prefixes field, specify part reference prefixes for parts you do not want to include in the report. Typically, you use this to omit parts that are not purchased for manufacture. To exclude more than one prefix, enter the prefixes separated with space characters.
If your design has design variants, you will have the option of selecting the variants whose part information CIS will use to generate the report. See the CIS online help for more information about creating reports for design variants.
5. In the Variant list, select a variant or the core design. The report output includes the set of bill of materials data for the selected design.
6. Select an option from the following table:
| Option | Button |
|---|---|
|
Print your report |
|
|
Preview your report before printing or exporting |
Print Preview |
|
Export your report to a file, an MS Exchange folder, a Lotus Notes database, or MS Mail. |
Export |
After you select one of the above options, CIS generates the report. This can take several minutes, depending on the number of parts in your design and the complexity of the Crystal Reports template. CIS checks for parts that are grouped (by having the same part number, for example), but that have different properties or packaging or have duplicate part references between instances of the parts.
CIS creates a report of the entire physical design regardless of the schematics and pages selected in the project manager.
7. To customize your Crystal Report, you can use the Enter Parameter Values dialog box to specify their values for the Crystal Reports Bill of Materials report if your Crystal Reports template contains user-defined variables.
The Enter Parameter Values dialog box appears when you click the Print Preview button in the Crystal Reports Bill of Materials dialog box. 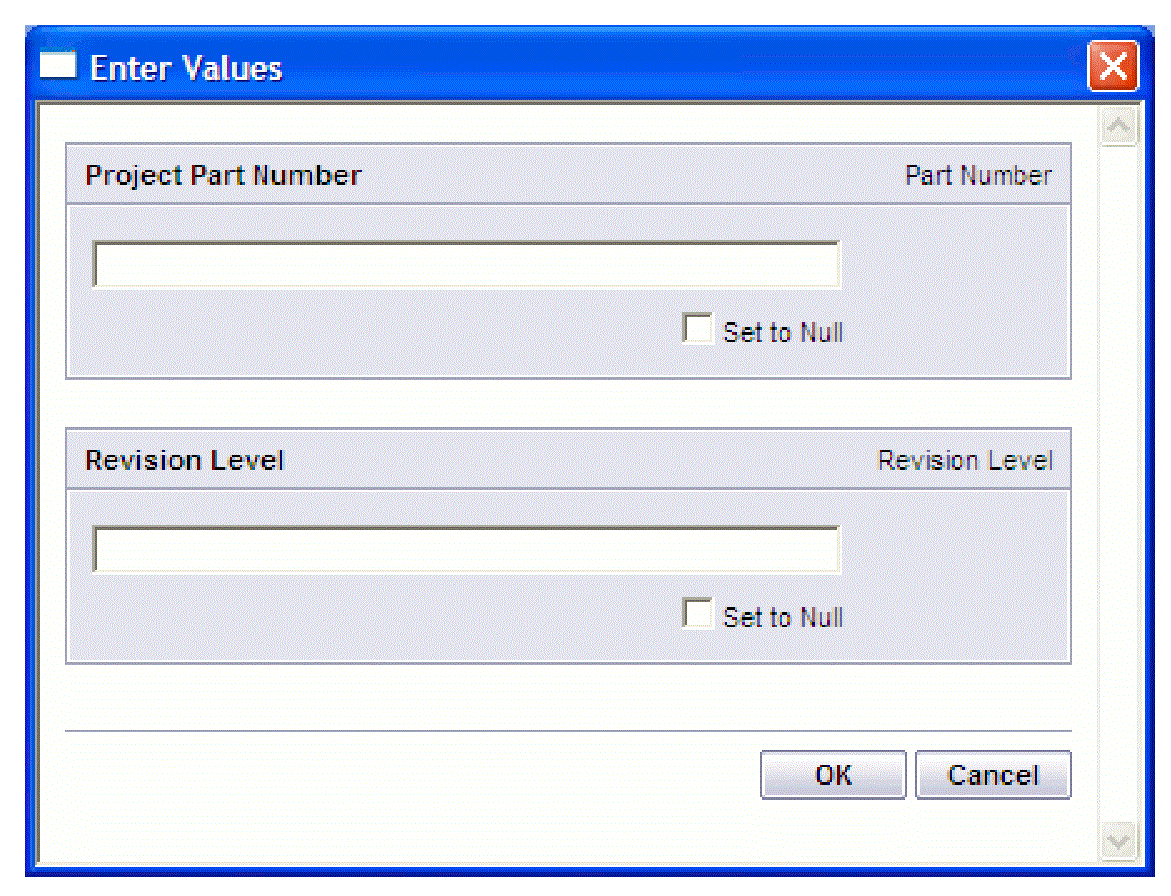
To print a Crystal Reports report, do the following:
- Depending on the design of the Crystal Reports template, you might be required to input some information about your design (for example, part number or revision level) before you print.
- When CIS displays Crystal Report’s Print dialog box, select the print options you want and click OK.
To preview a Crystal Reports report, do the following:
If you have user-defined variables in your Crystal Reports template, the Enter Parameter Values dialog box appears after you click the Print Preview button in the Crystal Reports Bill of Materials dialog box.
- When CIS displays the Crystal Report Viewer window, you can use the toolbar buttons to browse, zoom, print and export your report.
-
When you are ready to print or export your report, select one of the toolbar options from the following table:
Action Button Print your report

Export your report to a file, an MS Exchange folder, a Lotus Notes database, or MS Mail.

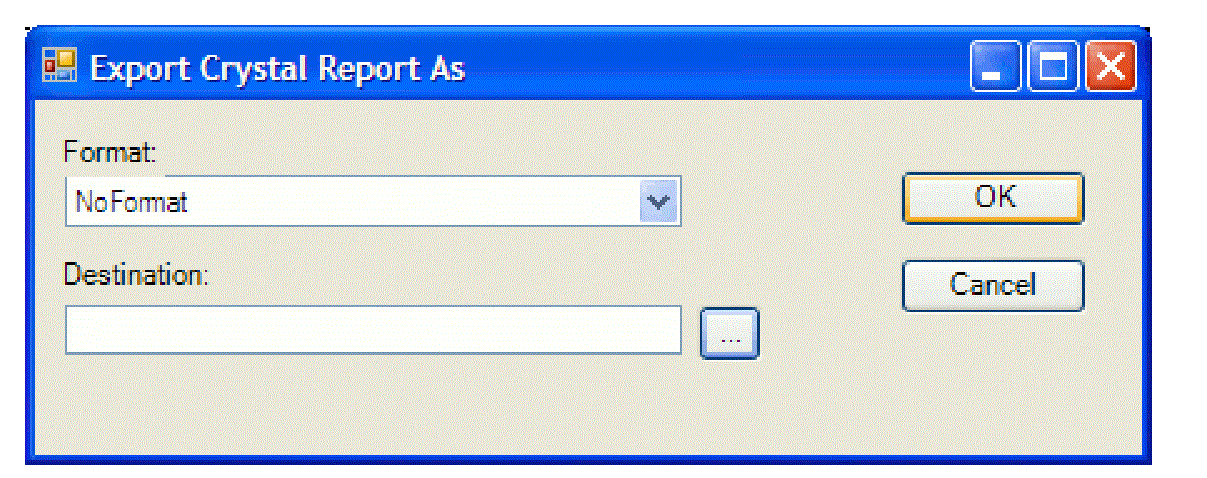
To export a Crystal Reports report, do the following:
- When CIS displays Export Crystal Reports As dialog box, select the format in which you want to export the report. For example, if you want to convert the report to Microsoft Excel format, choose Excel from the Format list.
-
In the Destination text box type the name (including destination directory) of the file to which you want to export the Report. You can also use the Browse button to navigate to the directory and enter the name in the File Name text box.
While the program assigns the native extension to all files you export in a specific word processor, or spreadsheet format, it automatically assigns the .TXT extension for all files you export in one of the common data interchange formats. However, the program you use to open the exported file may require a file extension other than TXT. In this case, you may need to consult the manual for that program to determine the correct file extension, and assign the appropriate extension when specifying the file name in the File Name text box.
In Crystal Reports 11.x, when you export files in a database format, the program assigns the native database extension.
- Click OK. The export process begins.
Creating Crystal Template
Crystal Reports is a powerful, dynamic and widely-used report design software solution from SAP BusinessObjects
You can use Crystal Reports in conjunction with CIS to make customized report templates with more advanced features than the standard CIS bill of materials, including precision formatting and formulas that total, filter, and analyze data for highly specific results. When you create customized Crystal Reports templates, you can use all of the part properties included in your preferred parts database and your individual design projects.
Once you have created Crystal Reports templates, any CIS user with access to them can generate, preview, print, and export reports with their design’s database part information from within CIS. They will not need to have copies of Crystal Reports installed locally on their workstations to use these templates.
You need to complete the following process to create your Crystal Reports templates:
- Create an SQLite database (.DB) file using a standard CIS bill of materials.
- Create report template (.RPT) files in Crystal Reports using the SQLite database file. You only need Crystal Reports software to create templates, not to use them. For this reason, you only need to purchase one copy of the software for your entire workgroup.
- Store the Crystal Reports template files where CIS can use them.
By default, the installer installs the SQLite® ODBC Driver for Win64.
To create an SQLite database (.DB) file for use by Crystal Reports, do the following:
- Open a new or existing schematic design in Capture. You should use a schematic design that has all the non-database part properties defined that you want to use when designing your Crystal Reports templates.
- From the Reports menu, point to CIS Bill of Materials and choose Standard. CIS displays the Standard Bill of Materials dialog box.
- In the Template Name text box, type in a name for the report (for example, Report for Crystal Reports template).
-
In the Select Properties list on the left, double-click each of the part properties until all of them are moved to the Output Format list on the right.
Do not try to be selective about the part properties you include at this time. Generating this report with all the properties in your database allows you to create a single database file with all the headings you might want to use to design your templates in Crystal Reports. This way, you will not have to repeat this procedure again unless the part properties used in your database change.
- Click OK. The report may take several minutes to generate.
- From the File menu, choose Save As. CIS displays the Save As dialog box.
- In the Save As Type list, select SQLite database format (*.DB).
- Specify the file name and location and click OK.
- To convert existing .MDB file to .DB file, convert the .MDB file to .DB file using ODBC Export method available in Microsoft Access.
- To create a Crystal Reports template, create a custom report using the SQLite database (.DB) file as your data file using Crystal Report Designer.
Note that the connection string will be the ODBC connection string for SQLite. Following is the suggested ODBC connection string for SQLite: DRIVER=SQLite3 ODBC Driver;Database="SQLite DB file Name";LongNames = 0;Timeout = 1000; NoTXN = 0;SyncPragma=NORMAL;StepAPI=0;NoWCHAR=1; - To store a template file for use by CIS, store your Crystal Reports template (.RPT) file where all users in your workgroup have access to it.
- To avoid having to browse for your template, store the file in the same directory as your database configuration (.DBC) file. The template will automatically appear in the Crystal Reports Bill of Materials dialog box.
You only need Crystal Reports software to create templates, not to use them. For this reason, you only need to buy one copy of the software for your entire workgroup.
Creating a BOM Variant Report
You can generate BOM variant reports to see how the part properties of your design variants differ from the properties of the core design.
You can create the following types of BOM variant reports:
- A BOM variant report that shows only the differences in the part numbers of the design variants and the core design.
- A detailed customizable BOM variant report that shows the differences in the part properties you specify.
To create a variant report for part numbers only, do the following:
- Open the core schematic design’s project (.OPJ) file in Capture.
- From the Reports menu, choose Variant Report. CIS displays the Variant Report dialog box. BOM variants are listed in the Variants list box.
-
In the Template Name text box, type in a name for the template, or select one from the drop-down list.
You can create multiple, named templates and define a different format for each. However, since a variant report file is, by default, saved using the design name and .VRT extension, you’ll have to save each report under a unique filename using the part manager’s Save As command (from the File menu).
- Select the Variant Comparison on the Part Number check box.
- In the Variants list, select one or more BOM variants. If you select more than one BOM variant, the Merge VARIANT Reports check box is selected by default. If you do not want to merge BOM variants in the report, clear the check box.
- Click OK. CIS automatically adds the template name for the variant report you have designed to the Template Name list so that you can use the template again the next time you want to generate a variant report.
If any design errors are encountered during report creation, a dialog box prompts you to view the errors in Session Log.
If no design errors are encountered during report creation, the variant report appears in a window.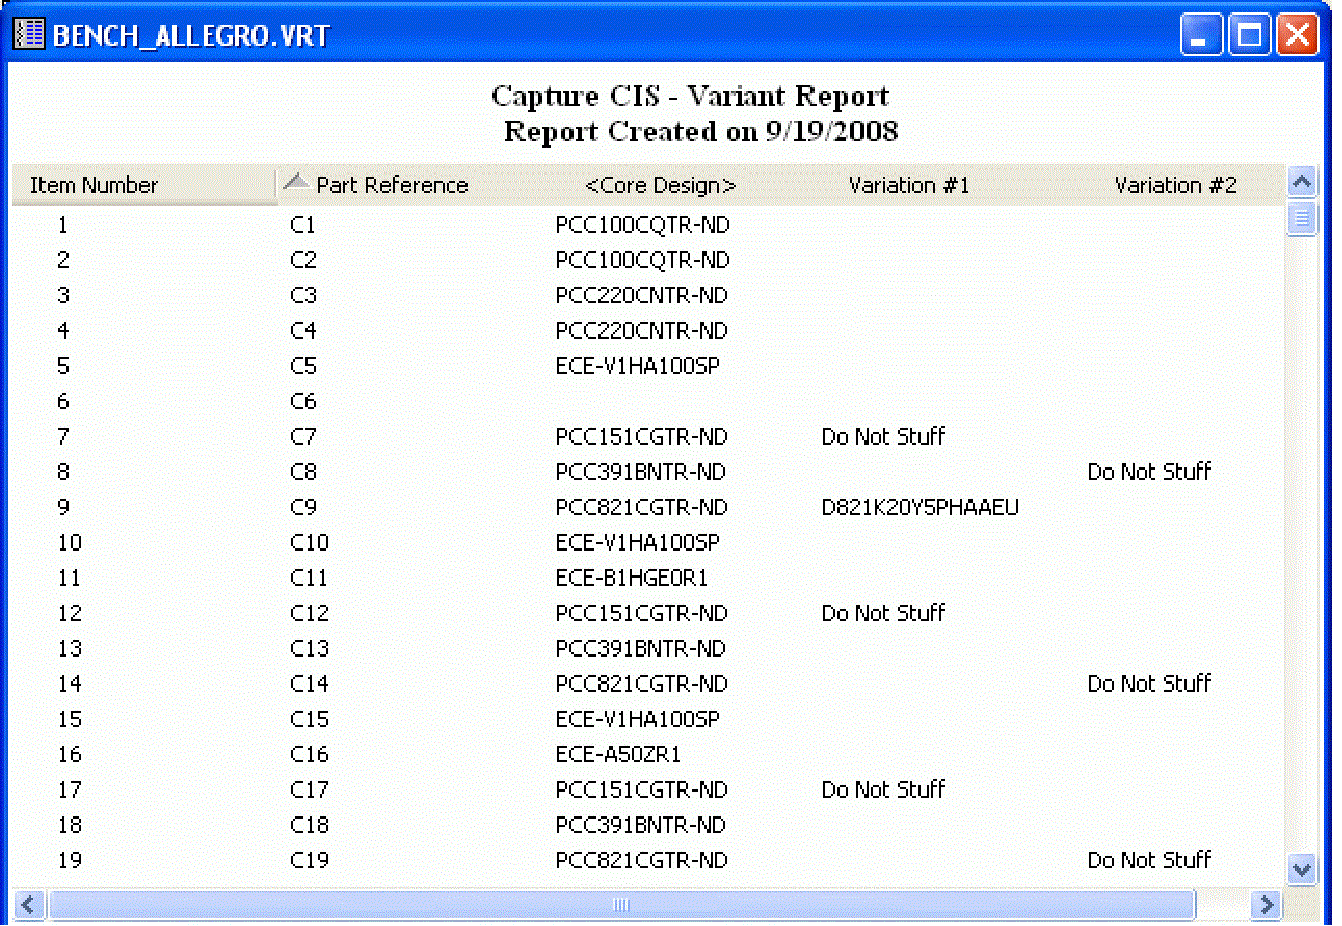
You can click a column heading to sort the rows by the values in that column, and click the same column heading again to reverse the sort order.
You can adjust the column widths by dragging the vertical lines between the column heading names to the left or right. If you save the variant report, it is saved with the current sort order.
-
To save the report, select one of the save options described in the following table:
Step Option Save the report into the design folder using the default file name. Note that you will overwrite any report previously saved using this default file name.
From the File menu, choose Save.
Save the report using a new file name into the directory of your choice.
From the File menu, choose Save As.
CIS creates the default file name using the design name. For example, if the design is named BENCH_ENG.DSN, the variant report file will be named BENCH_ENG.VRT by default.
- Specify a filename, save location, and format type. By default, CIS saves the report in tab-delimited format, but you can choose any of the following formats:
- Text - Tab delimited format (*.VRT)
- Excel delimited format (*.CSV) - comma separated format
- Formatted comma delimited file (*.FWC)
To create a detailed variant report, do the following:
- Open the core schematic design’s project (.OPJ) file in Capture.
- From the Reports menu, choose Variant Report. CIS displays the Variant Report dialog box. BOM variants are listed in the Variants list box.
-
In the Template Name text box, type in a name for the template, or select one from the drop-down list.
You can create multiple, named templates and define a different format for each. However, since a variant report file is, by default, saved using the design name and .VRT extension, you’ll have to save each report under a unique filename using the part manager’s Save As command (from the File menu).
-
Select or type in a part property you want in the variant report and click the Add button. The part property moves to the Output Format list. You can also double-click a property to move it from one side to the other.
The Select Properties list only includes schematic properties that you have configured to be transferred from the database. If you want to include a schematic property in your variant report that is not in your part database, you must type in its exact name and then choose the Add button. If you want to delete an added schematic property from the Select Properties list, select the property and click the Delete User Property button.
The property types and icons that appear in the Select Properties list box include the following:
|
|
Default CIS Property Names |
|---|---|
|
|
Properties transferred from placed parts on schematics You specify the properties that are transferred from the database to your placed parts when you configure CIS. |
|
|
Properties transferred from database parts |
|
|
Title block property names Title block property information is read from the first schematic page in the design and displayed in the report. |
-
Repeat step 3 until all the properties you want in the variant report appear in the Output Format list box.
The order of the items in the Output Format list box determines the order in which they appear in the report. To change the order of an item, select it and move it using the up or down arrow buttons to the right of the Output Format list box.
- Select the Allow Saving Title Block Properties option if you want to save the title block property information along with the BOM variant information when you save the variant report as a .CSV, .FWC, or .VRT file.
- Select the Display Core Design Properties option to display the value of a property on a part in the core design next to its variant property value. The core design property value is displayed in square brackets. For example, if the property value on a part in the core design is 91PF and property value on its variant is 82PF, the Value field in the variant report displays:
82PF [91PF] - In the Variants list, select one or more BOM variants. If you select more than one BOM variant, the Merge VARIANT Reports check box is selected by default. If you do not want to merge BOM variants in the report, clear the check box.
- Click OK. CIS automatically adds the template name for the variant report you have designed to the Template Name list so that you can use the template again the next time you want to generate a variant report.
If any design errors are encountered during report creation, a dialog box prompts you to view the errors in Session Log.
If no design errors are encountered during report creation, the variant report appears in a window.
You can click a column heading to sort the rows by the values in that column, and click the same column heading again to reverse the sort order.
You can adjust the column widths by dragging the vertical lines between the column heading names to the left or right. If you save the variant report, it is saved with the current sort order.
If you have included properties in your report that are configured as browsable, CIS will hyperlink (blue underline) the part values for those properties. You can click on the hyperlinks to display the latest version of the source file.
You can use a spreadsheet application to sort the exported output by multiple keys.
-
To save the report, select one of the save options described in the following table:
To do this... Select this option... Save the report into the design folder using the default file name. Note that you will overwrite any report previously saved using this default file name.
From the File menu, choose Save.
Save the report using a new file name into the directory of your choice.
From the File menu, choose Save As.
CIS creates the default file name using the design name. For example, if the design is named BENCH_ENG.DSN, the variant report file will be named BENCH_ENG.VRT by default.
- Specify a filename, save location, and format type. By default, CIS saves the report in tab-delimited format, but you can choose any of the following formats:
- Text - Tab delimited format (*.VRT)
- Excel delimited format (*.CSV) - comma separated format
- Formatted comma delimited file (*.FWC)
Item Number and Quantity are only listed in the first line of each grouping. CIS creates the default file name by concatenating the design name and the name of the bill of materials template used to generate the report. For example, if the design is named BENCH.DSN and the template is named ENG BILL OF MATERIALS, the bill of materials file will be named BENCH_ENG BILL OF MATERIALS.BOM by default.
View the next document: 13 - CIS Error and Warning Messages
If you have any questions or comments about the OrCAD X platform, click on the link below.
Contact Us